At this point, you should already have a domain name registered and a hosting account secured, which means you’re ready to link the two.
Note: If you acquired a domain name with a hosting provider, you can skip this lesson.
Updating Your Nameservers
Your domain is essentially your web address that people use to find your website on the internet, and your hosting server houses your website files. What we’re trying to do is connect the two so that when people type your domain name in their browser and click “Go,” the browser knows where to retrieve your website files to display them.
To connect your domain and hosting server you need to update the nameservers in your domain registrar. The nameservers that need to be placed in your domain registrar are provided by your hosting provider. So, in our case, updating the nameservers in Namecheap tells it to connect to your website hosted by Bluehost when someone types in your domain name, essentially pointing your domain to Bluehost.
This is why you can skip this step if you registered your domain with your hosting provider; the nameservers are already pointing to the right place. If you acquired them separately, however, you’ll need to connect them.
Point Your Domain To Bluehost: Updating Namecheap with Nameservers from Bluehost
Note: the process I’ll be outlining in this lesson is for a website whose domain name is registered to Namecheap and is hosted by Bluehost.
Different domain registrars have different ways to update their nameservers. Similarly, different hosting providers have different nameservers. So, if you didn’t opt for Namecheap and/or Bluehost, now is the time to Google what company you opted for because I won’t be discussing all of them here (it’s quite impossible to do given how many domain registrars and hosting providers there are).
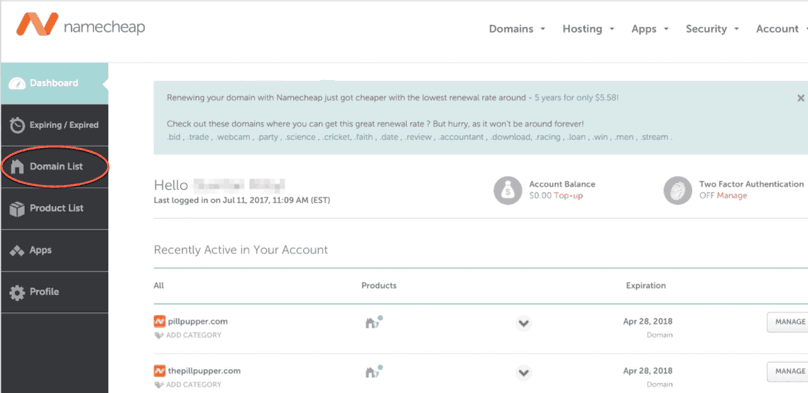
The first step is to log into your Namecheap account. When you log in, you’ll be redirected to this page. Next, click on the tab titled “Domain List” on the left.

Namecheap Dashboard with “Domain List” highlighted
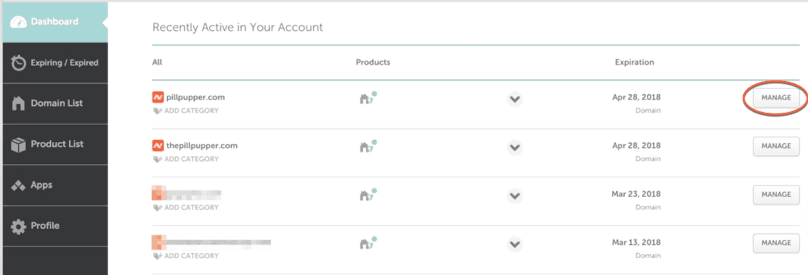
You’ll be routed to a page that lists your various domains. Next, click on the “Manage” button for the intended domain.

Namecheap Domain List with “Manage” highlighted
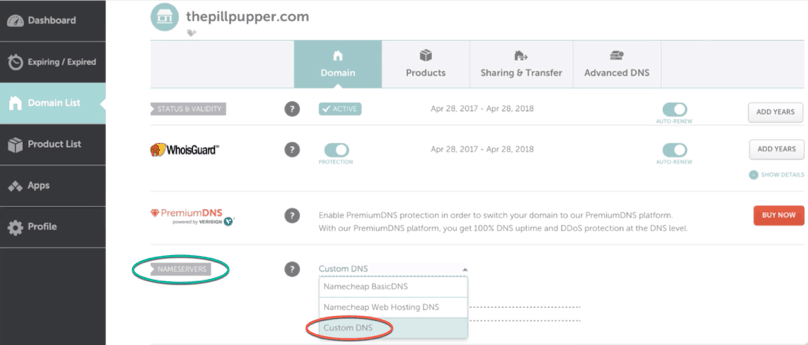
You’ll be routed a page that displays the details of your domain. In the “nameservers” section click on the dropdown menu. Then, click the option “Custom DNS.”

Namecheap Manage Domain with “Nameservers” and “Custom DNS” highlighted
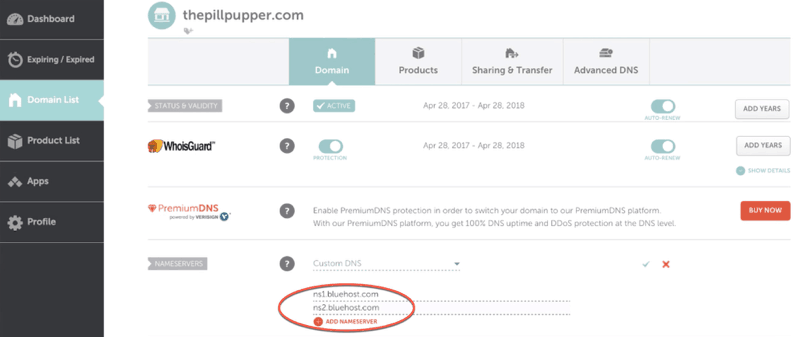
Once you select “Custom DNS,” two blank spaces will appear. Input the following:
- ns1.bluehost.com
- ns2.bluehost.com
Here’s what that should look like:

Namecheap Manage Domain Custom DNS fields filled out with Bluehost nameservers
Bluehost designates the same nameservers for everyone, so there’s no need to log in to your Bluehost account to do all this.
Note that you don’t need to click on “Add Nameservers” below the fields. After inputting each Custom DNS, click on the green checkmark next to the “Custom DNS” dropdown menu. Once you’ve completed this last step wait a few seconds to ensure everything went through, and then you’re done!
That wasn’t so bad, was it?
It’s important to note that it could take anywhere from 10 minutes to 48 hours for the changes to be applied.
Again, if you have a different registrar or if you have a different hosting company, just Google how to update the nameservers. You’ll probably find a YouTube video or a step-by-step guide with screenshots from either your hosting company or domain registrar detailing how to do it.