Note: This process can become quite complicated. If it’s easier for you to follow along in video format, watch the videos in Section 4 of the First-Time Internet Marketing Profits™ video training.
Now that the basic structure and design of your website is complete, it’s time to start creating core content and building a navigation menu.
Core content refers to the essential pages that every website should have, which includes an About page, a Contact page, a Privacy Policy page, and a Terms and Conditions page.
VERY Important Note: Shortly before we published this training, WordPress dramatically redesigned their visual page and post editor, so your screens won’t quite match up with those in this training by default.
You can switch back to WordPress’ “classic editor” very easily, which will make all of your screens when drafting pages or posts on your website match up with those within this training.
Just search the internet using a phrase along the lines of “how to change back to WordPress classic editor” and you should be able to find multiple articles and videos that will walk you through this process step-by-step in less than five minutes.
The Essential Pages For A Website
The About Page
People tend to get stuck here as well because they believe the About page needs to be very specific. However, what the About page should accomplish is allow your visitors to connect with you and your website in a personal way. Thus, the About page can be about pretty much anything: it can be anything about you, your niche, your passion, or your journey.
Ideally, it’ll tie you into the brand you’re building. You can do that by discussing your experience, especially if you’ve worked in the industry for many years, and your certifications, if you have any. Or, if your experience is lacking yet you consider it a passion, discuss how much you enjoy it. There are no specific requirements when it comes to what you should write about for the About page. Don’t overthink it; write what comes to mind and tweak it afterwards.
Limit the content to three to five paragraphs. People don’t want to read a dissertation; they just want a brief introduction to you and your website.
I would also highly recommend adding an image. If you want to use your own image but are worried about privacy, you can do what I do: publish your first name and never your full last name. You have the option to pick an alias or pen name, but that may get confusing if you end up creating many sites and using different pen names for each one.
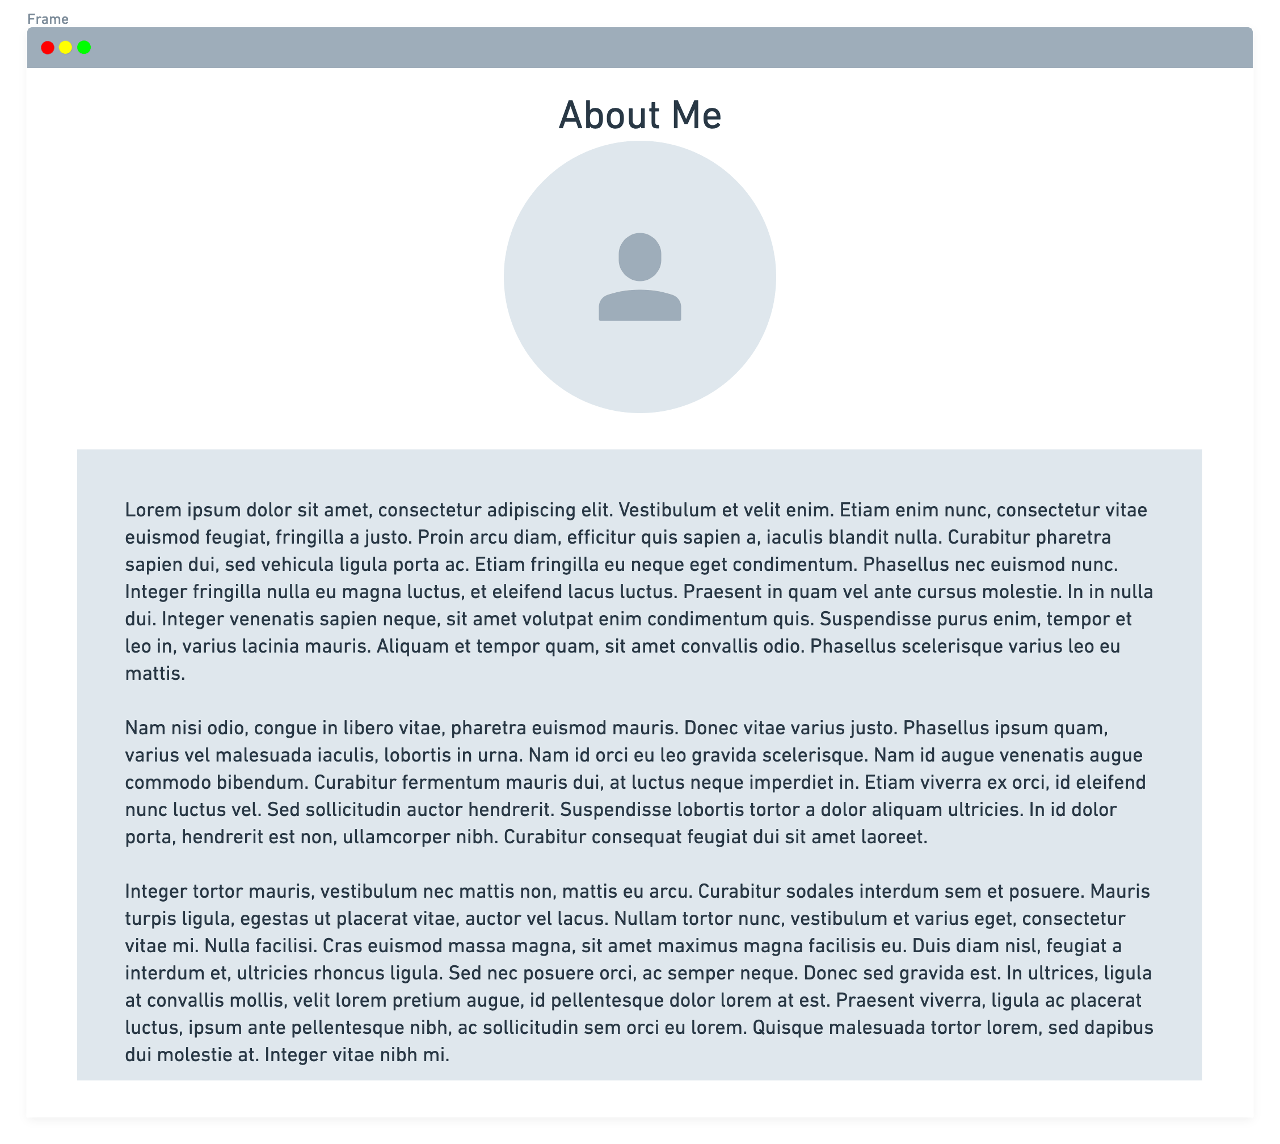
If you’re uncomfortable publishing your own photo and want to keep things private, use a stock image instead. A great place to find nice stock images is Pixabay.com.
The Contact Page
A Contact page in its simplest form should contain a friendly invitation for visitors to reach out and contact you as well as a contact form with name and email fields, a brief subject line to describe the topic of their message, and the actual message. You can also add a disclaimer that you’re asking for an email address ONLY so that you can reply to their message.
The Privacy Policy and Terms and Conditions Pages
First, a very firm disclosure: I am in NO WAY qualified to give legal advice. Consult an attorney for very important, high-stakes situations.
That said, based on discussions with attorneys over the years, my understanding is that legal writing is not copyrighted. Technically, you can copy any legal document you find online and replace the company name or website URL with your company or domain name. Again, I am not a lawyer, so for specific legal disclaimers, it’s better to consult an actual attorney.
There are also a number of free generators online for privacy policies and terms and conditions. One thing to remember when using a free generator is that you need to select the option in Yoast to not index these pages because it’s duplicate content. This is similar to what is outlined in Lesson 21 (indicating specific pages not to be indexed by search engines).
How To Create Your Site’s Core Content and Navigation Menu
Setting Up the About Page
First, to add a page, you need to go to your WordPress Dashboard and click on “Pages” on the left-hand side of the page. Then click “Add New.”
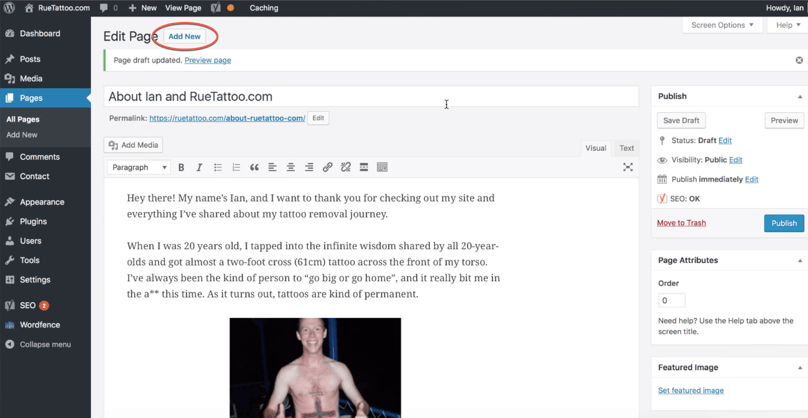
WordPress Dashboard, Pages, Add New, Edit Page. Note that Edit Page is now displayed because a new page was already added and saved as a draft.
When creating your About page, it’s advisable to optimize it for your domain name. For example, I optimized my About page using “RueTattoo.com” as my focus keyword so that when someone searches “Rue Tattoo” or “RueTattoo.com,” my page is likely to come up in the search results. Yoast SEO assists with this, so we’ll cover on-page SEO extensively in a later lesson. For now, suffice it to say that we want search engines to index your About page. Since I want to optimize for “RueTattoo.com,” I’ve placed that keyword in the page title, the permalink, the meta description, and as an attribute in the image I included.
Setting Up the Contact Page
Similar to the About Page, go to your WordPress Dashboard and click on “Pages” on the left-hand side of the page, and then click “Add New.”
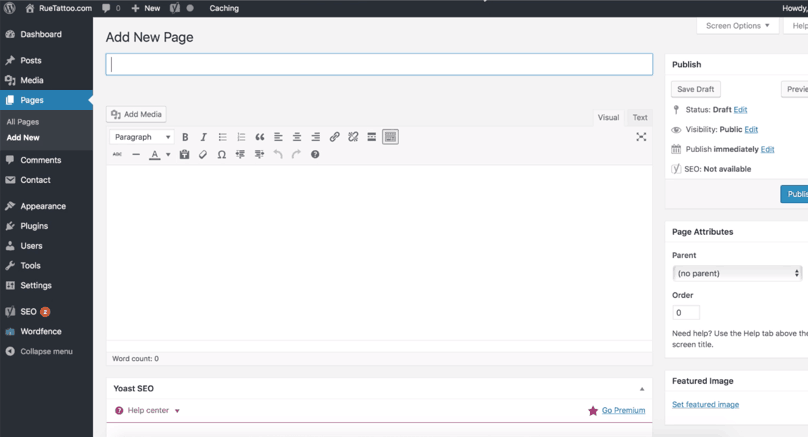
WordPress Dashboard, Pages, Add New, Add New Page.
The Contact page should contain a friendly invitation from you to your visitors to reach out. For example, here’s what my Contact page says:
“Looking for something you can’t find on our website, for some personal advice from someone that’s ‘been there,’ or just wanting to say ‘thanks’ for something you saw here on RueTattoo.com? Just fill out the form below and I’ll send you a reply as soon as I can!”
That’s only the invitation. To include the actual form, go back to the Contact Form 7 plugin you installed, copy the shortcode for the form, and then paste it into the page.
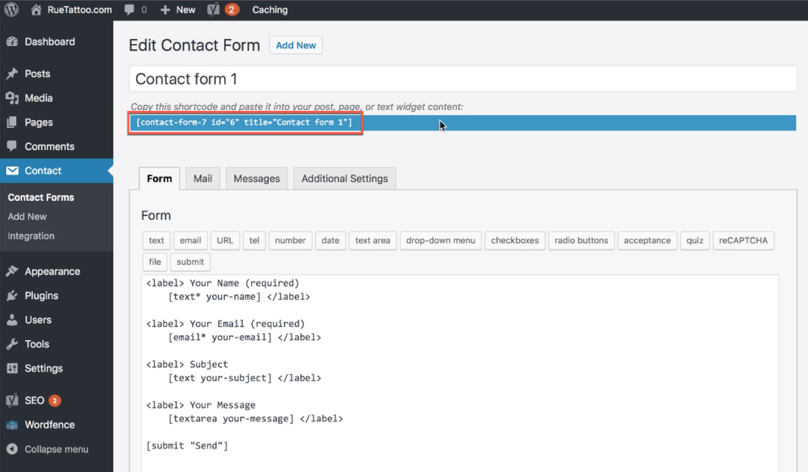
WordPress Dashboard, Contact, Contact Forms, Edit Contact Form. Note the shortcode highlighted in blue.
Once you publish the Contact page with the pasted shortcode, here’s what the page will look like:
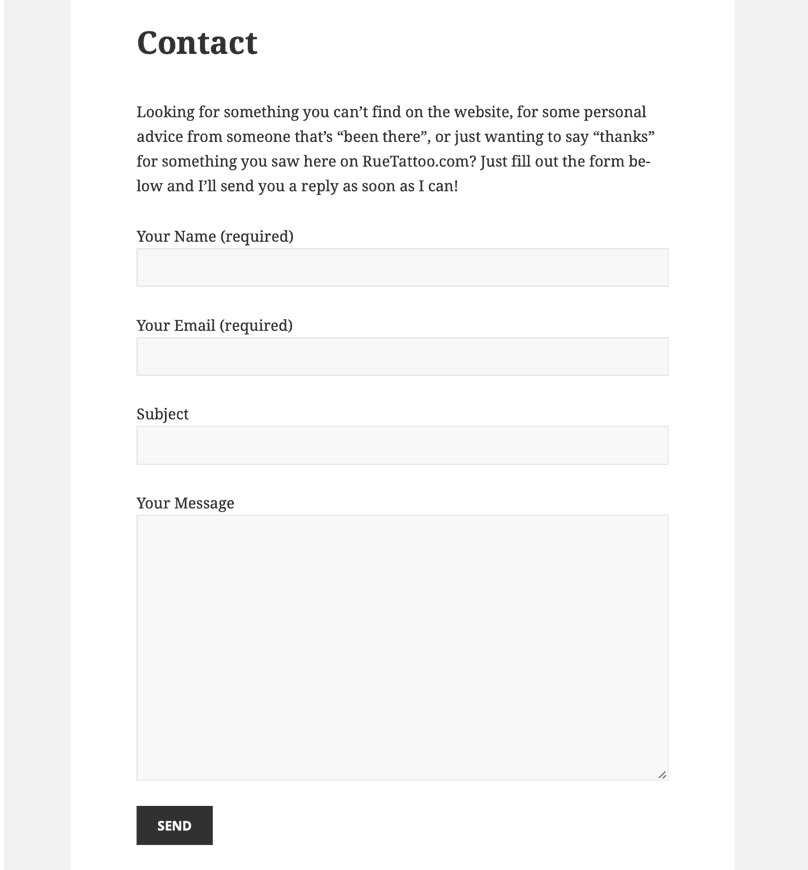
RueTattoo.com Contact Page
Everything that was set up in Lesson 21 when you installed Contact Form 7 is now ready. As soon as someone fills out the form and clicks “Send,” all the information will be sent to ian@ruetattoo.com.
Even if your Contact page is basic, it’s good practice to optimize it. Doing so won’t hurt anything, and it’s a personal preference of mine. Yoast SEO saves the day again with this process. Scroll down to the bottom of the Contact page until you find the Yoast SEO section.
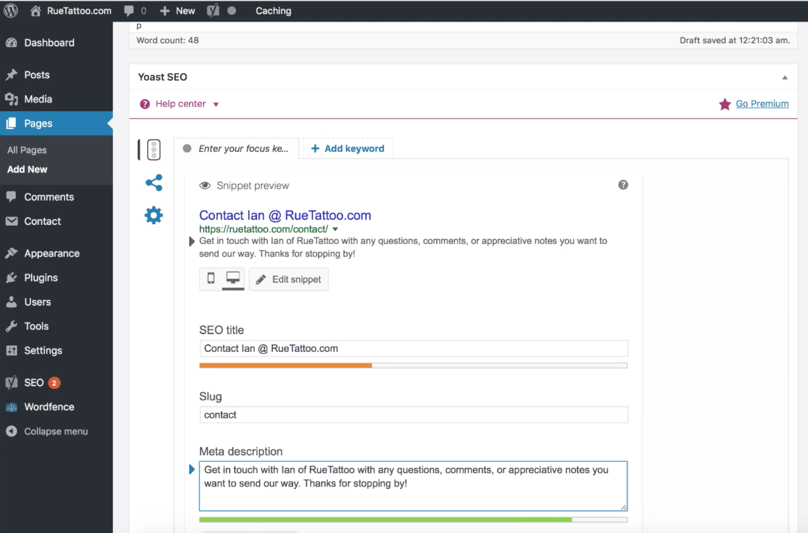
WordPress Dashboard, Pages, All Pages, Edit Page, Contact Page, scrolled down to “Yoast SEO” section. Pay attention to the SEO title, Slug, and Meta description.
The “SEO title” is the title that’s displayed in search results. The “slug” is the part of the URL that comes after your domain name. In this example, the slug is “contact,” which makes the complete URL of the page: https://ruetattoo.com/contact/. The “meta description” isn’t strictly for SEO purposes, but more to compel visitors viewing the search results to click on your link.
I didn’t set a focus keyword here because I’m not really trying to rank for anything except my brand name. Clicking “Publish” makes the page available to everyone.
Setting Up the Privacy Policy and Terms and Conditions Pages
You can find Privacy Policy and Terms of Service generators through a quick Google search, but a particular generator found on BenNadel.com is very useful. Entering the company name (yourcompanyname.com) and state will display a preview of the generated website terms and conditions.
The nifty thing about this particular generator is that it also generates the terms and conditions in HTML format, meaning you don’t have to format the headings and titles; all you need to do is copy and paste the HTML code into the text editor of the intended WordPress page and it’s ready to go. Here’s what I mean:
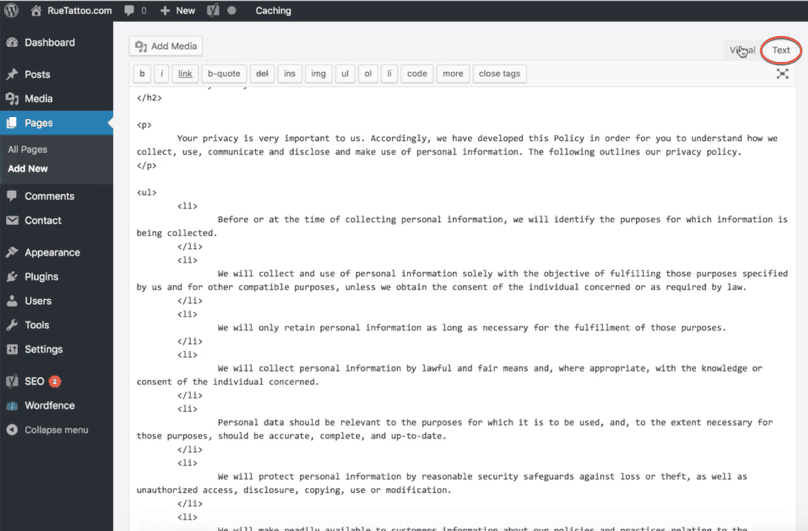
WordPress Dashboard, Pages, Add New, Add New Page. Note that the “Text” tab is selected instead of the “Visual” tab for editing in the upper right-hand of the page.
Note that I’m combining the Terms and Conditions and Privacy Policy in one page. I’m also going to optimize the page through Yoast SEO:
- SEO title = “RueTattoo.com Terms, Conditions, and Privacy Policy”
- Slug = “terms-conditions-privacy-policy”
- Meta description = “RueTattoo.com website terms and conditions as well as our privacy policy, can be found here.”
Because we used a generator for the content of this page, it’s likely the same content is found on Terms and Conditions pages of other websites. It’s important to tell search engines not to index this page to avoid our search engine rankings going down because Google thinks we have duplicate content.
The way to do this is also through Yoast SEO: click on the gear icon on the left-hand side of the Yoast SEO section of the page to go to the “Advanced settings.” Then, set the “Meta robots index” to “noindex” and click “Publish” to publish the page.
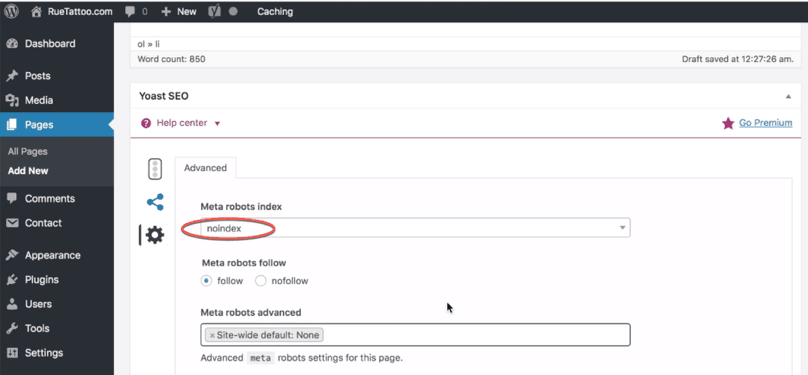
WordPress Dashboard, Pages, Add New, Edit Page, Terms and Conditions Page, scrolled down to “Yoast SEO” section, “Advanced settings” tab. Note the “Meta robots index” dropdown menu is set to “noindex.”
Setting Up the Navigation Menu
The last step of this process is to set up a navigation menu that displays the pages that were just set up.
Find and click on the menu option titled “Appearance” on the left-hand side of the WordPress Dashboard. Then, click on “Menus” to pull up the “Edit Menus” page. Enter a name for your menu (I titled my menu “Main Menu”) and then click “Create Menu” on the right.
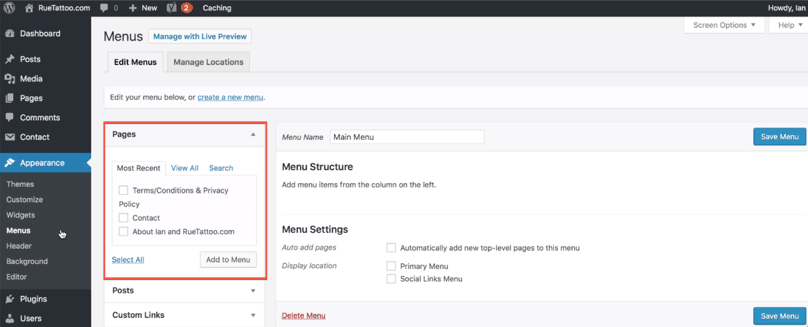
WordPress Dashboard, Appearance, Menus, Edit Menus. Note the “Menu Name” field and “Create Menu” button to the right. Also note that the pages we just set up are displayed on the left.
Next, select all the pages you just created and click “Add to Menu.”
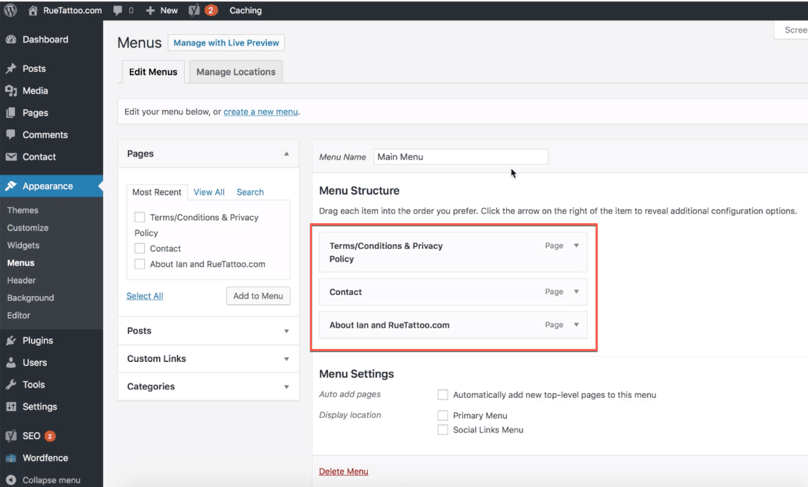
WordPress Dashboard, Appearance, Menus, Edit Menus with pages added to the menu.
Notice that the pages you selected now appear under “Menu Structure.” Next, add a link to the homepage by clicking “Custom Links,” entering the homepage URL and the name to display, and then clicking “Add to Menu.”
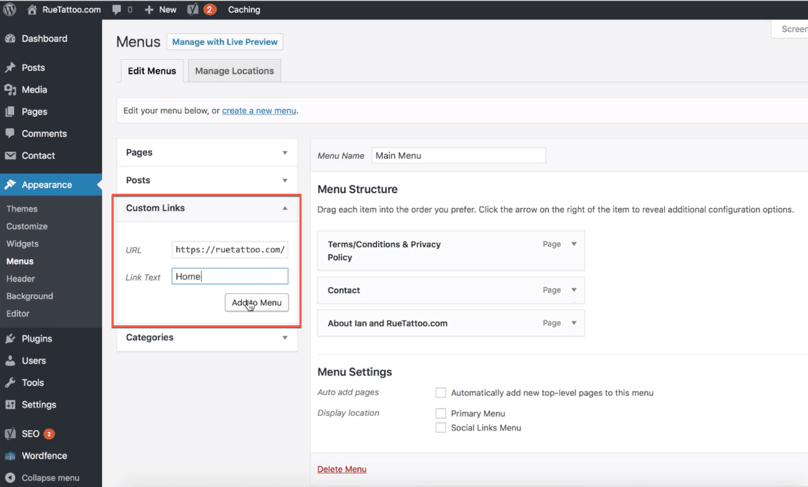
WordPress Dashboard, Appearance, Menus, Edit Menus with pages added to the menu and “Custom Link” fields being filled out. Clicking “Add to Menu” will add it to the “Menu Structure” section.
The pages under “Menu Structure” can be reorganized by dragging them, and whatever order they’re set in is the order they’ll appear in the menu. The best order to set your pages is Home page first, About page second, and the Contact page third. Also, the Terms and Conditions & Privacy Policy should be a dropdown underneath the About page. That way, if someone hovers over the “About” menu option they will see the Terms and Conditions & Privacy Policy page.
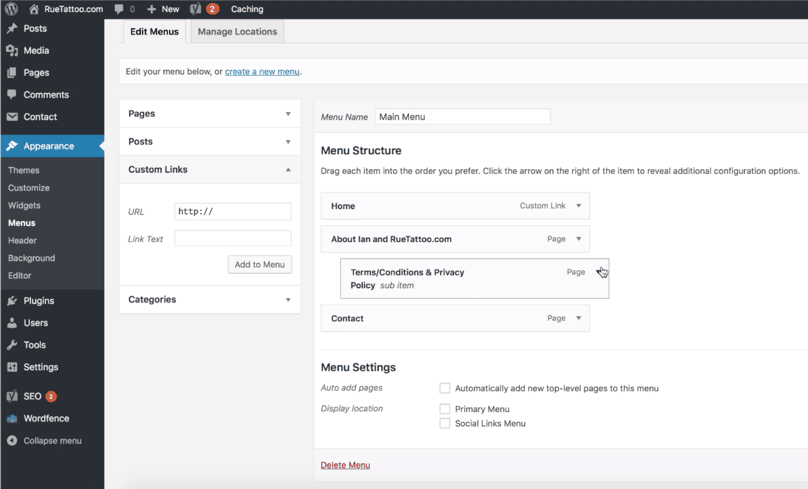
WordPress Dashboard, Appearance, Menus, Edit Menus with pages and “Custom Link” added to the menu (in the desired order). Note that the “Terms and Conditions & Privacy Policy” page is added as a sub-option under the “About” page. Also note the “Menu Settings” section below the “Menu Structure” section.
Checking “Automatically add new top-level pages option” means every time you create a new page, it will automatically be added to your menu, and you don’t normally want that automated. What you DO need to check is the “Primary Menu” option. If you miss checking this option, your navigation menu won’t be visible to visitors.
If you want to have links open in new tabs, you can do that by tweaking some settings in your Dashboard. First, click on the “Screen Options” pull tab at the top of the page to expand it. Then, you need to select “Link Target.”
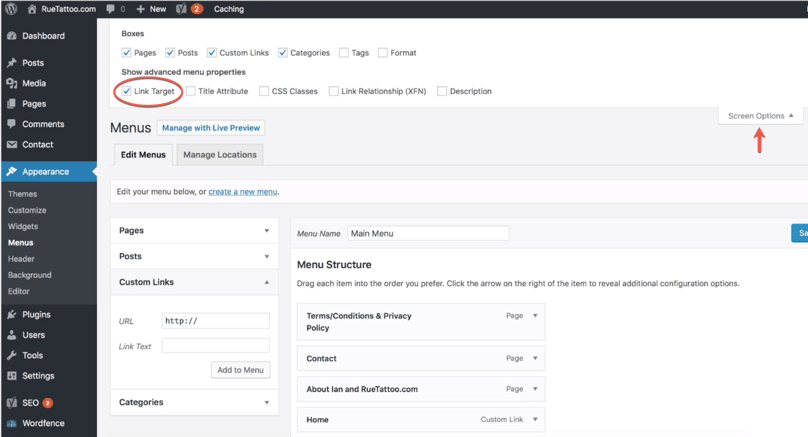
WordPress Dashboard, Appearance, Menus, Edit Menus, with “Screen Options” expanded and “Link Target” selected
Once “Link Target” is selected, an option will appear under “Menu Structure” to open the link in a new tab.
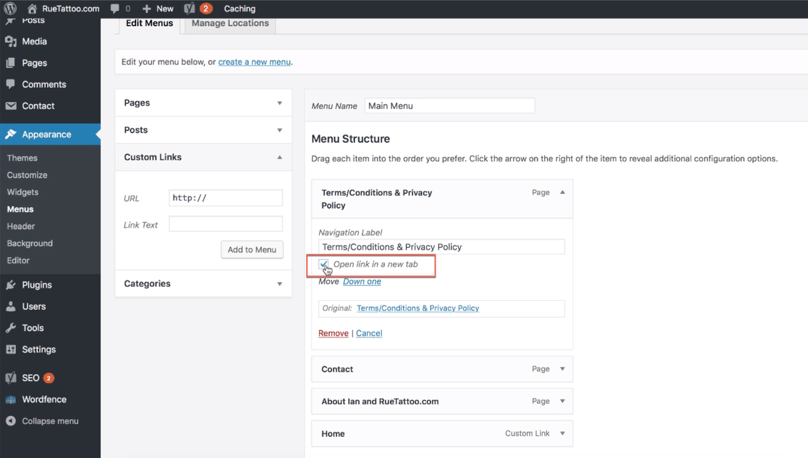
WordPress Dashboard, Appearance, Menus, Edit Menus, with “Open link in a new tab” option shown under “Terms/Conditions & Privacy Policy” page
Selecting the “Open link in a new tab” option for a page will open it in a new tab when it’s clicked in the menu. For your website pages, it doesn’t matter if they open in a new tab. However, for external links, such as affiliate links or links to your social media accounts, it’s best to have them open in a new tab so people don’t navigate away from your website unnecessarily.
Once you’re done with set up, click “Save Menu.” It’s then good practice to go to the website and check if the navigation menu is displaying properly.