Now that you’ve stripped WordPress of all of the useless crap, it’s time to set up things in their place that are actually helpful for your business. I’m going to walk you through installing must-have WordPress plugins for bloggers and adjusting a handful of settings to ensure your business will be profitable in the coming months as you add content.
Making WordPress as Hassle-Free as Possible
We want to achieve a couple of things here:
First, we want your site to be optimized for search engines. This is part of a very basic aspect of Search Engine Optimization (SEO). We’re merely setting the stage for further optimization down the road.
Second, we need to address WordPress’ security vulnerabilities. If your site gets hacked, you could lose access to your site. Someone could infect your files with a virus. Worst, someone could delete your entire website. Now is a good time to address security.
Installing Must-Have WordPress Plugins and Setting Site Structure For Bloggers
The essential plugins that we’re going to install are:
- Yoast SEO – helps make your site SEO friendly.
- Easy Updates Manager – handles updates for WordPress, plugins, and themes.
- Wordfence – aids with the security of your site.
- Contact Form 7 – allows the setup of customizable contact forms on your site.
Regarding site structure, we’re going to adjust your site’s permalink structure as well as the nickname that’s publicly displayed.
Permalinks are the permanent URLs assigned to your blog posts, as well as other pages of your blog. We’re going to adjust how your permalinks are structured because search engines use these URLs to index your site. These permalinks need to be SEO friendly.
I recommend changing your nickname because this is displayed publicly. WordPress sets your nickname to be the same as your username by default. For security purposes, you want the username not to be known by everyone because if a determined hacker gets hold of your username, they can try and access your WordPress dashboard by guessing your password.
Installing and Setting Up Yoast SEO
Note: This process can become quite complicated. If it’s easier for you to follow along in video format, watch the videos in Section 4 of the First-Time Internet Marketing Profits™ video training.
From the WordPress Dashboard, click “Plugins” on the left-hand side, and then click “Add New.” That will take you to the “Add Plugins” page. Type the word “yoast” in the search field located in the upper right-hand corner. Yoast SEO will be the first search result. Next, click “Install Now” to install the plugin.

WordPress Dashboard, “Add Plugins” page. Note that Yoast SEO is displayed as the first result when “yoast” is searched.
Once Yoast SEO is installed, the “Install Now” button turns into the “Activate” button. Click on that button. This action will navigate to the Plugins page.
Note: This installation process is the same for all other plugins.
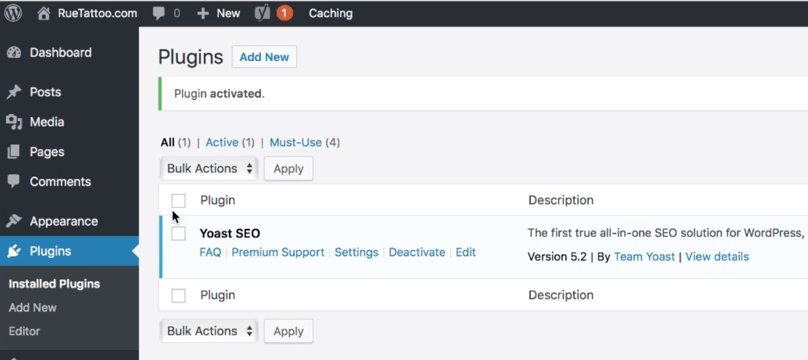
WordPress Dashboard, “Plugins page” with confirmation message that Yoast SEO was activated. Note the new menu option on the left-hand side of the page titled “SEO” with the Yoast SEO logo.
Now that Yoast SEO has been installed, it needs to be set up.
Notice that you have a new menu item on the left-hand side called “SEO” with the Yoast SEO logo. Hover over the “SEO” menu option, and then click on the “General” menu option to access the Yoast SEO Dashboard.
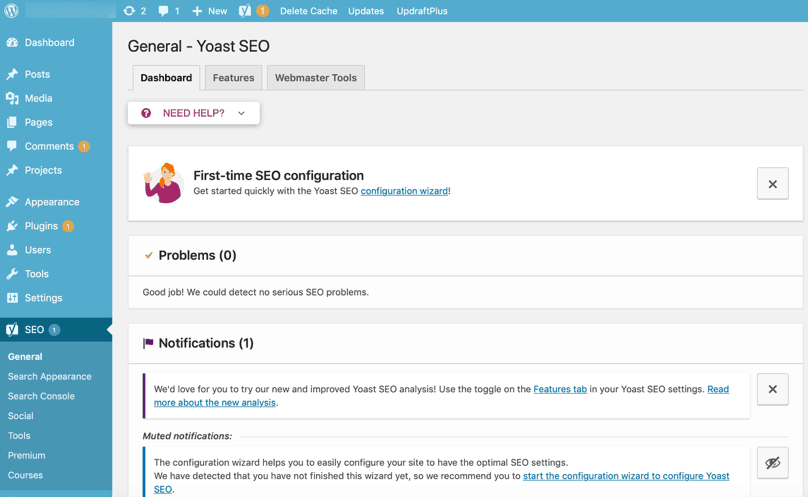
WordPress Dashboard and Yoast SEO Dashboard.
You can choose to enable or disable features to assist the SEO of your site (depending on what you’ll actually use) in the “Features” tab of the Yoast SEO Dashboard. You don’t want to enabled features that won’t be used because they’re using resources on your server and possibly slowing down your website.
For example, I never pay attention to the readability analysis. The readability analysis can slow down how quickly you’re able to type in the editor if you’re writing long posts (around 3,000 words or more).
Next, click on the “Search Appearance” menu option. You can access this by hovering over the “SEO” menu option on the left. Then, click to the “Taxonomies” tab and scroll down to the “Tags” section. Look for the slide switch titled “Show Tags in search results?” and switch it to “no.” Scroll down to the bottom and click “Save changes.”
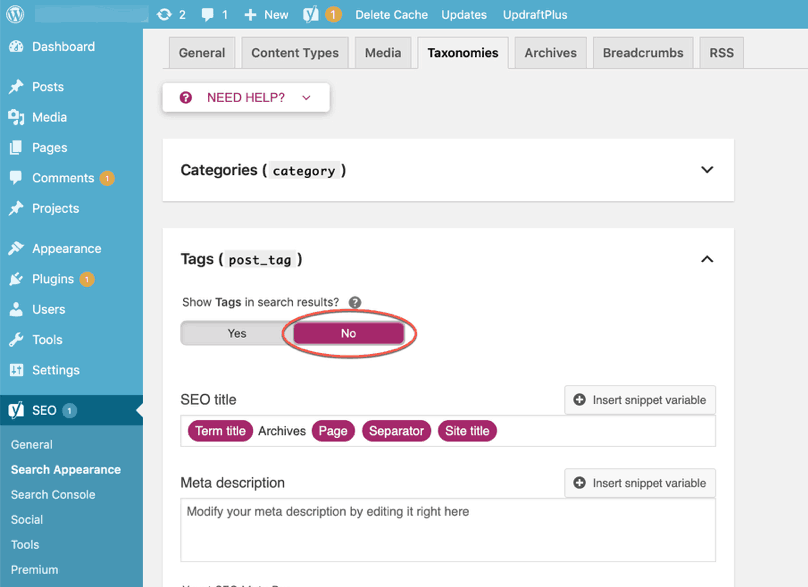
WordPress Dashboard, Yoast SEO “Search Appearance” page, “Taxonomies” tab, “Tags” section, “Show Tags in search results” set to “Yes” by default. Switch this to “No.”
The same procedure needs to be performed for another type of page. Click on the “Archives” tab from the “Search Appearance” page and scroll down to the “Author archives settings.” Look for the slide switch titled “Show author archives in search results?” and switch it to “no.” Scroll down to the bottom and click “Save changes.”
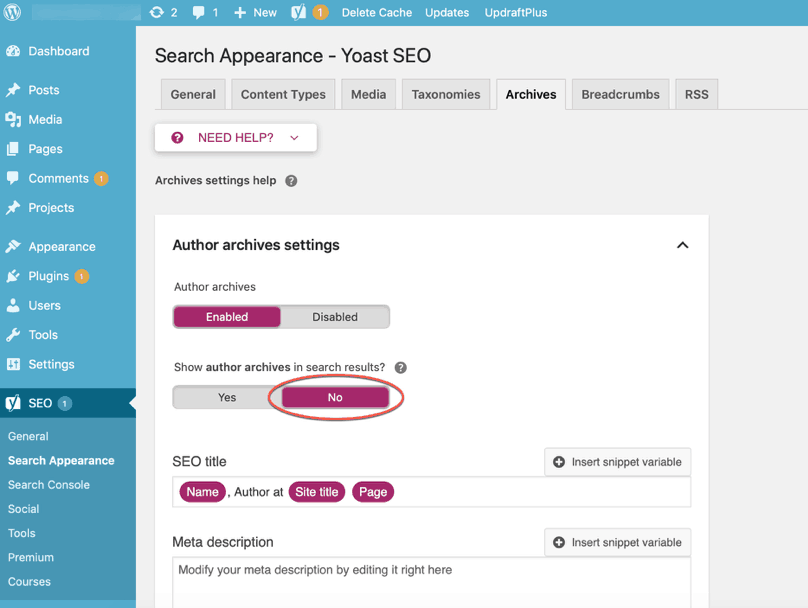
WordPress Dashboard, Yoast SEO “Search Appearance” page, “Archives” tab, “Author archives settings” section, “Show author archives in search results” set to “Yes” by default. Switch this to “No.”
What you’ve just done is change the settings of the Tags and Author archives pages so that they’re not saved by search engine databases, something known as being indexed.
A Note About Indexing
Indexing and ranking are two very different things. If a page or post is indexed, that doesn’t mean it will be on the first page of search results. If a page is indexed, that means the page is now in search engines’ databases, particularly Google, and people can find that page through Google.com. If the Tags and Author archives pages are allowed to be indexed, they can compete and even outrank your actual blog posts in search engine results.
Having Tags and Author archives pages indexed isn’t ideal because they’re basically a collection of posts. It’s better to show people your blog posts with helpful content. By electing to not show Tags or author archives in search results, you just told search engines to not include your Tags and Author archives pages in their database because those are fairly worthless pages that compete against pages and posts you actually want to rank.
This might not make much sense to you right now if you’ve never dealt with SEO before but keep it in mind as you move forward.
All the other Yoast SEO settings don’t matter too much. If you want to research and explore some of them, you certainly can, but if you don’t want to adjust anything else you can move on to the next section.
Installing and Setting Up Easy Updates Manager
The next plugin we’re going to install and update is Easy Updates Manager. The installation is very similar to the installation process for Yoast SEO:
Plugins → Add New → type “Easy Updates Manager” in the search field → click “Install Now” → click “Activate.”

WordPress Dashboard, “Add Plugins” page. Note that Easy Updates Manager is displayed as the first result when “easy updates manager” is searched.
Once Easy Updates Manager has been activated, you’ll be routed to the Plugins page.
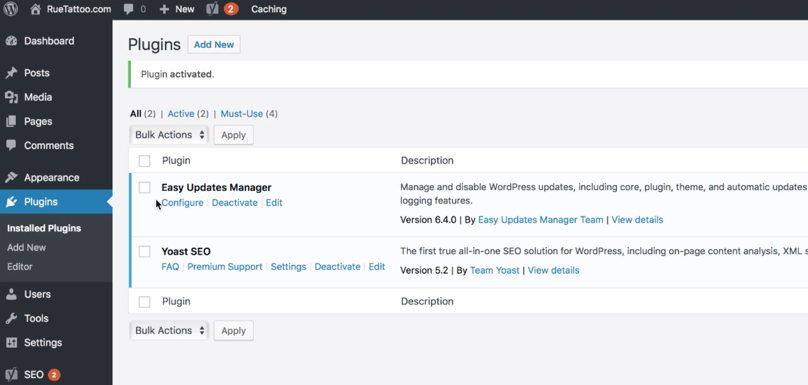
WordPress Dashboard, “Plugins page” with confirmation message that Easy Updates Manager was activated.
Unlike Yoast SEO, a new menu option will not appear in the left-hand menu. To set up Easy Updates Manager or to change any of the existing settings, you’ll need to navigate to the Plugins page and click “Configure” below its name: “Easy Updates Manager.” This action will navigate to the Easy Updates Manager Dashboard.
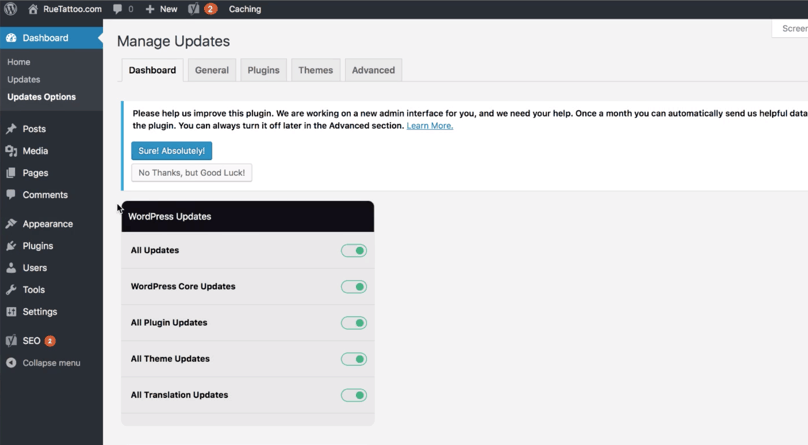
WordPress Dashboard, Easy Updates Manager Dashboard, WordPress “Updates” section with all updates turned on by default. Leave these settings as is.
By default, all WordPress updates are turned on, which is what you want. Scroll down to the “Automatic Updates” section. Turn on “Major Releases” and leave “Development Updates” turned off.
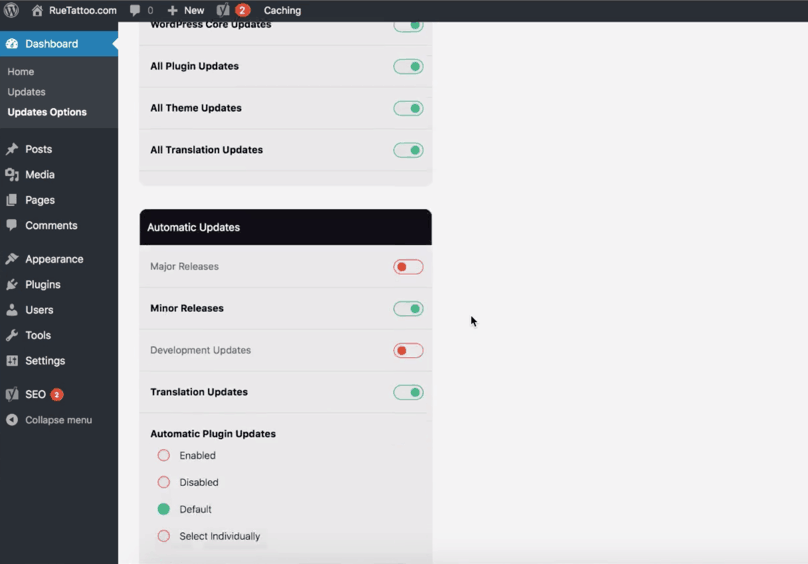
WordPress Dashboard, Easy Updates Manager Dashboard, “Automatic Updates” section. Turn on updates for “Major Releases” and leave “Development Updates” turned off.
Scroll further down and enable “Automatic Plugin Updates” and “Automatic Theme Updates.”
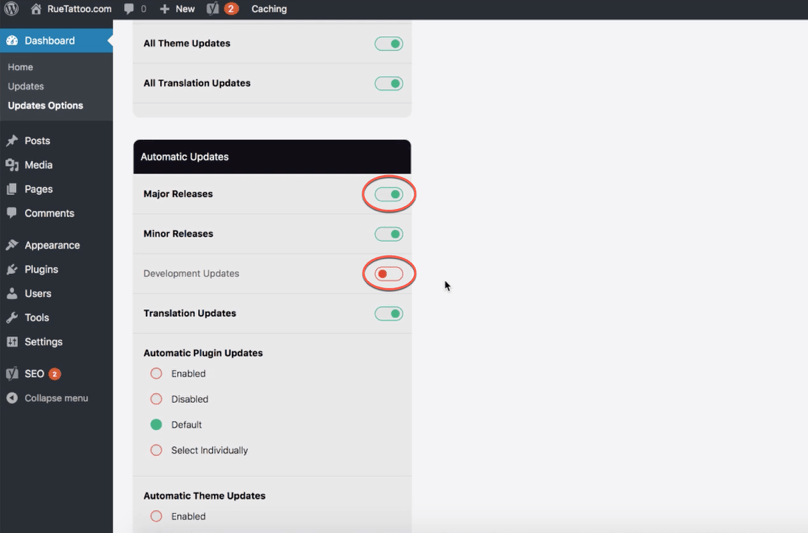
WordPress Dashboard, Easy Updates Manager Dashboard, “Automatic Updates” section with “Automatic Plugin Updates” and “Automatic Theme Updates” radio buttons. Enable both updates.
Further down, there’s the “Plugin and Theme Updates” section. There you can change settings for individual plugins and themes, but it’s best to have them all turned on.
All of the changes made for the latest version of this plugin are automatically saved. There’s no need to click a save button.
By installing and setting up the Easy Updates Manager plugin you’ve created a second layer of protection in the event the Bluehost default automatic updates fail. WordPress security is something to take very seriously and keeping your site and its components updated is a big part of having a secure website.
Installing and Setting Up Wordfence Security
Wordfence Security is my plugin of choice because it’s one of the leading security plugins for WordPress.
Once again, the installation is very similar to the previous installation processes:
Plugins → Add New → type “Wordfence” in the search field → click “Install Now” → click “Activate.”
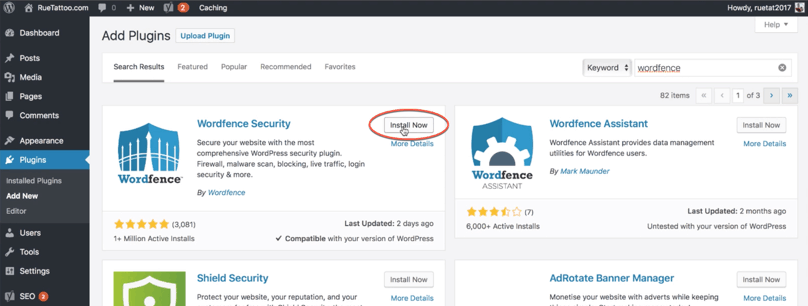
WordPress Dashboard, “Add Plugins” page. Note that Wordfence Security is displayed as the first result when “Wordfence” is searched.
Once Wordfence Security has been activated, you’ll be routed to the Plugins page.
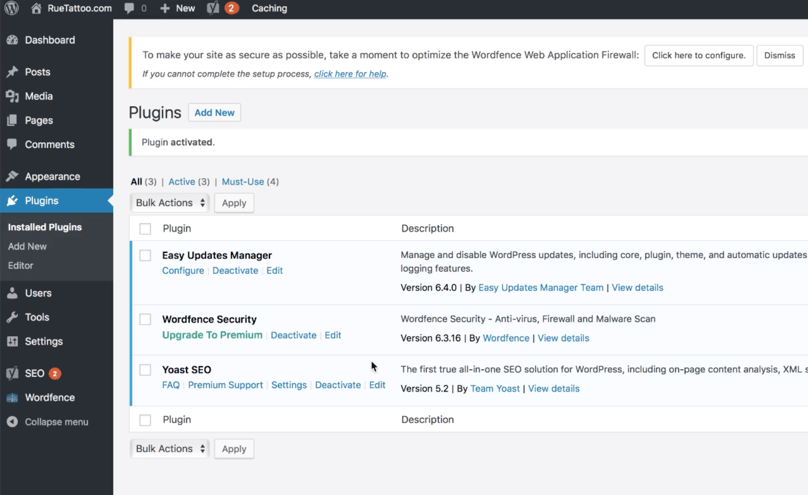
WordPress Dashboard, “Plugins” page with confirmation message that Wordfence Security was activated. Note new menu option on the left-hand side of the page titled “Wordfence” with the Wordfence logo.
Now that Wordfence is installed, it’s time to set it up.
Notice the new menu item on the left-hand side titled “Wordfence” with the Wordfence logo; click it, and then click “Dashboard.”
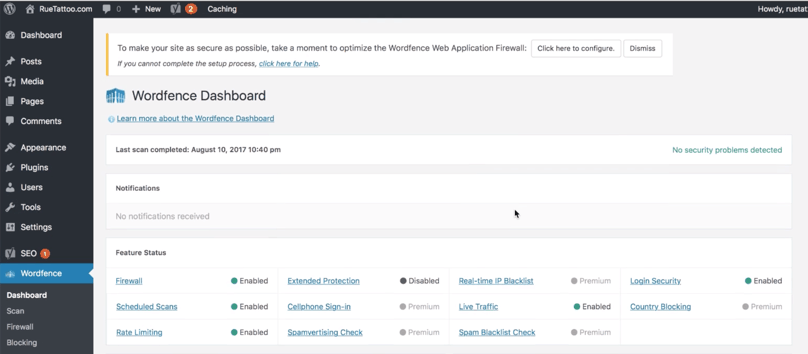
WordPress Dashboard, Wordfence Security Dashboard
From experience, Wordfence’s default settings are more than good enough to help protect your site, so we’re going to leave them as they are. If you’re interested in learning more about these settings, Google and study them since I won’t be going into detail.
To check that the Wordfence Web Application Firewall is set up correctly, scroll up to the field that states: “To make your site as secure as possible, take a moment to optimize the Wordfence Web Application Firewall.”
Then, click the link that states, “Click here to configure.”
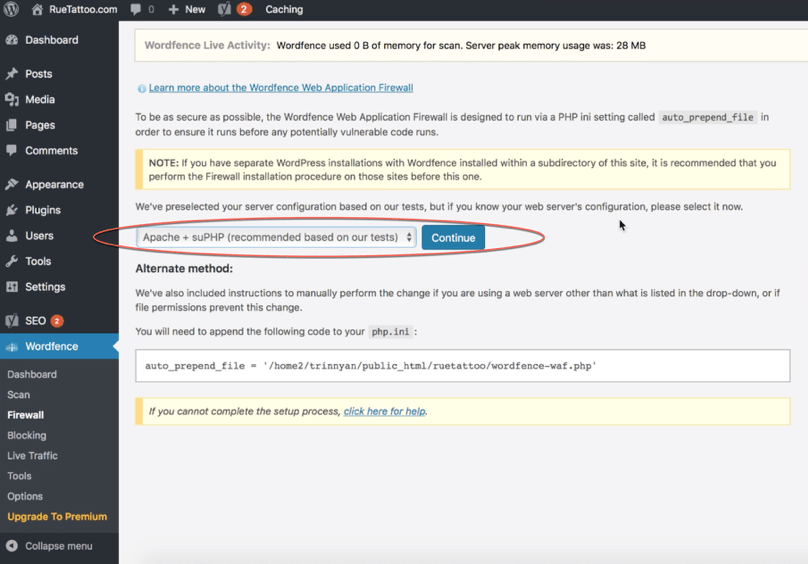
WordPress Dashboard, Wordfence Security, “Web Application Firewall” page. Make sure that “Apache + suPHP” is selected.
From the dropdown menu, select “Apache + suPHP” then click “Continue.”
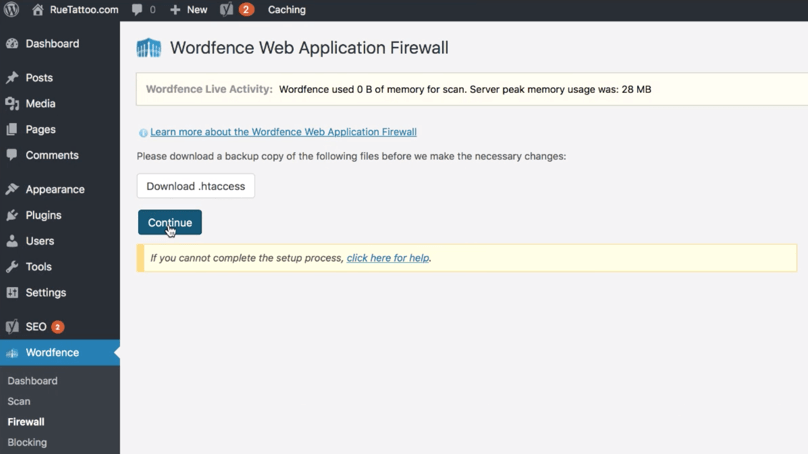
WordPress Dashboard, Wordfence Security, “Web Application Firewall” page, “Download .htaccess” option
A “Download .htaccess” option will appear – click on it. Explaining the purpose of .htaccess is for a more advanced lesson. For now, just know that .htaccess is an important WordPress file that contains installation configuration settings. There will be times when the installation or configuration of something new will mess up the WordPress site. Having a backup of the current version of the .htaccess file may help fix any issues when uploaded again. Downloading the .htaccess file is a precaution to take when installing or setting up something that can break your site. It’s not a cure-all; the safest backup is a backup of your WordPress installation (an advanced lesson).
Once the .htaccess file is downloaded, click “Continue” to proceed.
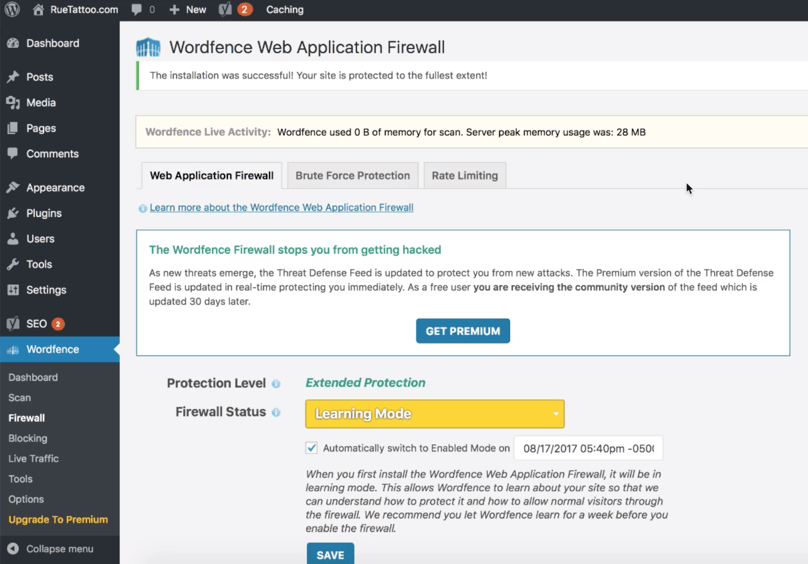
WordPress Dashboard, Wordfence Security, “Web Application Firewall” page with confirmation message that the Web Application Firewall has been successfully installed. Note that the Firewall Status is “Learning Mode,” which is what we want.
Wordfence Security should now be successfully set up for your WordPress site.
Installing and Setting Up Contact Form 7
Once again, the installation of Contact Form 7 is very similar to the previous installation processes:
Plugins → Add New → type “contact form” in the search field → click “Install Now” → click “Activate.”
I don’t really have a strict preference for contact forms. Contact Form 7 is highly rated and updated frequently. Try to get in the habit of looking for highly rated plugins that are updated frequently.
Contact Form 7 creates its own menu option in the left-hand menu titled “Contact” when installed.
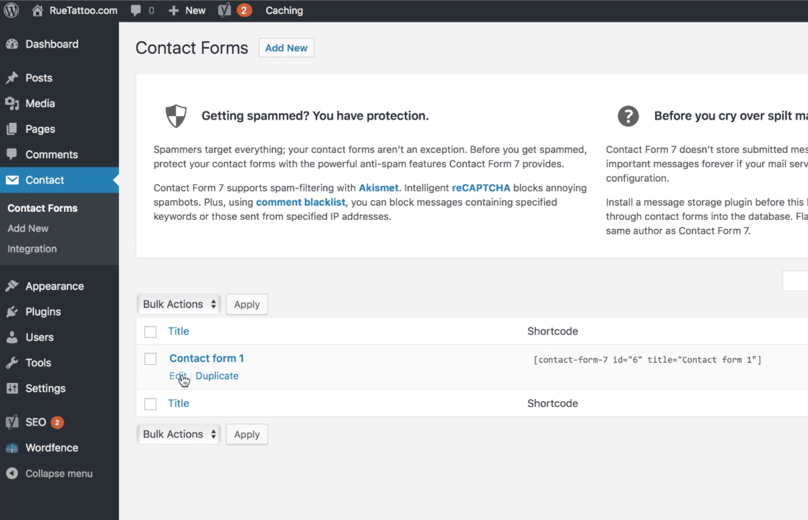
WordPress Dashboard, Contact Form 7, “Contact Forms” page with “Contact form 1” displayed.
“Contact form 1” is the default form in this plugin. You can make changes to it by clicking on “Edit” directly below the name on the “Contact Forms” page.
Clicking on “Edit” will navigate to a page where contact forms can be customized. At the moment it should look like code: it describes what people would see whenever “Contact form 1” is embedded in a page.
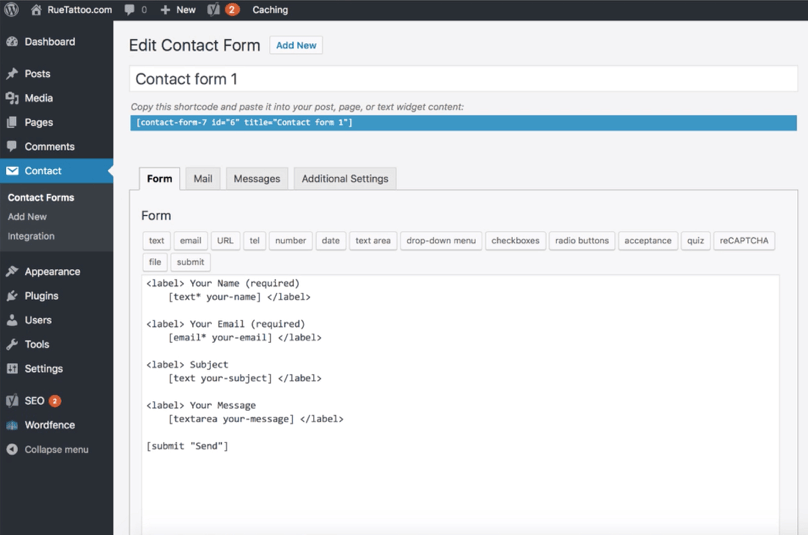
WordPress Dashboard, Contact Form 7, “Edit Contact Form” page for Contact form 1, “Form” tab
For example, when “Contact form 1” is embedded in a page, 4 fields will appear:
- “Your Name (required)”
- “Your Email (required)”
- “Subject”
- “Your Message”
At the bottom there will be a button titled “Send” that submits the completed form to an email address when clicked.
To change where the completed form is sent, click “Mail” and change the default WordPress admin email to the email address you want to receive completed forms. For example, my default WordPress admin email is “ian@stoppingscams.com,” so I’d want to update it to “ian@ruetattoo.com.”
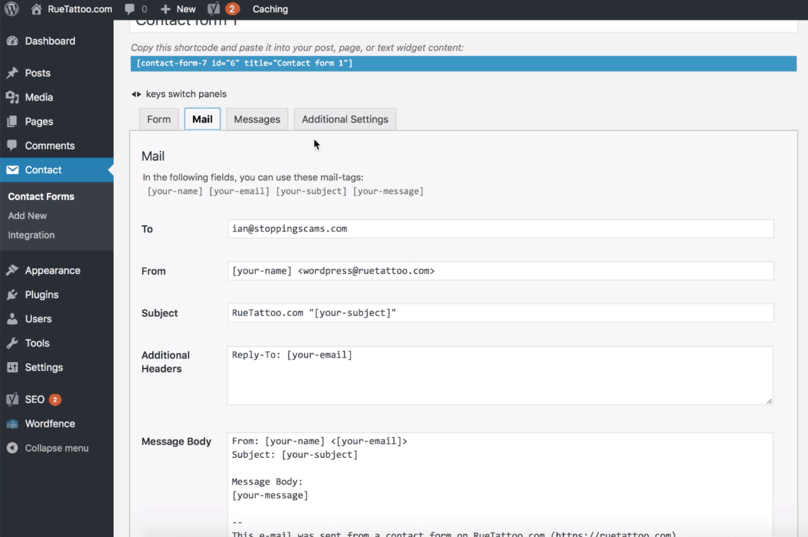
WordPress Dashboard, Contact Form 7, “Edit Contact Form” for Contact form 1, “Mail” tab
You can basically change the email address to whatever email address you prefer. For my example tattoo site, my preference is ian@ruetattoo.com because it shares the same domain and is more official.
The rest of the fields adjust the settings for how fields will appear in your email. For example, if we leave the rest of the fields as is, any time a visitor fills out “Contact form 1” on a page, you’ll receive an email with the following information:
- From: [the name entered in the “Your Name” field]
- Subject: [the subject entered in the “Subject” field]
- Reply-To: [the email entered in the “Your Email” field]
- The Message Body, which contains all of the above information plus the message entered in the “Your Message” field
As with most plugins, you can do a Google search on how to tweak the settings, especially if you want additional information from those who will be filling out your form. Remember that you can set up another contact form that asks for a different set of information.
Setting Up Your Permalink Structure
Permalink structure needs to be set up correctly for SEO purposes. I’ll discuss SEO in more detail in the next few lessons, but right now your keywords need to be both in the title of your post and in the post URL, which is its Permalink. If you set up the permalink structure correctly, the post title will automatically be in your permalink and you won’t have to adjust it every time you publish a post.
First, you need to navigate to “Settings” in the left-hand menu, then click “Permalinks.”
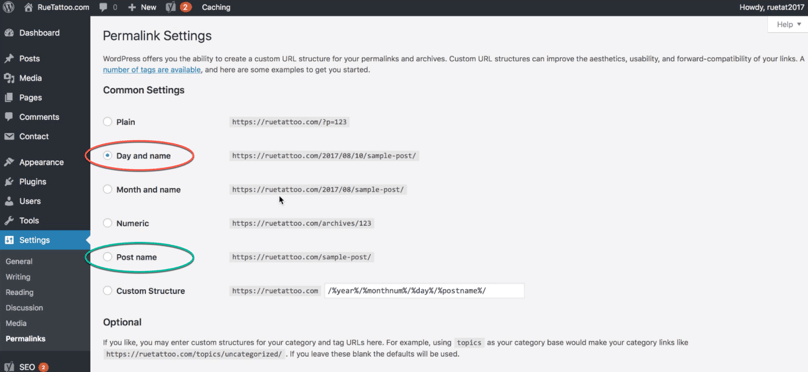
WordPress Dashboard, Settings, “Permalink Settings” page with default permalink structure “Day and name” selected. Make sure to change it to “Post name.”
The default structure is “Day and name,” so we need to change it to “Post name.” Then, click “Save changes” at the bottom of the page. And you’re done!
Setting Up Displayed User Profile
By default, WordPress sets your displayed name as your username. For security reasons, I don’t want the world to know the username I use to log in, and you shouldn’t, either. If someone knows your username, they’re that much closer to hacking your website, so take care of it. I don’t want the world to know my last name, either. That’s up to you, of course, but I would advise not to publish your last name as well.
To change these settings in WordPress, navigate to and click “Users” in the left-hand menu. Then, click on “All Users” to display all the usernames connected to your WordPress account. If you only have one account, the only username displayed will be the first one you set up, which is the one you use to log in to WordPress.
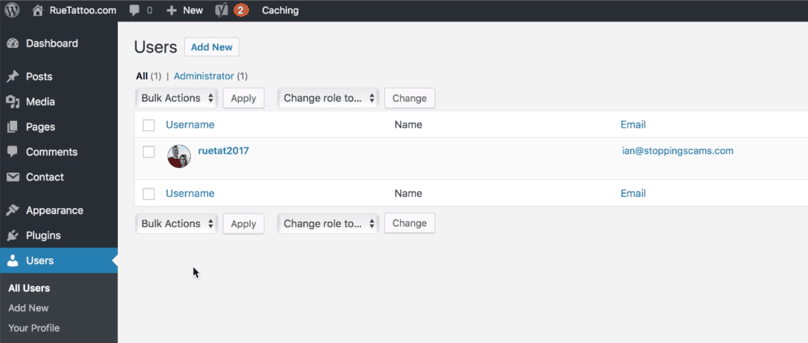
WordPress Dashboard, “Users” page with the username displayed.
Clicking “Edit” below the username will navigate to the Profile page. Scroll down to the “Name” section.
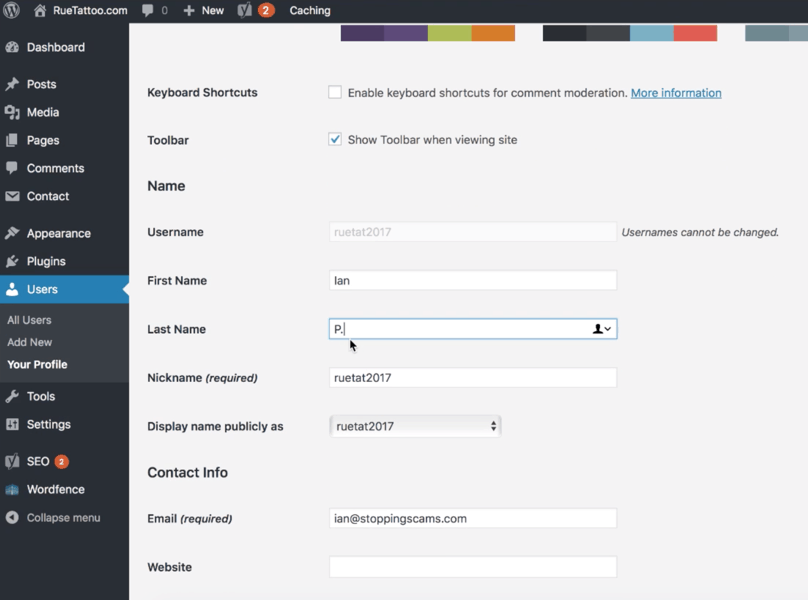
WordPress Dashboard, “Users” page, Profile Page, “Name” section. Note that the “Display name publicly as” field has the username by default. After you input a First Name, Last Name, and Nickname, the “Display name publicly as” field will become a dropdown menu that will show other choices such as “First Name, Last Name,” “First Name + Last Name,” and “Nickname.”
By default, the “First Name” and “Last Name” fields are blank, while the “Nickname” and “Display name publicly as” fields are populated with your username. Fill out the “First Name,” “Last Name,” and “Nickname” fields so the “Display name publicly as” field will display more options. After setting a Nickname, it’s available to select from a dropdown menu as the display name. The display name you choose is up to you. You can also choose to change the email address.
How to display a profile picture is beyond the scope of this lesson, and an unnecessary step. If that’s something you choose to do, set up a Gravatar account for that email address. Do a Google search to learn more about how to display a profile picture on WordPress.
When you’re done, click “Update” at the bottom of the page.