Menu

Learning how to make printables for your readers can be tedious, especially for those who don’t have a background in design. But printables are a great tool to keep in your blogging arsenal. In today’s article, I walk you through how to make printables for your blog.
Running a successful blog is so much more than writing blog posts.
One of the things you need to learn aside from putting out stellar content is to provide additional value to your audience through (mostly free) resources.
Printables are among these resources that you can give to your readers that are useful to them and give them additional value from your blog. When your readers find your blog valuable, they come back for more, they spread the word, and they eventually help you make money from your blog.
In today’s blog post, I share how to make printables for your blog.
Printables are exactly what they sound like: digital files that you can download and print. It can be anything from checklists, worksheets, graphic elements, or photos.

Okay, but why take the trouble of making them?
Printables attract social media users. People anything free, and if they come across something that’s free and useful, they’re likely to go to your site to download it. Pinterest, in particular, is great for promoting free printables.
Printables are great lead magnets. Giving out printables in return for email addresses is an effective way to get visitors to opt in to your mailing list, especially if the printables are particularly useful to your visitors.
Printables help keep your existing readers happy. You want to constantly provide value to your devoted fans and subscribers and make them think “I knew there was a reason I read this blog/subscribed to this email list.”
Printables have branding power. This goes beyond watermarks or your blog name at the bottom. When you design your printables, you can design them such that they have this distinct look and feel associated with you and your blog.
Think of how Cath Kidston or kikki.K products are immediately recognizable. You can aim for that distinction in your printables.
Printables can potentially be sold. When designing and creating printables becomes second nature to you, you can then take it to the next level and sell your printables.
Now that you know why you need to learn how to make them, here are the four general steps to create printables for your blog.
Planning your process makes your subsequent tasks more efficient and saves you time and effort from rushing into doing things that are really unnecessary.

Here are the things you need to keep in mind while planning your project.
As I’ve mentioned, you can use printables as a social media lead-in, or a lead magnet to attract subscribers, or a content upgrade on your blog post, among other uses.
Ask yourself the purpose of this printable and where you’re going to use it. If possible, write them down so you don’t forget; you should always have this purpose in mind while you create your printable.
The possibilities are endless here; it really depends on your niche, your target audience, and what they need. Just to give you an idea, here are some types of printables that other bloggers offer on their blogs:
And many, many more types are out there. Add to that variations and combinations of these printables. Out of all those infinite possibilities, think of which type or types of printable your target audience needs.
Will it help them do a task more easily? Will it save them time? Is it to help them become organized, or to help them keep plenty of things in one place? What results can they expect from using your printable?
These are just some of the questions you need to be asking so that you can focus on the particular need your printable addresses.
It’s worth looking at other blogs in your niche and seeing what they’re providing their readers. That way, you have a reference for what printables will probably work and what will probably not work. Plus, other blogs may be providing printables that you haven’t even thought of.
Let me stress this though: Never copy the printables! The point is to see what’s out there and if other readers are responsive to them.
When you’ve gathered a few ideas from your brainstorming and your research, it’s time to ask your readers what they think about your plan to provide printables and what type of printables they’d like. After all, they’re the ones who know best what they want.
The best software or tool for you to make your printable is the one that has all the basic features and the one that you’re most comfortable using. If you’re already used to working with a particular tool, then good for you. If not, here are some tools you can try so you can find the one that best fits you and your project.
The most important stage of your process is the creation of your printable. Here are the steps to follow when creating your printable.
Much like getting your pen and paper ready when you’re about to draw, gathering your digital materials before you start helps you stay focused on the flow, rather than scrambling for materials when you’re right in the middle of creating.

Here are some of the materials you need to prepare before diving head-on.
Fonts. Are you going to use special fonts for your printables? Or are you planning to use the same fonts you’re already using on your website? Either way, make sure they’re installed on your laptop and that you have a backup copy of the digital file. They’re usually in .ttf file format, but there are also .otf, .woff, .eot, and .svg font files.
Graphic elements. These are elements such as icons, cliparts, illustrations, background patterns and textures, and color palettes.
Photos. You might need to use stock photos in your printable, so make sure you’ve already downloaded the ones you’re going to use. You may also want to use photos that you took yourself, so make sure you have those ready as well.
Templates. Creating a printable doesn’t mean you have to start from scratch; your software may already have built-in templates you can use. If the built-in templates aren’t to your liking, you can look for other templates that you can buy or download for free.
Here are some sites where you can get/buy these digital materials.
Creating a rough draft of your printable can take you hours or days, depending on how complex your printable is. Here are some design tips to apply to your printable.

Make sure the design is functional. Remember the purpose of your printable, and always keep it in mind when you’re designing it. If the purpose is for display, then make it exceptionally pretty. If the purpose is to have your readers write on the printed page, make sure there’s enough space for them to do so.
If the printable is meant to be bound (like in planners or a series of worksheets), make sure there’s plenty of space to punch holes, bind or staple them together. Ensure your readers can print it even when they have to print in grayscale (when they’re saving on ink or there just isn’t colored ink or toner available).
Make it pleasing to look at. The value of your printable doesn’t only hinge on its function, but also in its appearance. If it’s not aesthetically pleasing, your readers won’t bother.
Avoid using too many fonts, too many embellishments, and too much color. They distract from the purpose of your printable. On the other hand, if your font is boring, your graphic elements lack oomph, and your colors are bland, your printable is going to look uninspired and blah.
Go with just enough elements to be both purposeful and attractive, with just the right amount of high-value content.
Use a distinct look. This early, aim to have a signature that identifies your printables. It can be a unique font, or a background pattern, or a color palette. Whatever it is, it should be something that your readers easily recognize when they see it.
Go for a PDF file format. There are a variety of file formats you can go with, such as .jpeg, .png, or .doc, depending on the software you used to create your printable. However, I highly recommend saving your printable as a .pdf file.
Aside from having a set size and being uneditable, you can set a password for the file itself so that only those who know the password can access and print the file. This feature is especially useful for exclusive, subscriber-only printables.
Because creating your printable depends on your chosen software or tool, there are no step-by-step instructions I can provide that will apply to everyone. But here are a few reminders when creating your printable.
Set the resolution to be at least 300 dpi. This is the key to having excellent-looking, high-quality printables.
Always test print your printable before you declare it finished. You want to be absolutely sure your printable will look like you want it to look like on paper. Ideally, you should use a variety of print settings: normal, high-quality, fast draft, grayscale.
Include detailed instructions when needed. If your printable needs more instructions than “print on high-quality paper and use,” write these instructions and provide them with the printable.
For example, indicate if they should use a certain type of paper, or if they need to trim it to size, or if they can type on certain text fields on the file before they print it.
If your printable is a .pdf file, it’s best to include it as the first page so your readers can read through them before they print it. You don’t want them to find out that you had special instructions after they’ve already printed it.
Indicate your copyright disclaimer. Aside from branding, your copyright disclaimer is a step against intellectual property theft; avoid your printable being passed off as someone else’s work, and avoid them making money off it, especially if you’re providing it for free.
It can be as simple as placing your blog name and URL at the bottom of each page. However, this may not be enough to scare off determined plagiarists.
Try to find a way to mark your printable in other ways such that no one can print it without printing your copyright. At the same time, this marking shouldn’t hinder how your printable is used (i.e., it shouldn’t obscure important graphics, it shouldn’t be distracting, etc.).
Once you’re done creating your printable, the next step is to upload the finished file to your website so you can create a URL for your readers to download.
Below are the steps to do it in WordPress.
1. On your WordPress dashboard, hover on Media, and then click on “Add Media.”
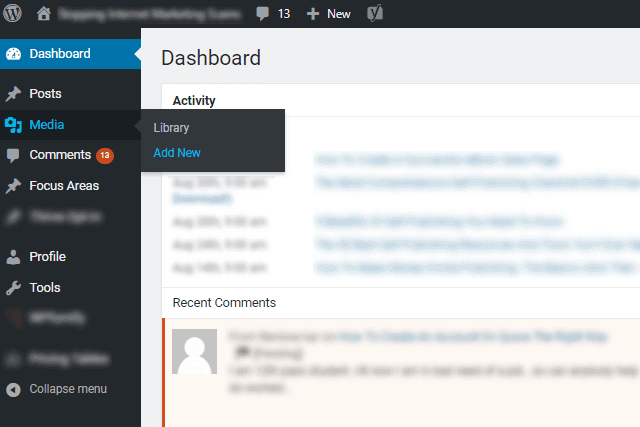
Click To Zoom
2. On the next screen, either drag and drop your .pdf file in the dotted box or click “Select Files” to manually add the file.
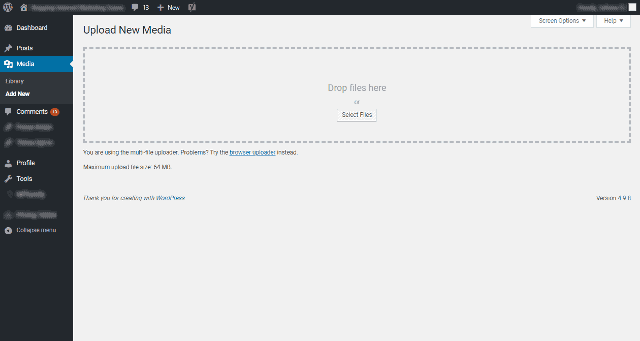
Click To Zoom
3. When the upload is successful, the file will show up at the bottom with a link called “Edit” beside it. Click on “Edit” to go to the Edit Media page.
4. The most important part here is the “File URL” field. Copy that URL and paste it where you plan to promote your printable.
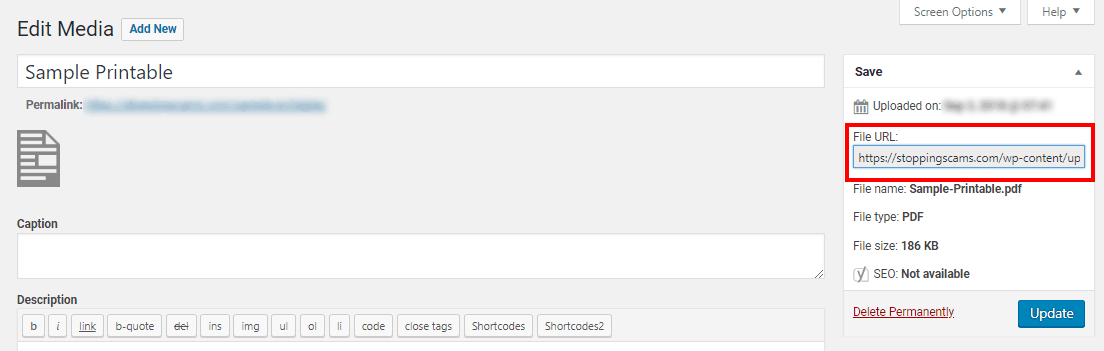
Note the File URL field in the red box (Click To Zoom)
Note: Only instructions in WordPress are included because it’s the most popular CMS. If you’re not using WordPress, your CMS should have detailed instructions on how to upload a file on your website.
Here are some reminders when uploading your printable to your website.
Pay attention to the filename. The filename for your printable is easy to take for granted, but it’s actually important to pay attention to it.
The filename needs to be clear and concise, and your readers need to know what it is at a glance, without having to open the file.
Don’t use vague filenames like “File001.” Instead, you can use a descriptive name like “Monthly Grocery Checklist” and then append your blog name so your readers know where they downloaded it from.
Test your download link to see if it works. Before you even start sharing and promoting your content to your audience, it’s best to make sure that they won’t have any problems downloading from the link you provide and then printing the downloaded file.
When you’ve uploaded the file on your website, and you have a working file URL, you can now share and promote your printable. Here are a few ways you can promote your printables.
Sharing freebies on social media is a good way to expand your audience. You can post a link to the landing page offering your printable through a CTA on your Facebook page, a tweet, or a Pin on Pinterest.

Pinterest is a strong favorite of plenty of bloggers because it’s highly visual and you can promote both blog posts with content upgrades (more on this below) and your landing page with your generic free printable in exchange for their email address.
Plus, Pinterest pins last longer than other social media posts, such as tweets or Facebook updates. You can repin the same pin over and over; no need to create a new one for every time you want to promote it.
Pinterest pins work best when you mention your free printable (e.g., “free worksheet included!”) and include an image of it. People can’t resist freebies, and actually seeing what they’re getting is a bonus.
A content upgrade is a bonus download that goes with a blog post. This is different from your generic lead magnet because a content upgrade is created specifically to complement the blog post it’s offered from.
It seems like added work on top of creating a blog post, and it is, but a thoughtful, well-crafted content upgrade can increase your newsletter signups to a degree that might surprise you.
When you’re planning a content upgrade, you need to think of your readers’ needs right at the moment that they’re reading your blog post. What do they wish they had while reading your blog post? A content upgrade that’s irrelevant will do more harm than good.
If you have a mailing list, you should already have CTAs linked to opt-in pages all over your blog to entice readers to subscribe to your mailing list. Printables will be perfect as lead magnets in these opt-in pages.
Make sure you aren’t neglecting your existing subscribers. Create value-packed printables that are exclusive to subscribers. You can even advertise this as an additional perk of subscribing to your email list: exclusive updates, content, plus exclusive freebies!

Here are a few more reminders when you promote your printables.
Learn how to create excellent landing pages. Landing pages are where you offer your printable in exchange for subscribing to your email list.
No matter how helpful your printable is, if visitors to your landing page aren’t convinced that it’s worth giving their email address for, it’s all for naught.
There are plenty of tools you can use to make your own landing pages (LeadPages [affiliate link] is one of them), but you also need to study what makes landing pages resonate with your audience and what will make them download your printable.
I’ve discussed essential elements of a landing page in another article, and I’ve also discussed how to split test landing pages.
Encourage your readers and subscribers to share your printables. If your printables are truly valuable, your readers won’t hesitate to share your printables with their friends, family, or whoever needs it. Make sure your branding is on the printable itself so they all know where it came from and they can go back to your blog for more.
As you’ve witnessed, making a printable for your blog isn’t an easy task. But keep at it, practice doing a number of printables, and pretty soon you’ll have an impressive array of printables you can use as lead magnets, content upgrades, and premium content for your subscribers. In the future, you can sell these printables as a source of income from your blog.
Here is a recap of the steps I outlined above.
Below are a couple more reminders before you go and make your printables.
Including instructions to download and print your printable is enough for most of your readers.
However, some of them will inevitably be puzzled by anything technical.

Other times, there will be real technical glitches. The link to your printable may not work, the file may not download, or the file may download but not print.
Or they may ask how and when to use the printable.
Answering questions (and complaints) about your printable is part and parcel of offering them, so you need to be ready for it.
Even after the planning and research that went into your printables, some of them will be flops.
That’s okay.
It’s an opportunity for you to learn what your audience doesn’t like and what not to do next time. Plus, the time you spent making those printables weren’t wasted; think of them as hours of practice for when you make printables that your readers will love.
Do you already make and offer printables for your blog? If so, what kinds of printables do you offer and how do you make them? Share your tips in the comments!
JoAnne is your average, everyday, sane stay-at-home mom who believes in the power of the internet to make dreams come true. She has an insatiable appetite for chocolate, as well as all things internet marketing. She keeps up with the latest trends in blogging, affiliate marketing, e-commerce, and more.
