(1) comment
Add Your Reply

Building anything from scratch is crazy scary: a PC, a car, a house. Building your own self-hosted blog sure sounds scary, but it shouldn’t be! Here, I’ll tell you how to build a blog from scratch.
Note: If you’re here, I’m assuming you’ve already found your blog niche. If not, I discussed it here in great detail, so check it out first before you continue here.
The first thing to think about when building your blog from scratch is what you want to build it on because that’s the first tool in your blogging arsenal. The thing is, because there are numerous platforms that are available, it can be incredibly mind-boggling to choose the best one for you.
Remember, once you’ve started your blog, switching blog platforms can be a painstaking, not to mention expensive, task. You’ll want to choose the right one from the start. To make things simple, I’ll go through the most popular blogging platforms for beginners.
![]()
Price: Free to use, but you’ll need to pay for your domain name and hosting
WordPress is an open-source content management system (CMS). Simply put, it’s free software that you install on a third-party web server (through your hosting provider; I’ll go into more detail about this in the next section) that you manage.
With WordPress.org, you can install plugins and edit the code, giving you full design and functional control over your blog. Also, if you want to expand your blog and monetize it, WordPress.org allows you to do that. Finally, because millions of people use this software, support is widely available. Whatever customization you had in mind, there’s a very good chance that someone else has done it (or at least, tried to do it and failed).
If you’re going for a self-hosted blog, which I sincerely, highly recommend you do, then WordPress.org is the way to go (more on that later…).
Pros:
Cons:
![]()
Price: Free to $25/month
Wait a minute. There’s WordPress.com, too? There are two WordPresses?
Relax. You can think of WordPress.com as WordPress.org’s sibling. It’s the same CMS but hosted by WordPress.com. That means you don’t have to go behind the scenes so much. WordPress.com will handle the tricky parts, like updates or security. All you have to do is post content.
Unfortunately, because they control the backend, it means being restricted to WordPress themes and plugins. You’re going to miss out on a lot of design options and customizations that self-hosted WordPress.org users can readily use.
WordPress.com also limits how you monetize your blog with their strict affiliate policy, even if you’re a paying user. In addition, you don’t own your blog. If WordPress.com decides to suspend or delete your blog for any reason, they legally can. There goes your blog and your audience, and everything you’ve built.
Pros:
Cons:
![]()
Price: Free
Blogger has been around since 1999 and owned by Google since 2003, making it one of the oldest blogging platforms around. Because it’s owned by Google, you only need a Google account to get started. Plus, you get to use Google tools, such as Analytics and AdSense.
Similar to WordPress.com, blogspot.com hosts your site. By default, you get a subdomain “blogspot.com” However, if you have a domain, you can connect it to your blog. It’s very simple to use and allows you to create up to 100 blogs for every Google account.
You can show AdSense and other ad services on your pages so you can earn some money. However, you are severely limited in terms of design and customization. While you do have access to HTML and CSS code, you are limited to the functionality offered by Blogger.
Pros:
Cons:
![]()
Price: Free
Medium was developed by Twitter co-founder Evan Williams and launched in 2012, so it’s one of the young players in the blog publishing space. Unlike WordPress and Blogger, Medium offers no customization whatsoever. Thus, it feels like Twitter with infinitely more characters.
When you publish articles on Medium, its algorithm will display your articles to interested readers. So if you’re just looking to showcase your writing to like-minded writers and bloggers, Medium is a great place to start.
Another thing going against it is that it’s ad-free, so no advertising revenues for you. However, your posts do reach a target audience and it’s a great way to be known. Some companies have begun to use this platform as another marketing strategy, which is something you can emulate when you build your personal brand.
As with Blogger and WordPress.com, as this is hosted by Medium.com, your blog isn’t yours, and if they decide to shut your blog down, then there’s nothing you can do.
Pros:
Cons:
![]()
Price: $12 to $18 per month (when billed annually; $16 to $26 when billed month-to-month)
Squarespace offers simple, elegant websites. It’s simple to use and you need no technical knowledge. A really polished website can be yours in a matter of hours. You can use it to launch a sleek, modern blog, but their drag-and-drop website builder and editor offers features that are more for businesses, such as an e-commerce platform.
It’s ad-free like Medium, so no advertising revenues, but if you do decide to sell products one day, there’s no easier way to do it with style.
Pros:
Cons:
![]()
Price: Free to ~$25 a month (when billed annually; up to $30 when billed month-to-month)
Wix is a cloud-based platform offering beautiful websites through an easy drag-and-drop website builder, much like Squarespace. However, they offer more templates and third-party apps for customization. An e-commerce platform is also offered, making it ideal for businesses as well.
A drawback of Wix would have to be its inflexibility with its templates. Once you’ve chosen a template, you can’t change the theme unless you’re willing to re-upload ALL your content.
Pros:
Cons:
![]()
Price: Free to ~$25 a month (when billed annually; up to $35 when billed month-to-month)
Weebly has a drag-and-drop website builder as well, similar to Wix and Squarespace. Among these last three platforms, though, Weebly is the easiest to navigate overall. You need no prior experience, and once you sign in you can just drag and drop your way into a polished website. It’s for small businesses who want a website and want it now.
Your access to the backend and therefore your room for customization is very limited as well. However, unlike Wix, you can change your templates without losing your content.
Pros:
Cons:
You’re probably even more confused now after reading about eight different platforms. As you just read, they all have their pros and cons, and at this point, you might be inclined to check out one or two of them. However, I’m going to strongly recommend that you go with self-hosted WordPress.org (which I will refer to from here on out as just “WordPress,” so that you don’t get confused). Here’s why:

With a self-hosted blog, you get complete, utter control of your blog: from its design to its functionality to its monetization. You don’t have to worry about getting your blog suspended, or worse, deleted.
When you get to the point that your readership is high enough, you can contact private advertisers and increase your potential to earn. Private advertisers almost always welcome self-hosted WordPress blogs compared to other platforms.

Themes and plugins (both free and paid) allow you to customize your blog and do almost anything you can think of. These themes and plugins are, for the most part, carefully maintained and updated every time WordPress updates (more on this later).
What’s more, they’re typically plug and play. If you find that you don’t like or can’t work with a particular plugin, simply uninstall it. Similarly, if you don’t like the way your template looks, or if your blog is going a different direction and you need a design overhaul, simply change the template. No need to contact anyone or program anything.
WordPress can be used in so many different ways. Aside from a blog, you can eventually make it into an e-commerce site for when you want to go into selling full-time. You can also turn it into an e-learning site, or even a place for your portfolio if you’re a photographer, an artist, or a writer. Whatever you can imagine, you can create with WordPress.

WordPress has millions of users worldwide, and a natural consequence of that is a huge support community and knowledge base. Stuck on an issue or trying to add a cool new feature but you just can’t figure out how? Go to the WordPress support forum and learn more there.
Otherwise, a simple Google search should pull up a lot of tutorials and resources online that would help. The WordPress community has solutions for almost any kind of problem you might face.

Again, the sheer number of WordPress users is a testament to how intuitive it is to learn. Anyone at any technical experience level should be able to get a hang of it in a short while. Some coding is required, but it’s really minimal and again, you can take advantage of the extensive support available online if you’re stuck on something. For the most part, even newbies can fire up a blog in minutes.

The whole point of putting up a blog is so that people can see it, right? WordPress is inherently SEO-friendly because of its high-quality code and its organized content structure. Aside from its intrinsic search engine-friendly design, there are tons of plugins you can install and resources you can use to optimize your posts and your pages even better.

Make no mistake: hacking a WordPress site is still possible. The people at WordPress do realize this, and have structured it such that security updates are made from time to time. You can never be too secure though, and most WordPress site owners take precautions, such as limiting login attempts, doing periodic backups, and securing the most critical files. Again, there are plenty of resources you can go through to be able to do all this. If that’s not enough, there are plugins to help you, so it’s never a very tough job.
Hopefully, you are now convinced that self-hosted WordPress is the best platform to build your blog on. You might want to choose a different platform if you have different blogging goals, but if you are determined to get serious income from your blog, then WordPress is really the only way to go.
Now that you’ve decided which blogging platform to use, your next step is now to find a web host to house your website files.
A web host makes your website available to everyone on the World Wide Web. Simply put, web hosting service providers work by storing your website files in web servers (dedicated high-powered computers). When someone types in your web address, the internet connects to the web server where your website is and then displays the contents back to their computer through their browser.

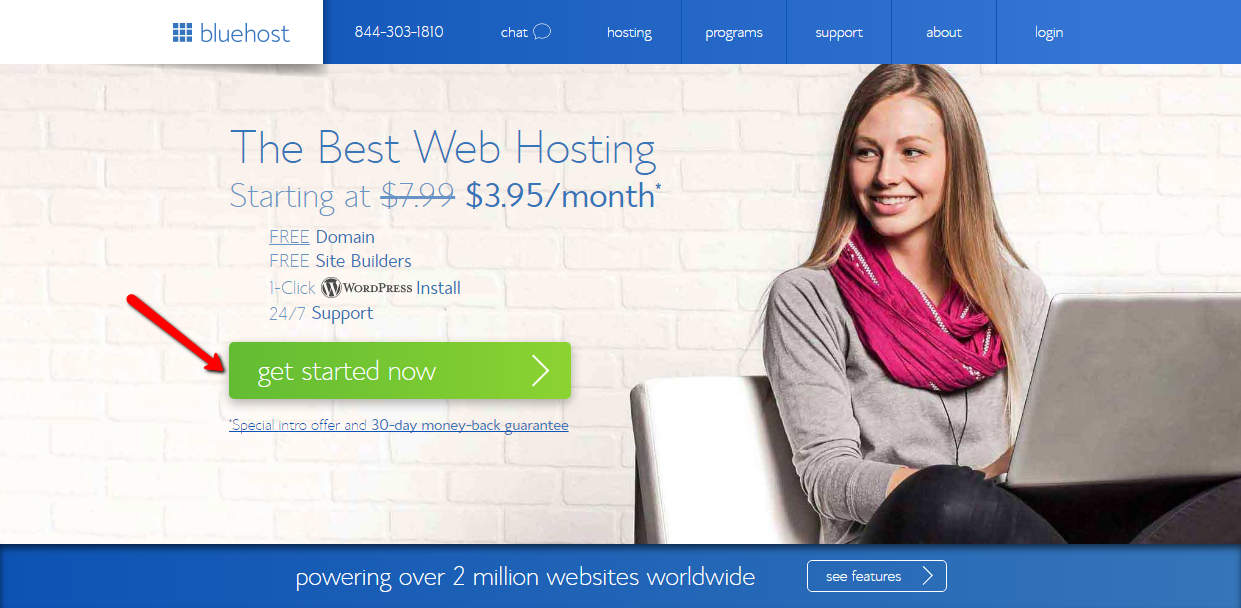
Doing a simple search will bring up many web hosting providers, such as InMotion, HostGator, and SiteGround, but we at StoppingScams.com highly recommend using Bluehost (affiliate link). You can click here to go through Ian’s step-by-step guide. Note that his guide assumes that you’re installing WordPress.
Essentially, here are the four simple steps to set up your hosting with Bluehost:
Click to Zoom
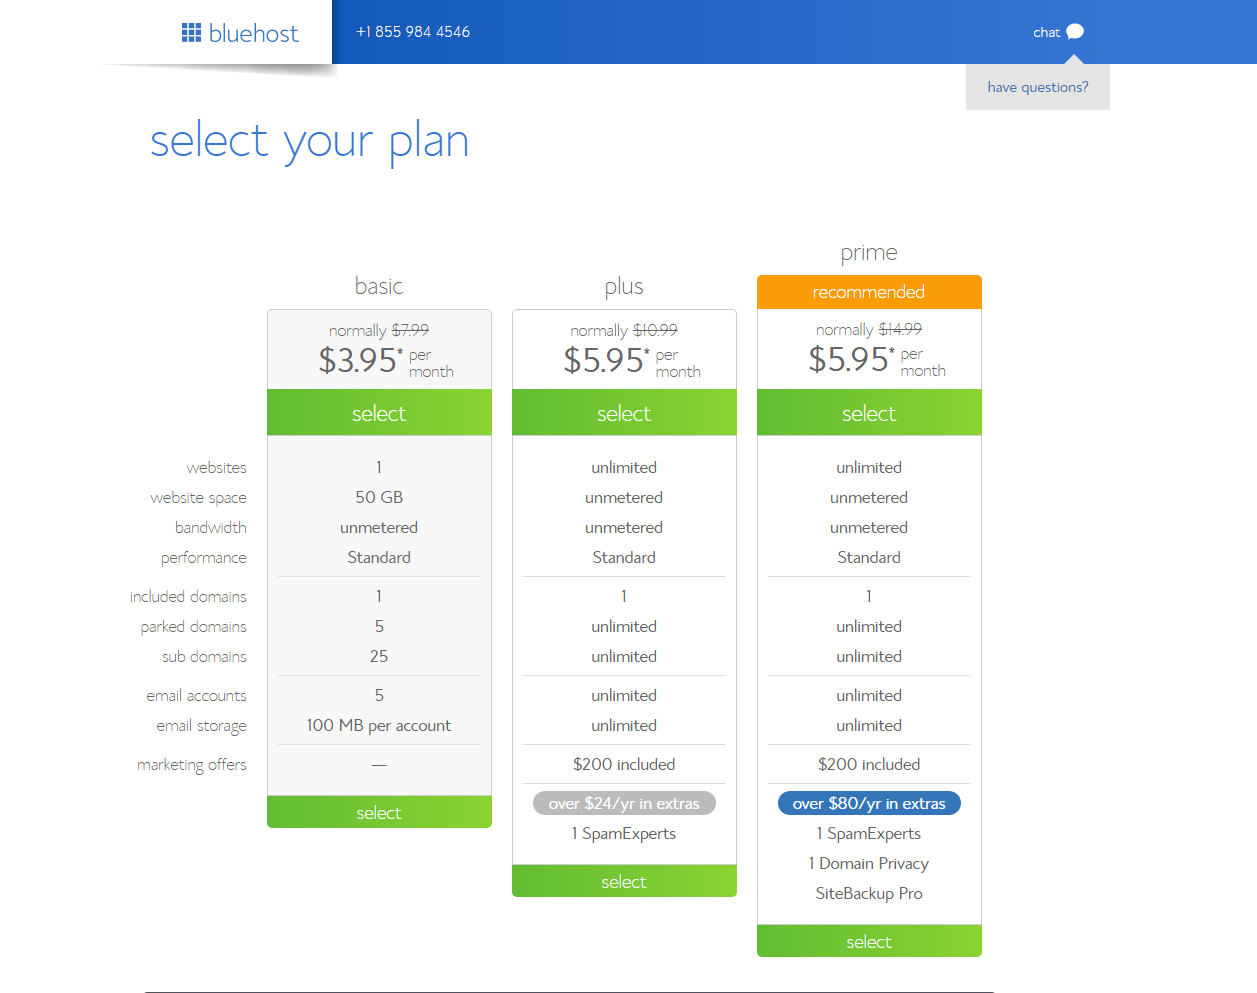
Click to Zoom
Wait. Stop. You’ll want to pause right here and think this through carefully.
Your domain name is your web address. For example, stoppingscams.com is this site’s domain name. You’ll want to choose one thoroughly for the following reasons:
Your domain name is your first impression.
Your URL is the first thing your readers will encounter, and the first thing that comes to mind when they read your URL is what they’ll think about you.
It impacts your SEO.
Keywords in your domain name can help your SEO ranking, though you’ll want to steer away from exact match keywords. More about this as we go deeper.
It defines your brand.
When you get this right, your future branding efforts will be a lot easier.
So how do you pick the right domain name that ticks all the right checkboxes? Let’s go through some pointers when picking out your domain name.
Is “brandable” even a word? If you consult a dictionary, it probably isn’t, but you understand what it means, don’t you? You want to achieve the same with your domain name. It should relate to your niche even if it doesn’t describe it explicitly. For example, if you’re blogging about poetry, RhymeAndReason.com would be descriptive without overtly having “poetry” in its name.

Also, if you’re in a niche where you have competition, you’ll want to make yours stand out, so be creative. An example of a category that has a lot of bloggers writing about it would probably be health and fitness for older moms (e.g., 40 years old and up). You can probably name it JumpingBabushka.com if you’re of Polish or Russian descent. That’ll surely make you stand out from all the others.
Consider your niche and think about what people will typically search for if they want to find your niche. You want your readers to know what your blog is all about from just seeing your web address. However, you don’t want to be too specific here, because you’ll want to think long-term. For example, RaisingAToddler.com will quickly become inapplicable as your toddler grows up.
You’ll want to keep it down to 1 to 2 words, 3 maximum. Being concise makes your domain name easy to spell, easy to type, and easy to say. If you tick all three of these, then it’s easy to remember. And if it’s easy to remember, it’s easy to share and spread the word.

Again, you want it easy to spell, easy to type, easy to say. If your domain name is “Stars4-U.com” I guarantee you’ll have a hell of a time explaining that it’s “4” not “for” and there’s a hyphen between “4” and “U” and it’s “U” not “you.” That’s a pretty extreme example, but you get the picture. Just don’t do it.
You’ll want to avoid legal issues down the line, so nip them in the bud before you even start. Stay away from names that already have trademarks. A simple web search should be able to address that. If it’s already taken, try to tweak it and see if you can make it work. If not, move on. No one needs the hassle and the lasting mark of a lawsuit.

There’s no use coming up with a brandable name if you don’t have dibs on it in social media. Half a decade ago, this wouldn’t even be a factor, but the game has changed and nowadays, social media is integral to the success of any brand. Use it when you post on your social media so that your readers get to associate it with you and your blog and use it to engage with you and other readers.
On that note, you’ll want to check if A) it makes for a catchy hashtag and B) no such hashtag already exists. You want to use hashtags to get in front of your target audience on Twitter, Instagram, Facebook, and wherever else it makes sense to use them. Make it your own.
Bonus: it makes it easier for potential readers to go find your blog if they happen to stumble on a social media post.
As far as domain extensions go, “.com” is still undisputedly the best. It can be tough to get a short and memorable .com domain name as it’s been around for such a long time, but it’s what your readers assume precisely because it’s been there almost from the start.
We even called internet companies as “dot-coms” and refer to the internet boom in the 90s as the “dot-com” bubble. This prevalence in everyday culture is unmatched by the second most popular extension “.net” You’ll probably end up spending more than you anticipated, but that recall and familiarity should be worth it.
By now, hopefully, you have your domain name figured out. The next step is registering it with a domain registrar. Bluehost provides this service, too, so if you want to make it easy on yourself, you can register it on the window you just paused in the previous step. I don’t recommend doing this, though, because this will cost more in the long run.
If you want to save, the more popular ones for beginners are Namecheap, GoDaddy, and iPage. GoDaddy is the largest and iPage is the cheapest, but Namecheap is the one I’d recommend because they don’t surprise you with their renewal charges and you get a lot of services for the price you pay.
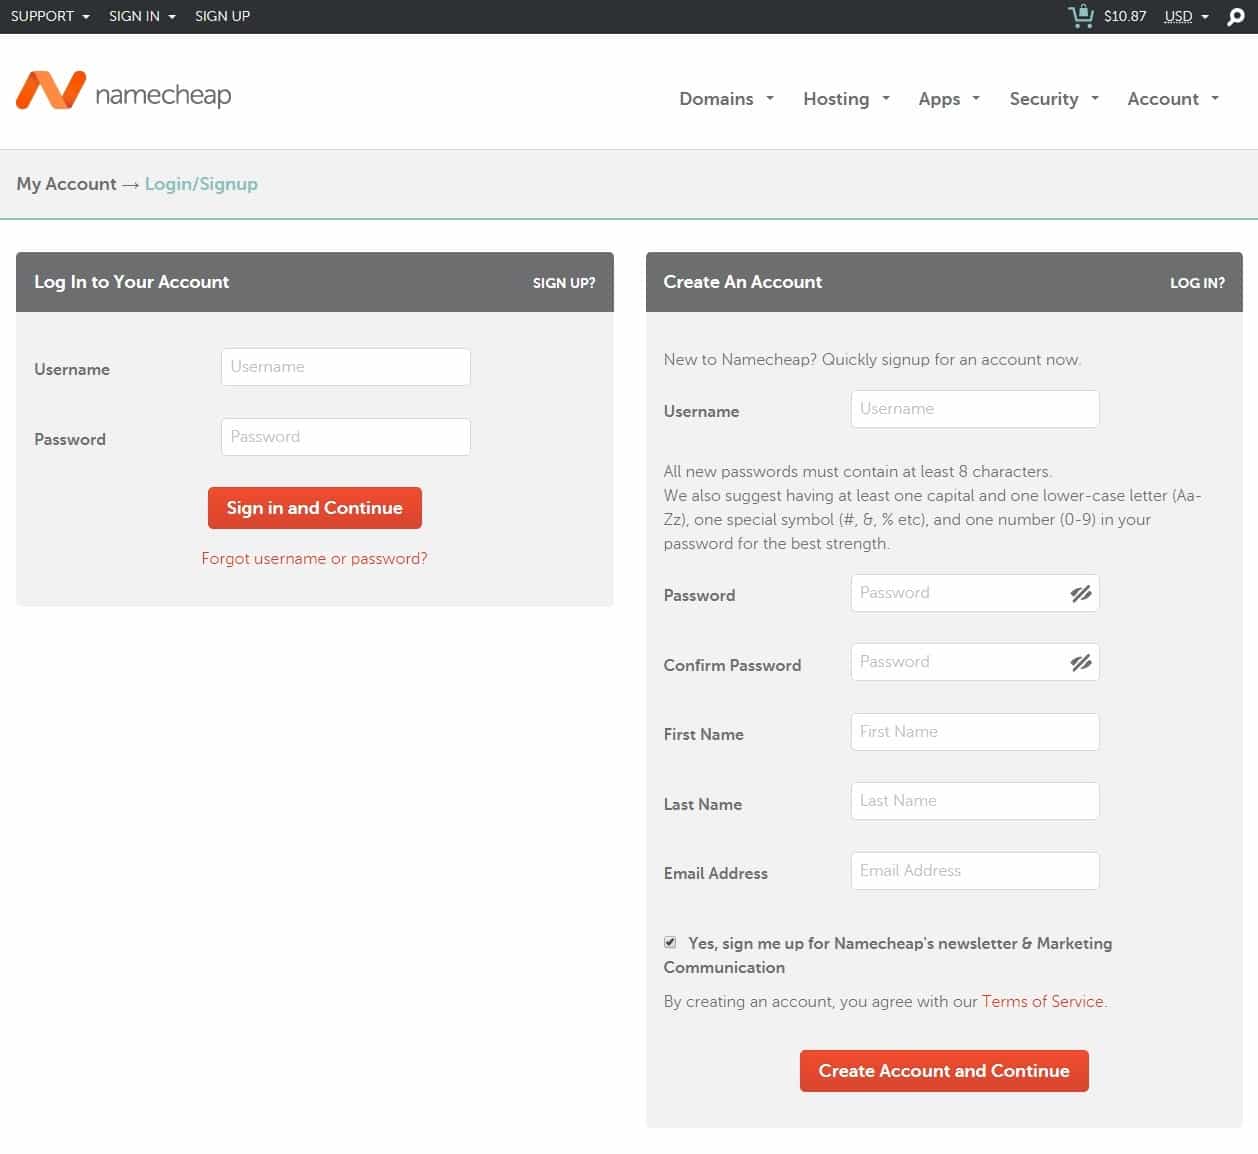
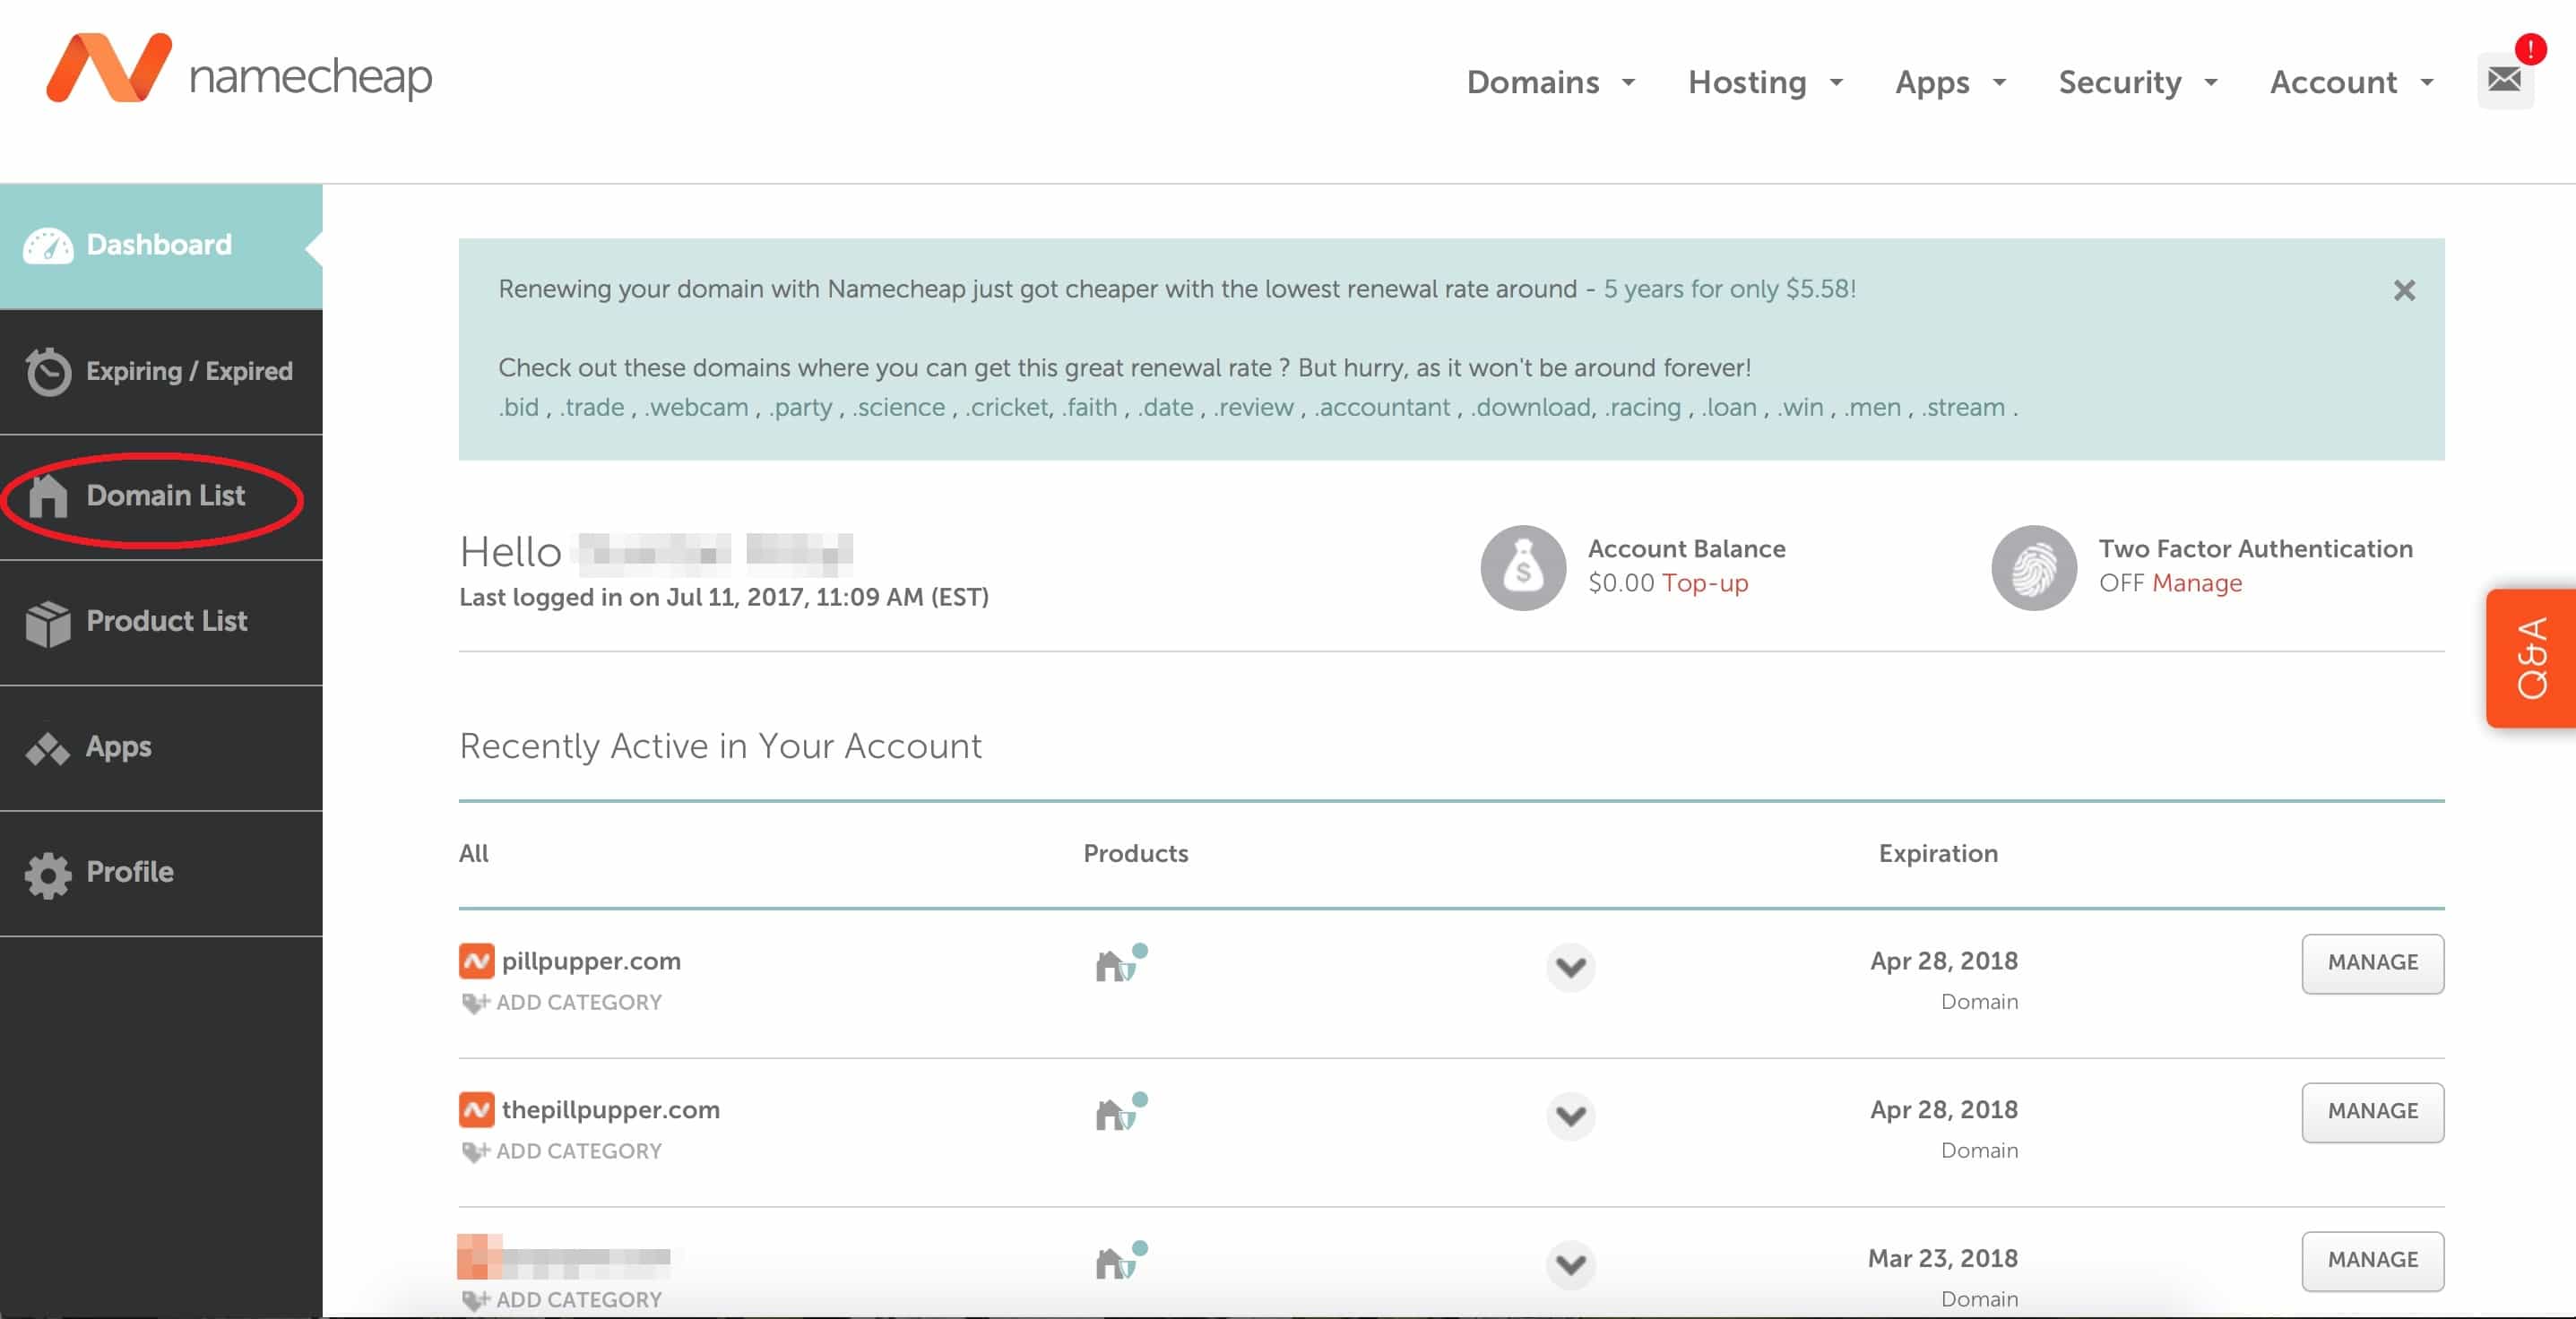
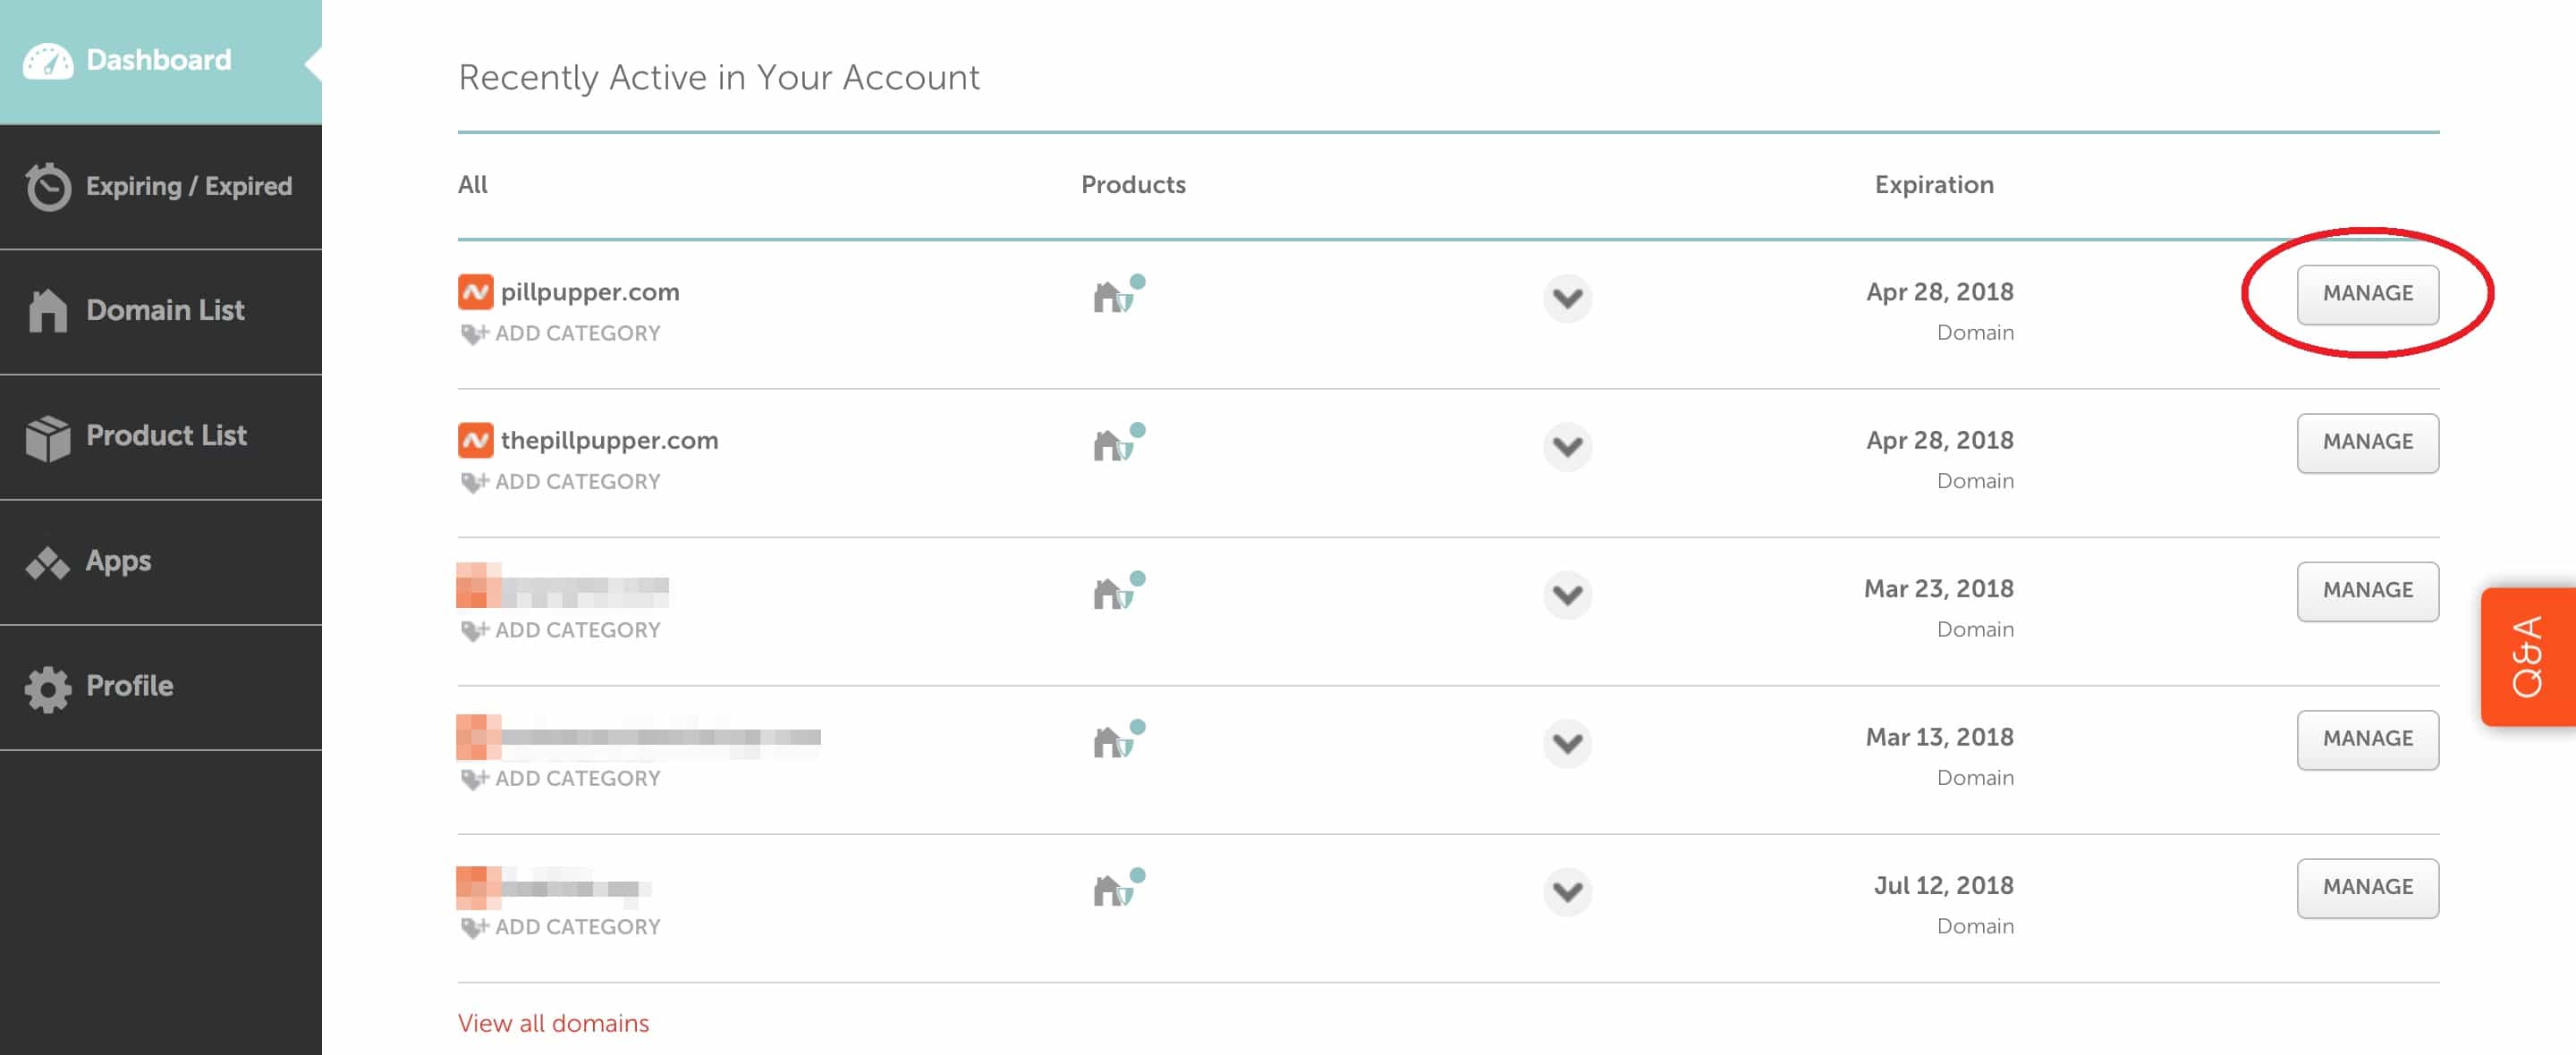
So how do you register your domain name with Namecheap? It takes just five easy steps:
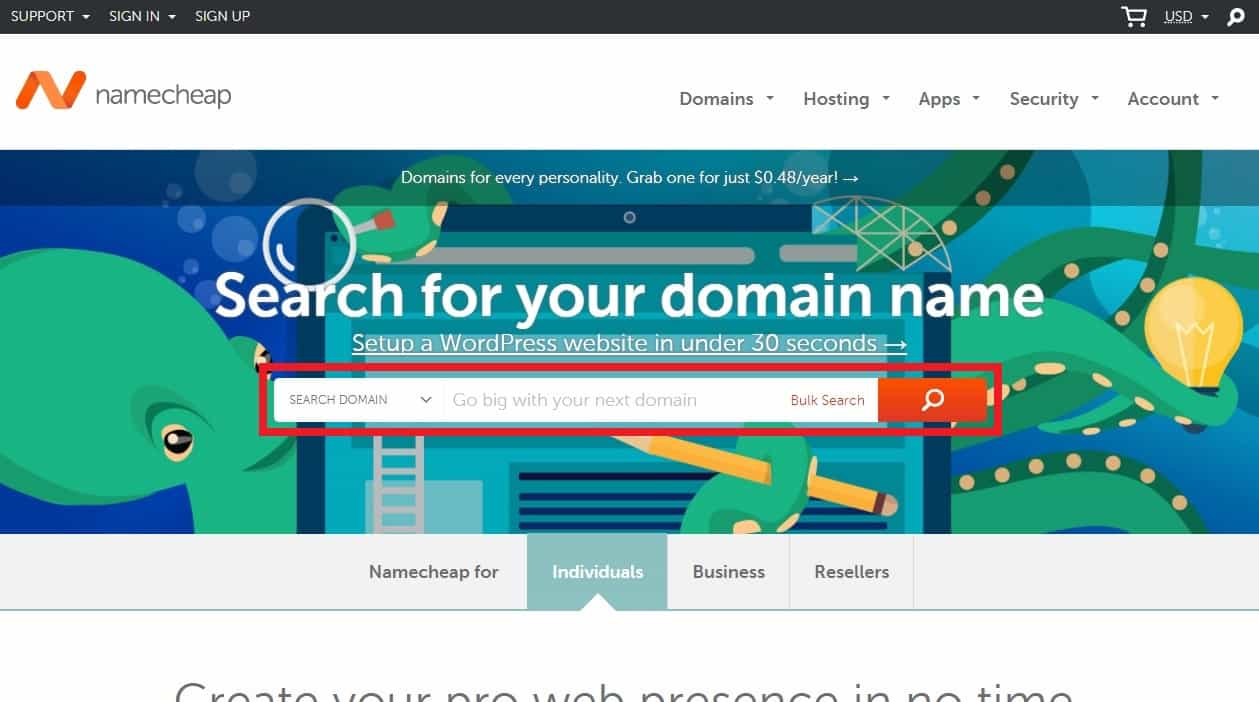
Click to Zoom
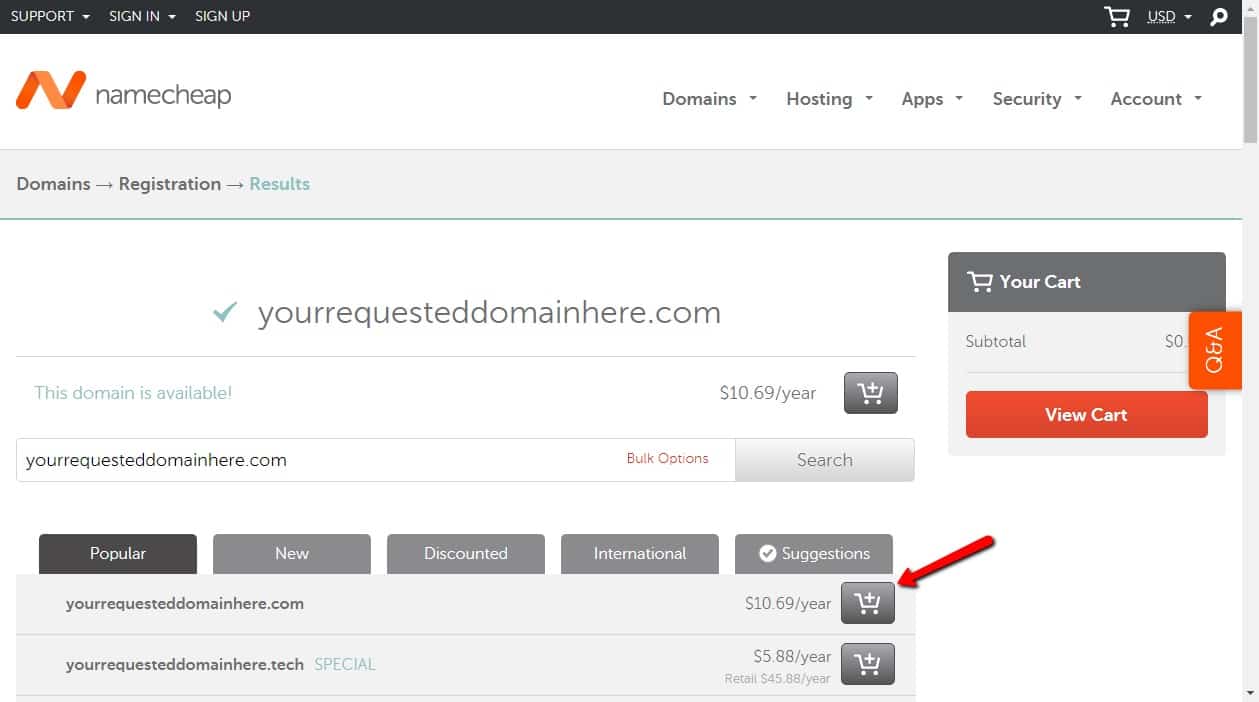
Click to Zoom
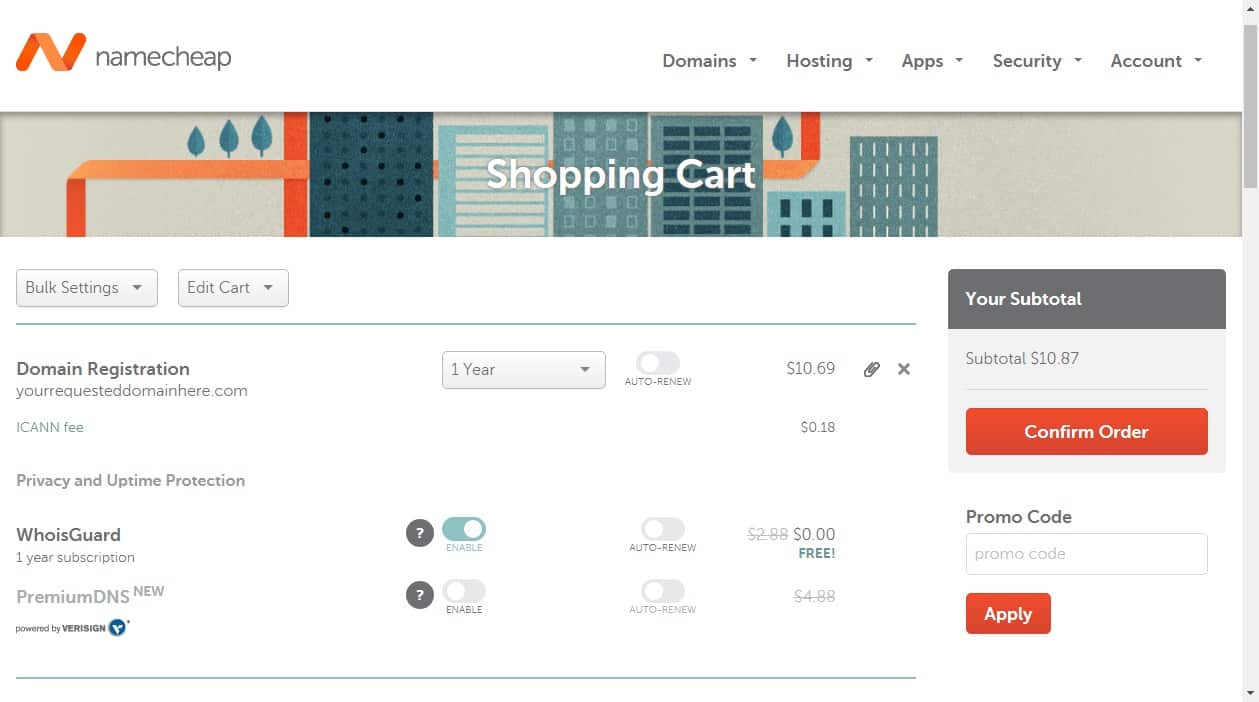
Click to Zoom
Click to Zoom
That’s it! You now have your very own domain name. Now we need to connect it to your Bluehost web hosting.
Yup, we’re not quite done with the technical mumbo jumbo yet. This is the most technical thing in this entire process, and you’ll find you only have to do this once if you decide to not change domain registrars or web hosts for the whole time you own your blog.
Why do we need to do it? Well, your domain name is your web address. You need to connect the web address to where your actual website files are saved, and that’s on the server of your web hosts. So how do we connect it?
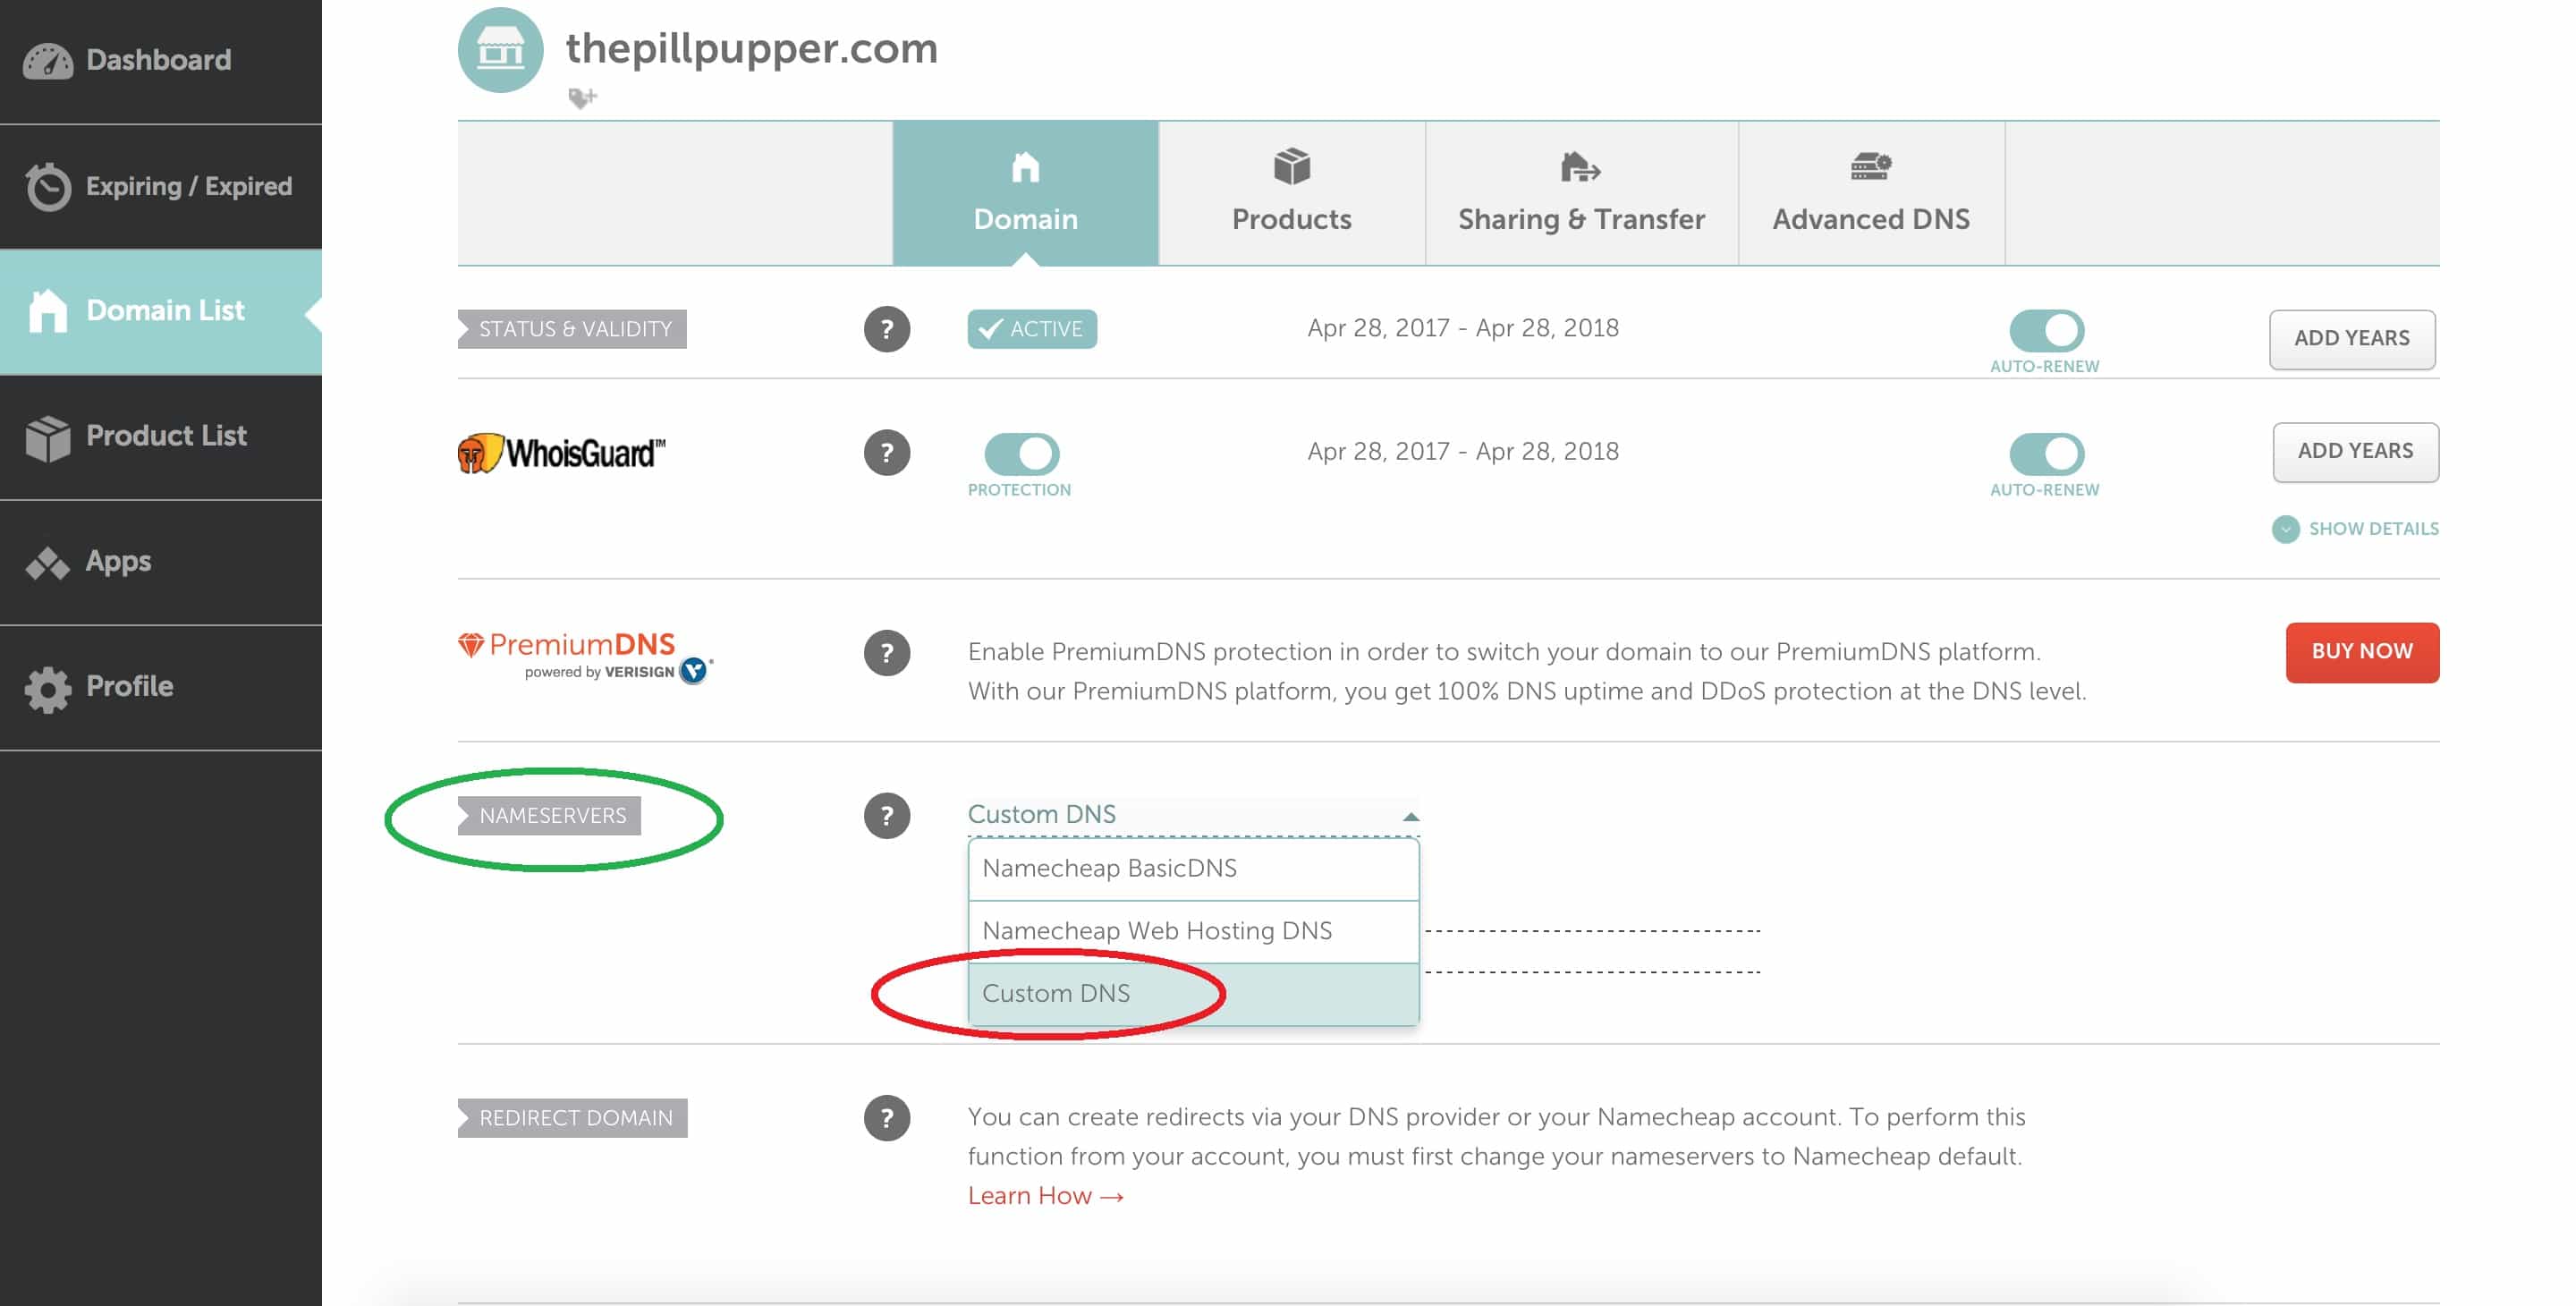
You update your nameservers in Namecheap. Your nameservers are provided by your host, in this case, Bluehost. Updating your nameservers in Namecheap tells it to connect to your website hosted by Bluehost when someone types in your domain name. That’s all it does. You can read about how to do it here, or you can follow these steps:
Click to Zoom
Click to Zoom
Click To Zoom
And that’s that! You’ve just set up your blog! The next step is to configure it by installing WordPress.

As we discussed in a previous section, we at StoppingScams.com highly recommend WordPress. If you bought hosting from Bluehost, installing WordPress is a breeze. You can read all about it here, or back in Ian’s step-by-step guide here, or follow the steps below:
There you have it! You now have a functional website that you can design and post content in.
After your domain name, the general look and feel of your website is the next element that will catch your readers’ attention. Aside from being visually appealing, your design should present your content in an easily comprehensible manner. The way to do this is to minimize clutter and keep everything intuitive.

Some techniques you can use for your blog design include the following.
The area around your paragraphs, text boxes, and images is collectively called whitespace. It may seem like a whole lot of, well, nothing, but it’s actually useful. You can use it to direct your readers’ eyes down your page by reducing that “cramped” feeling when you have too much text and too many graphics in a page.
Another made-up word, you say. To that I say, yes, it’s made up, but hear me out. Most of your readers won’t read and absorb every single word you post, especially on their first reading. They’ll tend to scan a page for the most important information.
Whitespace will help them do that, but other techniques you can use are using subheadings, breaking up your paragraphs, using lists, and formatting important points in your text in boldface or italics (note: do this very sparingly or your intended effect will be lost).
WordPress offers lots of themes to choose from, and it might be overwhelming at first to choose color schemes, navigation menu placements, fonts, and all these website elements. The good news is that so many have gone before you, and with some Google skills and a bit of luck, you can find loads of themes, both free and premium.
The important thing, for now, is to start with a theme with 2–3 main colors (any more than this and you risk overwhelming your readers) that’s crisp, clean, and definitely mobile-responsive (i.e., easily read from smartphones and tablets).

Congratulations! You are now officially the proud owner of a blog! You deserve a fine glass of bubbly for your incredibly hard work (alcohol optional). That wasn’t so bad, was it?
Now that you have a domain, a web host, a website, and an amazing theme, it’s time to bite the bullet and create your first post! Jump here for tips on how to create content for your blog.
Did you follow my guide? Was it easy to understand, or was there something I missed? Do you have any questions for me? Hit me up in the comments!
This is the second of a five-part series about how to start making money blogging. I highly recommend reading them in order, but for your reference, here are links to the five articles in the series:
JoAnne is your average, everyday, sane stay-at-home mom who believes in the power of the internet to make dreams come true. She has an insatiable appetite for chocolate, as well as all things internet marketing. She keeps up with the latest trends in blogging, affiliate marketing, e-commerce, and more.
