(3) comments
Add Your Reply

The number of active bloggers in the United States is estimated to hit 31.7 million by the end of 2020. Holy cow — that’s a lot of blogs. Don’t be discouraged by this overwhelming number though if you want to start a blog. You, too, can kickstart your very own blog by following this guide.
Sure, setting up a blog is easy. All you need to do is follow a few simple website set-up steps and you’re good to go. Anyone can do that! But creating a stable foundation that sets your blog up for success? Now that’s a different story.
Blogging is so much more than just translating your scattered thoughts onto the screen. That’s why this guide answers the most important and fundamental question you need to ask yourself from the get-go: “How can I start a blog that’s set up for success?”


A blog is defined as “a discussion or informational website published on the World Wide Web consisting of discrete, often informal diary-style text entries (posts).” In other words, a blog is an extension of YOU: your passion and daily life. The insight you bring to your blog is what will set it apart from all the others.
Creating a successful blog is in no way simple, but if you follow these steps, rest easy knowing that you’re creating an online business that’s set up for success.
Let’s dive in!

There are plenty of online articles about starting a blog that completely gloss over the niche picking process. Picking a niche can be a challenging process that leaves you wondering, “how do I find a topic to focus on that hasn’t already been published on the internet?”
Yes, coming up with a unique idea is difficult, but here’s a little secret I’ve learned along the way: it isn’t necessary.
Let’s face it. It’s near impossible to come up with a brand new idea, especially with the number of people creating blogs every day. However, don’t forget that YOU are unique. Your voice and personal experiences set your blog apart in the niche you’ve chosen.
Successful blogs have one thing in common: they’re able to solve or answer their audience’s pain points, specific problems that the audience in a particular niche face. More on this later.
With that said, there ARE a handful of niches that will never die known as “evergreen niches.” Examples of evergreen niches are: “Health/ Wellness/ Beauty,” “Make Money Online” (Business Opportunities), and “Relationships & Dating.” These niches are very popular and attract a lot of competition. It’ll be quite difficult to become an authority in any one of these niches because of the number of long-term blogs that already exist for these topics.
Start this process by answering the following questions with 5 to 10 answers each. The more answers for each question, the better.
It’s important to pick a niche that you’re passionate about or have insider knowledge of. Think of an area where you have more knowledge than the general public. You want your blog to be the first thought that pops into people’s minds when they research a certain topic.
If you’re still hungry for more guidance on how to discover your perfect niche, we dive deeper in this no-nonsense guide.
Remember pain points?. Your audience must be willing to make purchases on or from your site to solve their pain points. That’s why it’s important to make sure that the niche you’re targeting has the potential to earn money, and monetization is most commonly achieved through the selling of products.
Niches shouldn’t be too broad nor too narrow. It should land smack dab in the middle. The broader the niche, the more information there is to cover.
“Isn’t a broad niche ideal, though?”
Yes and no. A niche that’s too broad takes much longer to generate consistent traffic to your website.
Conversely, the narrower the niche, the less content you’re going to get out of it.
Generally, the rule of thumb when determining if a niche is too broad or too narrow is to ask yourself, “will I be able to write articles about various keywords surrounding this topic 2-3 times a week for months, if not years?”

There are only two requirements for starting a blog that require startup capital: registering a domain name and securing website hosting. That’s it.
Picking a domain name is not as easy as it sounds. It requires thought and careful consideration and can take several hours (if not days) — and that’s okay. It’s crucial to be sure about the domain name you choose because it cannot be changed once it’s been registered. Well, technically you CAN, but it’s a complicated and costly process.
With that said, how DO you pick a good domain name?
This part requires you to unleash your creative side. Picking the perfect domain name is an imperative step in the success of a blog since it serves as the first impression to the people visiting your website.
To pick the perfect domain name, follow these simple guidelines:
You should have a pretty decent list of domain names for your blog now. If you don’t, I suggest using the following tools to make the process easier: www.leandomainsearch.com and www.namemesh.com. All you have to do is to enter the “idea” for a domain name and voila! You now have thousands of suggestions.
For example, if I’m trying to pursue a niche in electric guitars and can’t come up with a URL, here’s an example of leandomainsearch’s suggestions when I search for “electric guitars.”
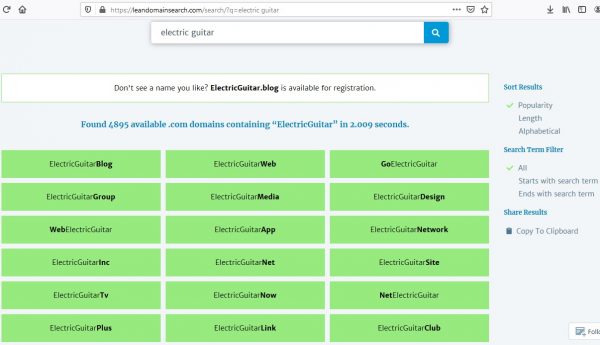
As you can see, there are about 2000 available domains that include the words “electric guitars.” You can do this, too, if you’re having a difficult time coming up with a unique domain name.
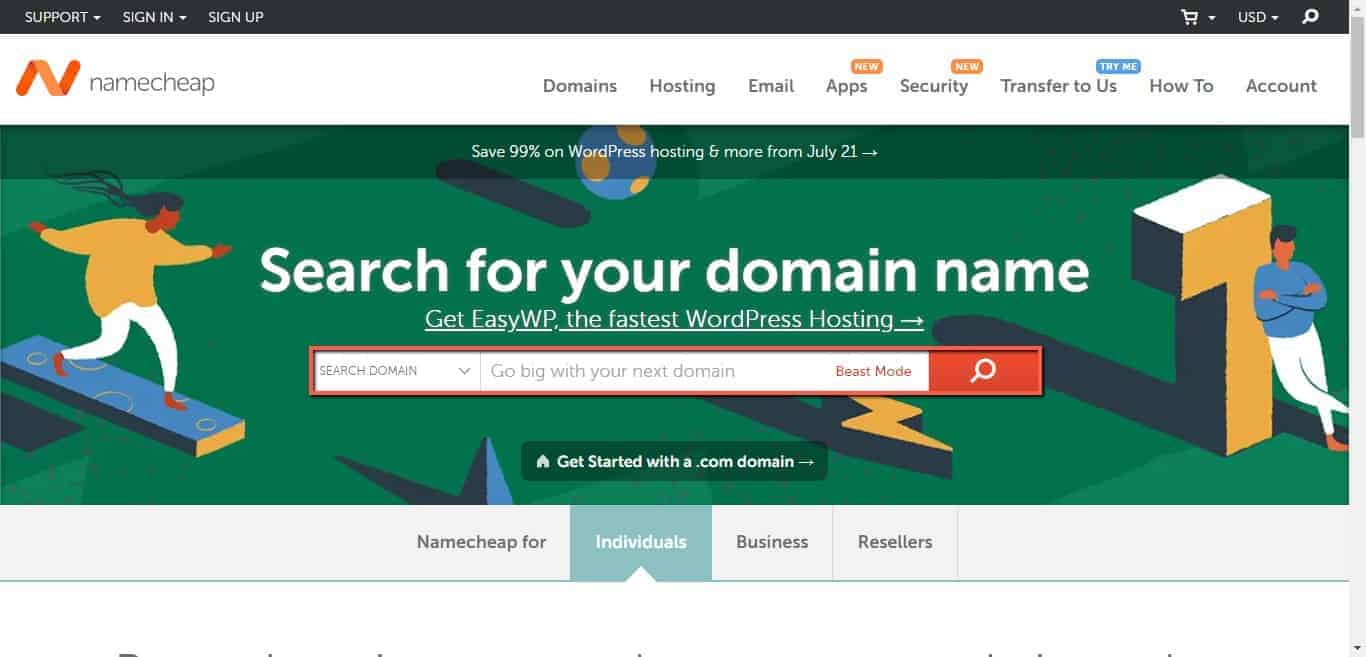
Now that you’ve picked the perfect domain name, it’s time to register it with a domain registrar. There are a lot of domain registrars out there like GoDaddy, Namecheap, and Domain.com, but my go-to is Namecheap because it’s the best value if you plan to blog long-term. Not only is Namecheap transparent with their fees, their prices are fair. The value for what you pay beats out the competition.
You could opt for the easy route and register your domain with a hosting company (more on hosting later), but I don’t recommend it as it’ll end up costing you more in the long run.
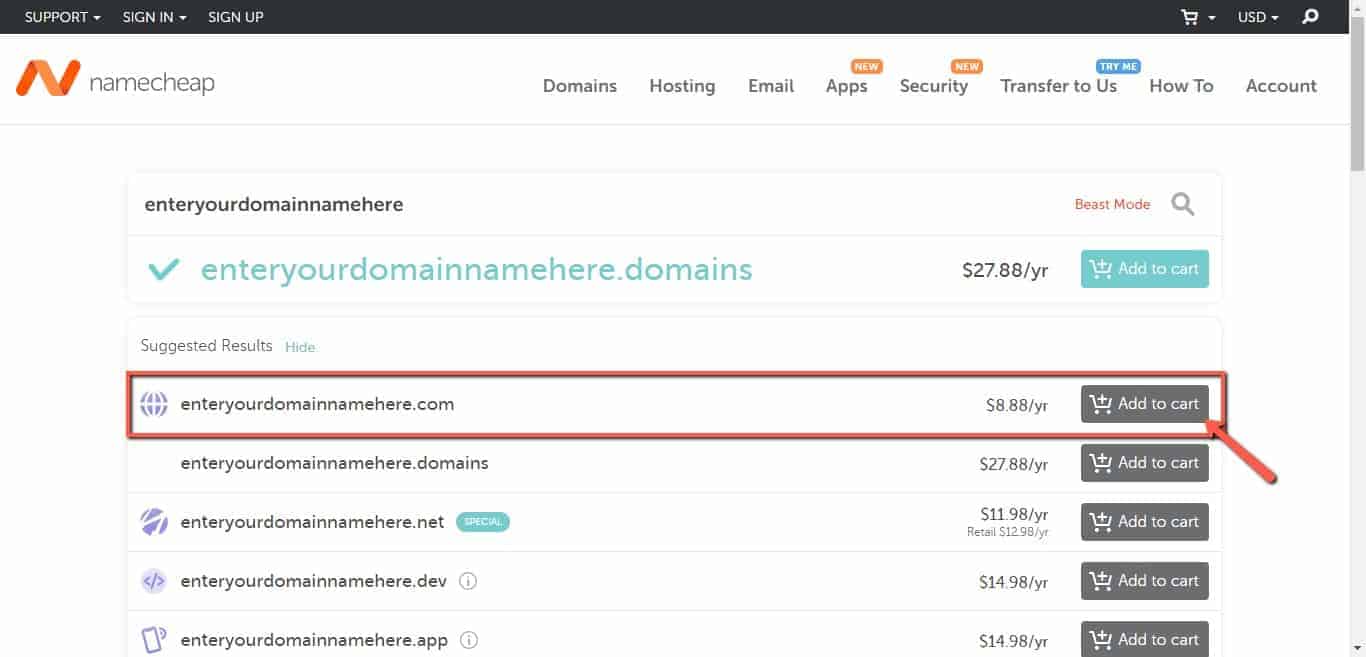
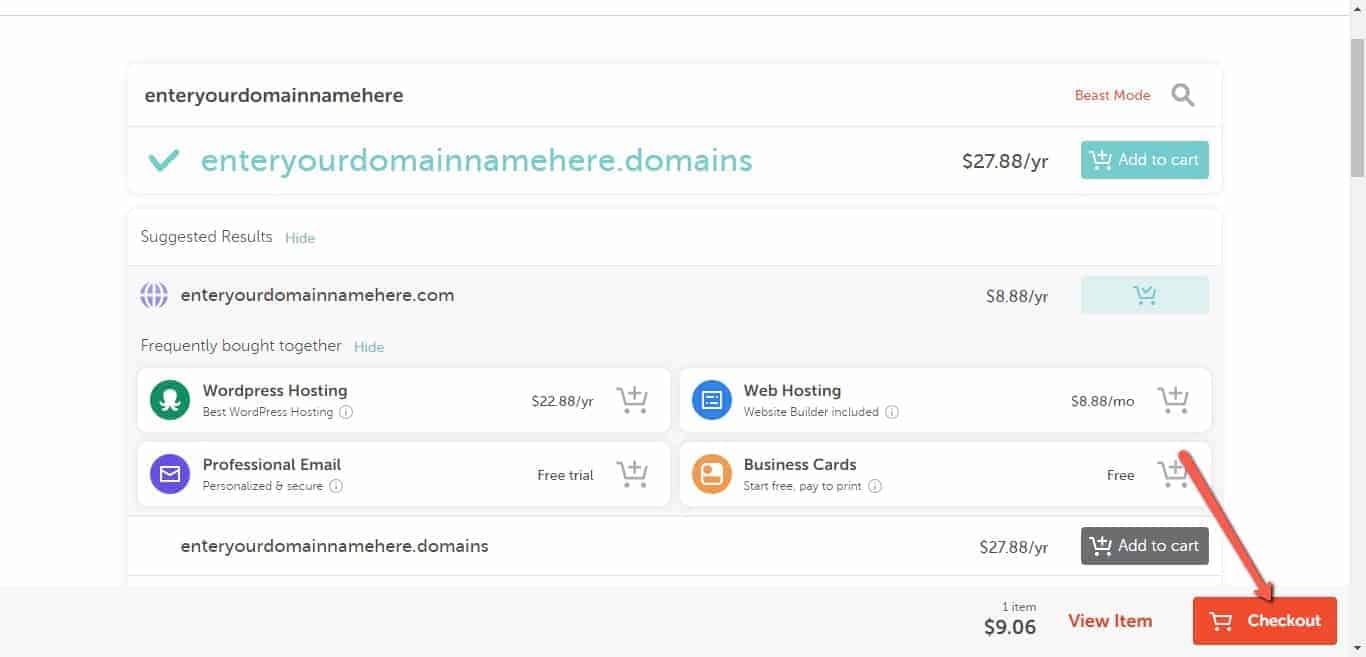
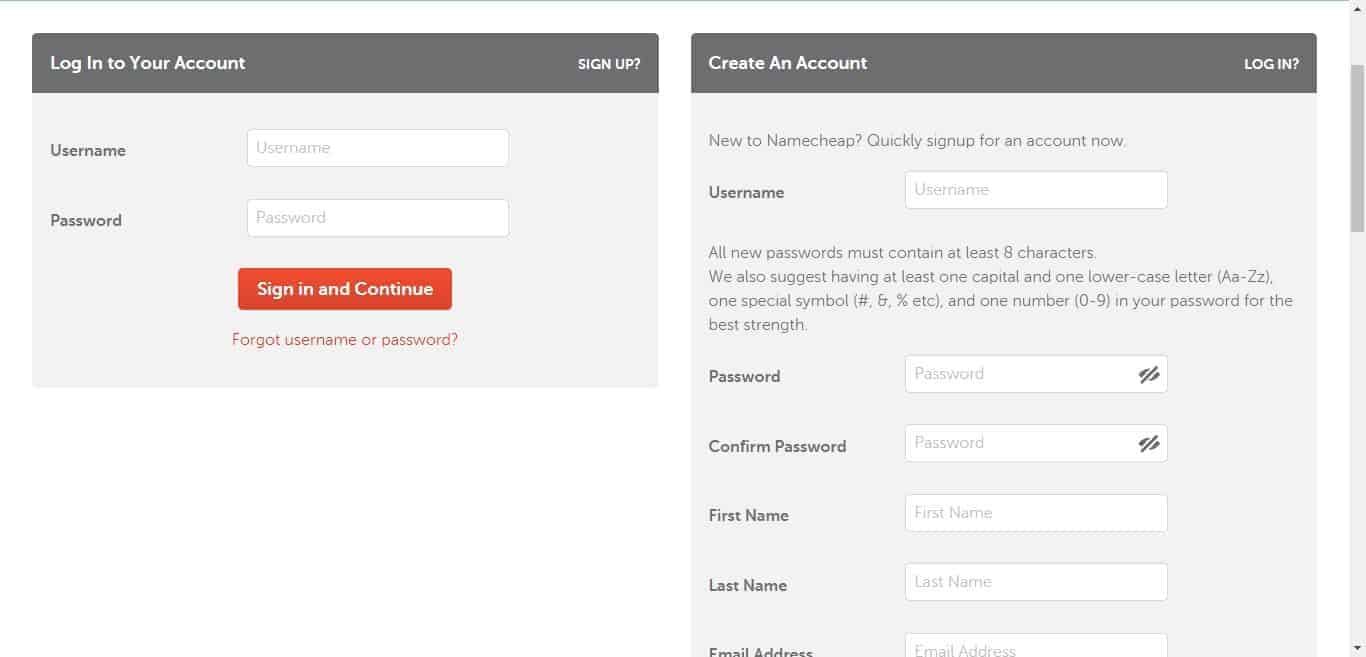
To register your domain name with Namecheap (affiliate link), follow these simple steps:
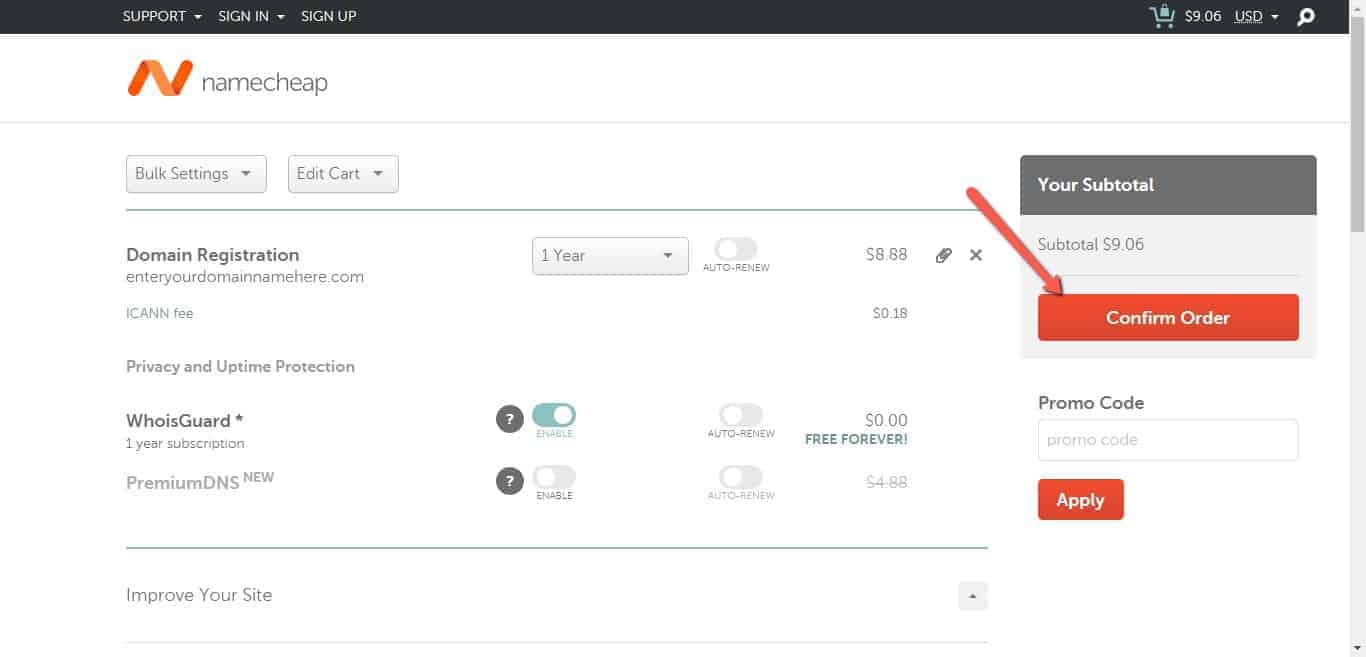
You’re now the proud owner of your own domain! The next step will be to secure hosting for your website.

A web hosting service provider stores the files for your website in a secure server. By doing this, your website is made available to anyone who searches the internet.
Out of all the web hosting service providers out there, nothing comes close to Bluehost (affiliate link). Bluehost is the perfect combination of value, quality, and service for new and intermediate bloggers.
Here’s how to register with Bluehost:
1. Click this (affiliate link) link and then click “Get Started Now.” You’ll be navigated to Bluehost’s pricing plans webpage.
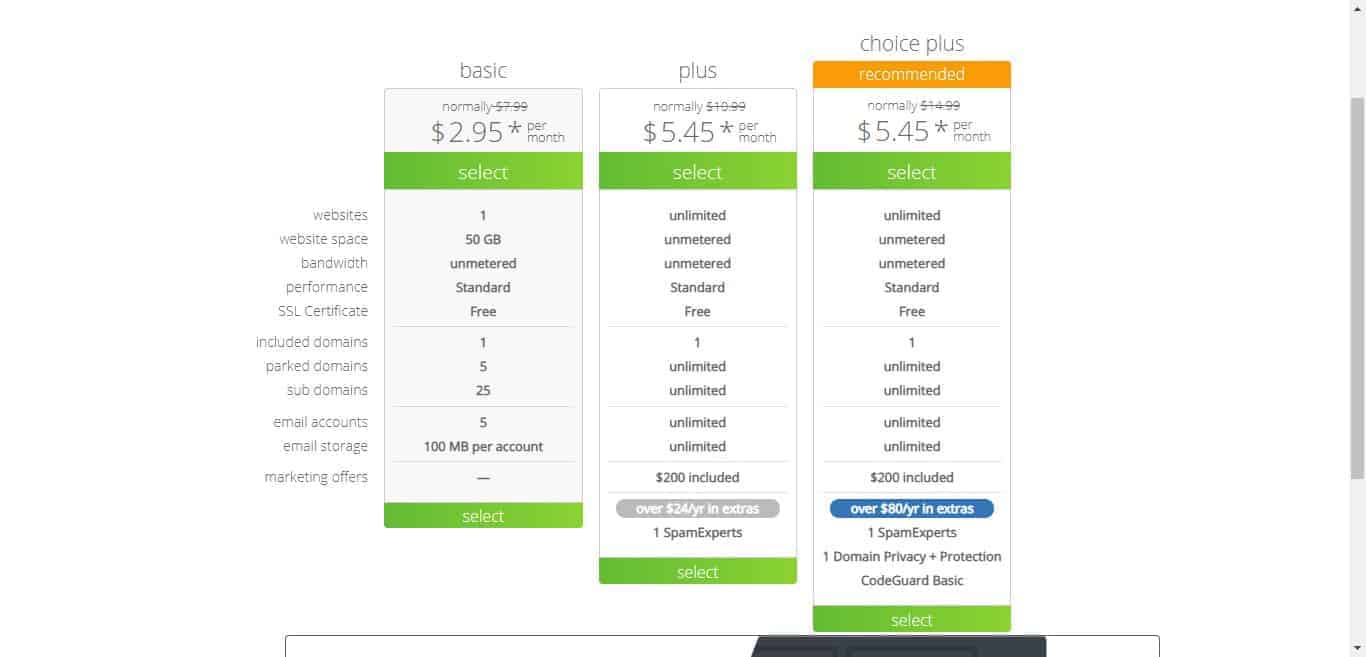
However, if you don’t have that much start-up capital to begin with, the Basic hosting plan is perfectly sufficient.
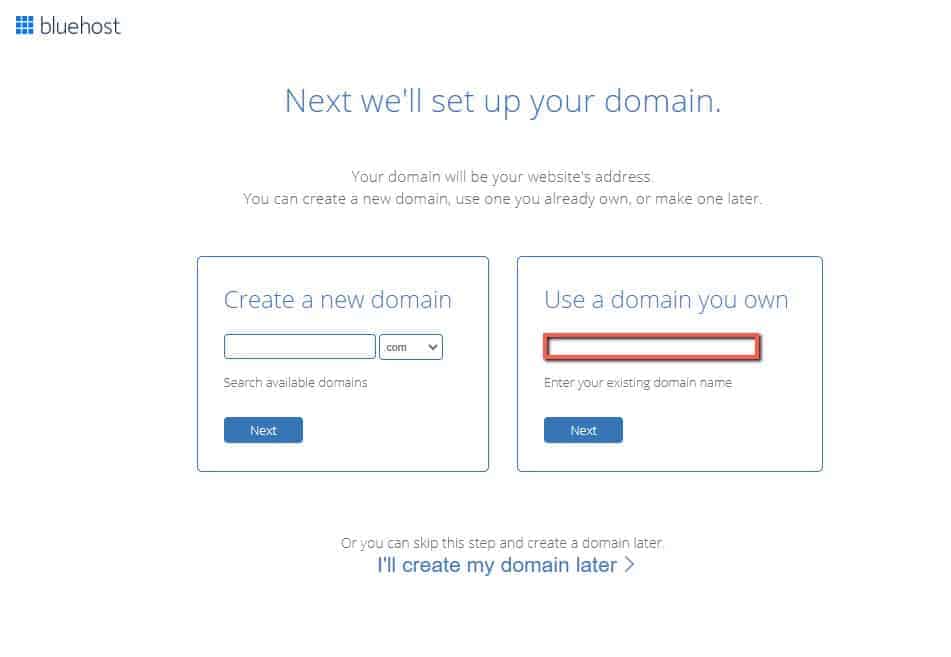
2. Once you’ve selected a plan that best suits your needs, you’ll be routed to a page that requires you to enter your domain name. Assuming you’ve already set up a domain name with Namecheap, enter it under “Use a domain you own.”
3. On the next page, you’ll be prompted to enter the necessary information to create an account. You’ll also see the summary of your fees at the bottom of the page. Make sure to uncheck any upsells before checking out!
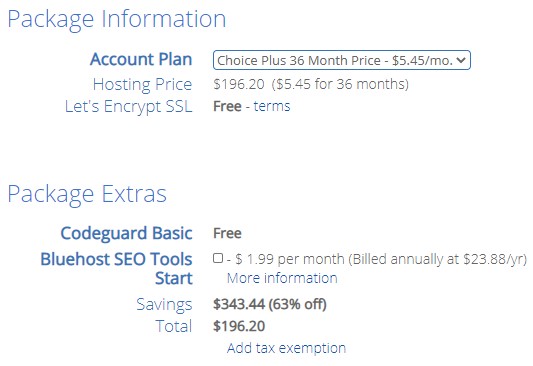
After check out, you’ll immediately receive a payment confirmation in your inbox. There’s a waiting period while Bluehost sets up your hosting; once that’s done, you’ll be sent a supplementary email containing vital information about your website. Print that email and keep it somewhere safe because it contains important information you’ll likely need while you’re with Bluehost.
And that’s it! You’ve just set up hosting with Bluehost. The next thing you’ll need to do is to connect Bluehost to your domain at Namecheap.
This should only be done once, unless you decide to change domain registrars or web hosts during the time you own your blog.
I mentioned earlier that your domain name is your web address and the web hosting provider provides the space for your actual website files to be saved. Your domain and hosting server need to be connected together in order for your website to function. Otherwise, no one will ever see your site!
“How the heck do I do that??”
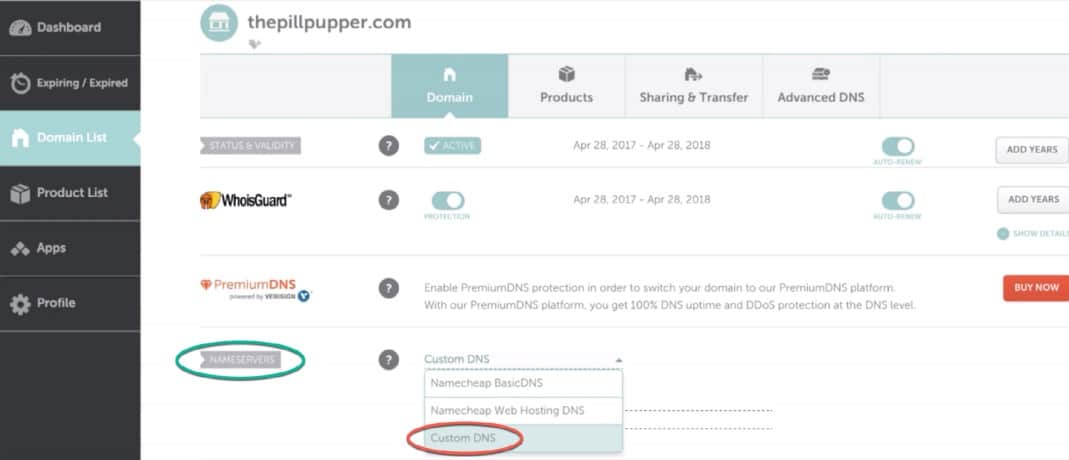
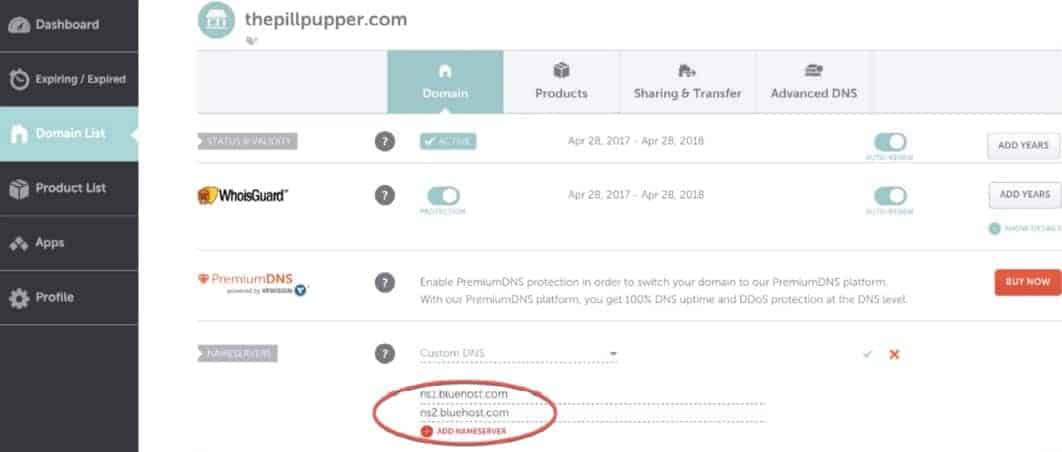
To connect your domain and hosting server you need to update the nameservers in your domain registrar. The nameservers for your domain are already provided by your hosting provider (Bluehost). Updating the nameservers allows Namecheap to point your domain to Bluehost by telling it to connect to your website when someone searches for your domain name.
Although it sounds complicated, this is actually a simple and necessary process that makes your website visible.
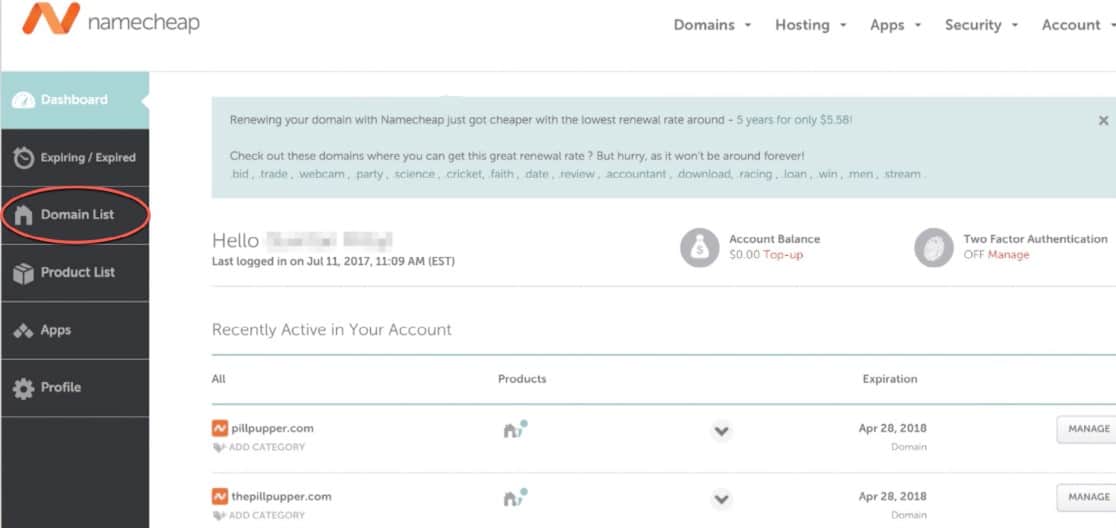
To update your domain’s nameservers:

That’s basically it! All you have to do now is install your blogging software (WordPress) and you’re all set for your first blog post.

WordPress.org is the only blogging platform to concern yourself with, and it’s the only one I recommend.
Why?
Because WordPress.org gives you full control of the steering wheel. The range of customization options for your blog with the themes and plugins WordPress offers are countless, and you have full control over how you choose to monetize it. You won’t have to worry about your blog being suspended or, worse, deleted.
Plus, there are 455,000,000 websites using WordPress right now. This community of support and knowledge has proven to be a great resource for any problem you might encounter with the platform, providing a seemingly endless menu of solutions.
Still not convinced? This post may change your mind.
If you purchased hosting from Bluehost, installing WordPress will only take 5 minutes:
Once WordPress is installed, you’ll be redirected to the home page.
The next thing to do is start designing your blog using one of WordPress’ limitless themes. I don’t teach a step-by-step process on how to design a blog because that’s entirely up to you.
However, since you’re just getting started, it’s important to not go overboard. Here are some important techniques and tips to keep in mind as you design your blog:
Now that your blog is set up, it’s time to start writing content.
But wait!
Don’t just start writing and publishing everything that comes to mind. There’s a lot that goes into choosing what to write about to effectively drive traffic to your site.

A keyword is a word or phrase used in search engines by a person who is seeking information. To eliminate any confusion, I’ll refer to both “search words” and “phrases” as keywords from now on.
The two biggest mistakes people make when starting a blog are: writing whatever comes to mind (instead of specializing and building authority in the chosen niche) and not doing keyword research.
Keyword research will make or break your entire business.

I know that sounds dramatic, but everything that relates to your blog business, including content creation and content marketing, is dependent on SEO (more on that later). Thus, the importance of keyword research.
To drive traffic to your site, it’s crucial to know what keywords are being used when a certain topic is being searched.
Keyword research will serve as a guide to ensure that your content reaches your target audience. It’s just as important as niche selection, but much more data-driven and analytical. It’s more of a science than an art.
You might think that keywords with high search volume are the way to go, but they’re not. These keywords are unquestionably dominated by high-authority sites, which makes it impossible for a new blog to rank for in the Search Engine Results Pages (SERPs).
Surprised? Hear me out.
Everyone needs to start somewhere, and you need to start small. Instead of trying to rank for high search volume keywords that you have no chance of ranking for, build up from the scraps that established sites are leaving behind. Target keywords with 30, 100, and 500 searches a month.
Your website’s authority will slowly build on those little scraps over time and will be able to compete with high-authority sites in about 8 to 12 months. But it’s possible to start gaining traction earlier, even with lower search volume keywords.
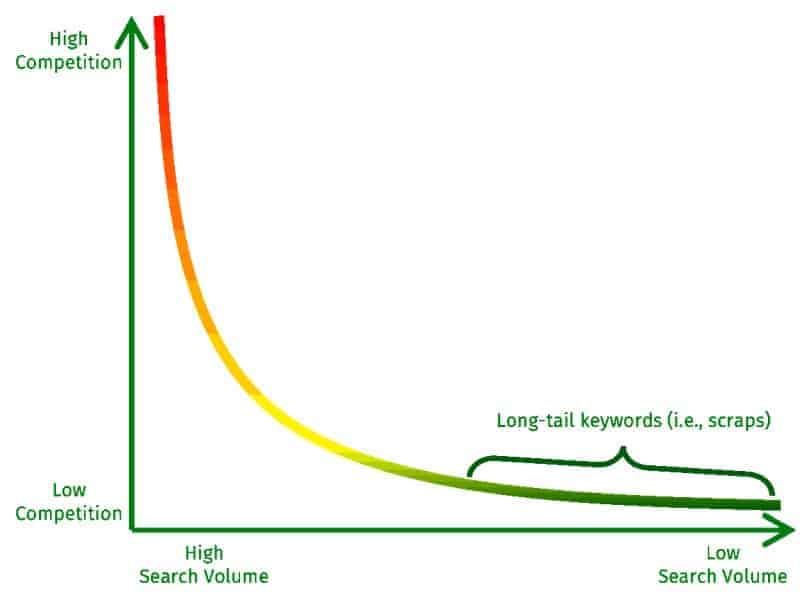
As long as you keep pumping out high-quality content targeting low search volume keywords, you’re setting yourself up for success.
This section will focus on the best free keyword research tool out there: Google Keyword Planner. Although other free keyword research tools like UberSuggest and keyword.io are available, nothing comes close to the level of accuracy that Google Keyword Planner provides. After all, what else are you going to trust over the leading search engine itself?
Don’t let anyone make you think that you NEED a premium keyword tool to research quality keywords. However, if you’d like to keep things simple, a premium keyword tool might work for you.
There are only two disadvantages to using a free keyword tool: they do not provide much data on competition and data you DO get requires manual interpretation. That sounds more intimidating than it is, though, especially with additional free tools at your disposal.
To supplement Google Keyword Planner’s lack of information about competition, I HIGHLY recommend installing MozBar (a Chrome extension). This extension will provide you with all the data you need regarding competition, and. I’ll show you how to interpret that data later in this article.
The following is an overview of how to use free keyword tools. If you’re looking for other ways to jumpstart your keyword research process, take a look at this article: How to Do Keyword Research for Blog Posts in 6 Simple Steps.
Google Keyword Planner was primarily created to search keywords for Google Ads, but a lot of bloggers have been using the tool to conduct keyword research for their blog posts.
Setting up a Google Ads account will make it easier to access the keyword planner and keep track of your research.
While setting up an account, you’ll be prompted to answer questions about your business. Be careful not to launch an ads campaign or enter any billing information. Otherwise, you’ll have to actually buy ads from Google.
Once the initial setup is complete, you’ll be navigated to this page. Click on the Tools and Settings” tab located at the upper right-hand corner of the screen. This is where you’ll find the keyword planner, within the “Planning” column.
Click the “Discover new keywords” tab and enter your desired keyword.
Expand on a seed keyword or root word to find longer keywords (known as long-tail keywords) related to your product or service.
I’m going to search for “semi-hollow body guitars” as an example. Notice that I’m using the long-tail keyword “semi-hollow body guitars” as opposed to the seed keyword “guitars.” This will generate a more diverse search result tailored to my specific niche.
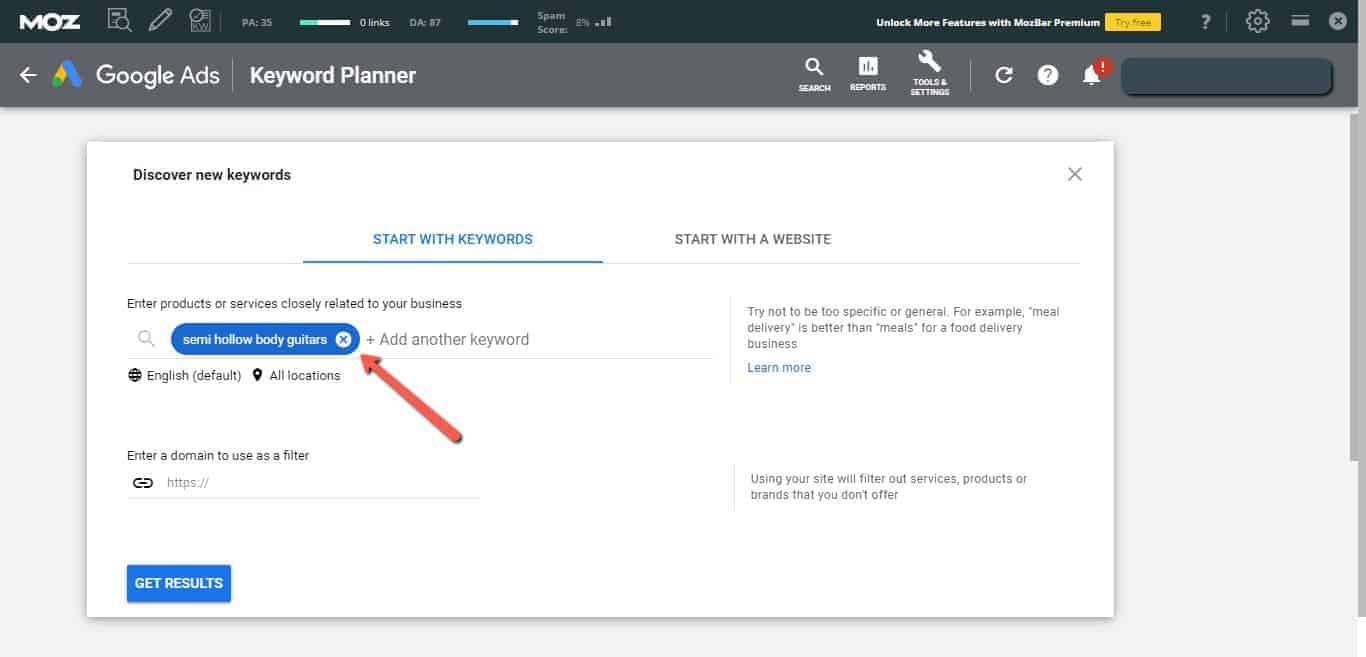
Take note that you can change the target location of your searches. You can target specific states or cities, but since you’re just getting started, that won’t be necessary yet. To target all locations, simply remove the current location.
Keyword search results can be found on the left-hand side of the column sorted by relevance. The only column that’s important to look at here is the “Avg. monthly searches” column. You can disregard the other columns for now.
Let’s take a look at the top result of my search for the keyword “semi hollow body guitar.” This keyword would be great to rank for because it only has an average monthly search rate of 1k-10k. However, it’s hopeless to aim for the top keyword of your search results as it’ll take years before it’ll be able to slide into the first page of SERPs.
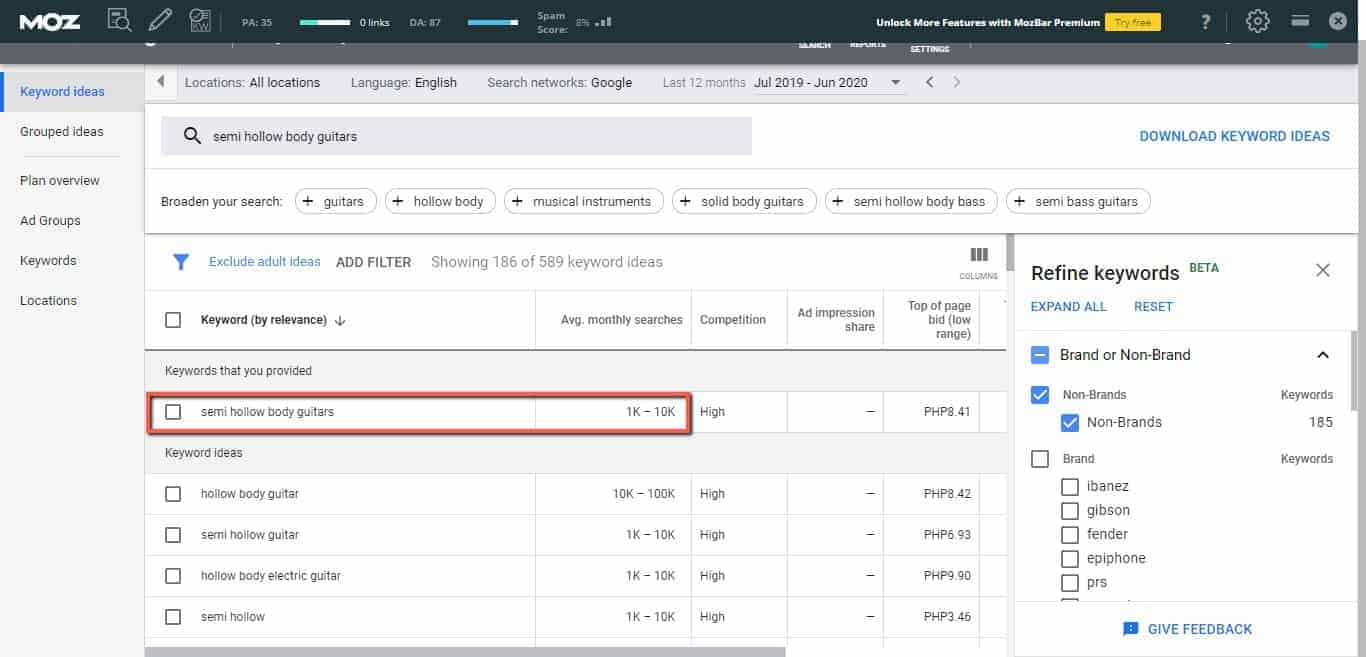
Since the keywords to try and target are the ones with low search volumes, you’ll want to see those at the top. Click the “Avg. monthly searches” tab to toggle between ascending and descending order.
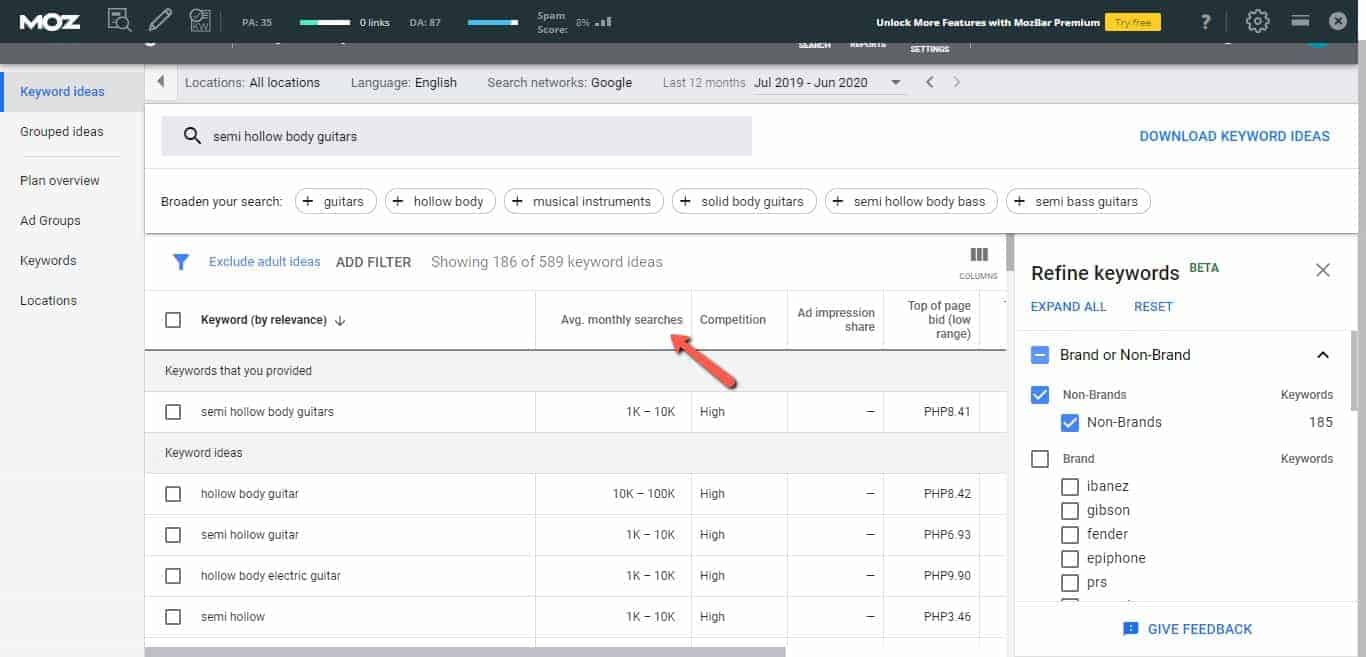
It’s worth noting that Google Keyword Planner now has a “Refine keywords” section (that was still in beta at the time of this publication). If your keyword involves products, you may notice that there are a lot of search results associated with brands or shops. The “Refine keywords” function allows you to hide those particular results by clicking on the “Brand or Non-Brand” tab, unchecking the “Brands” category, and leaving the “Non-Brand” category checked.
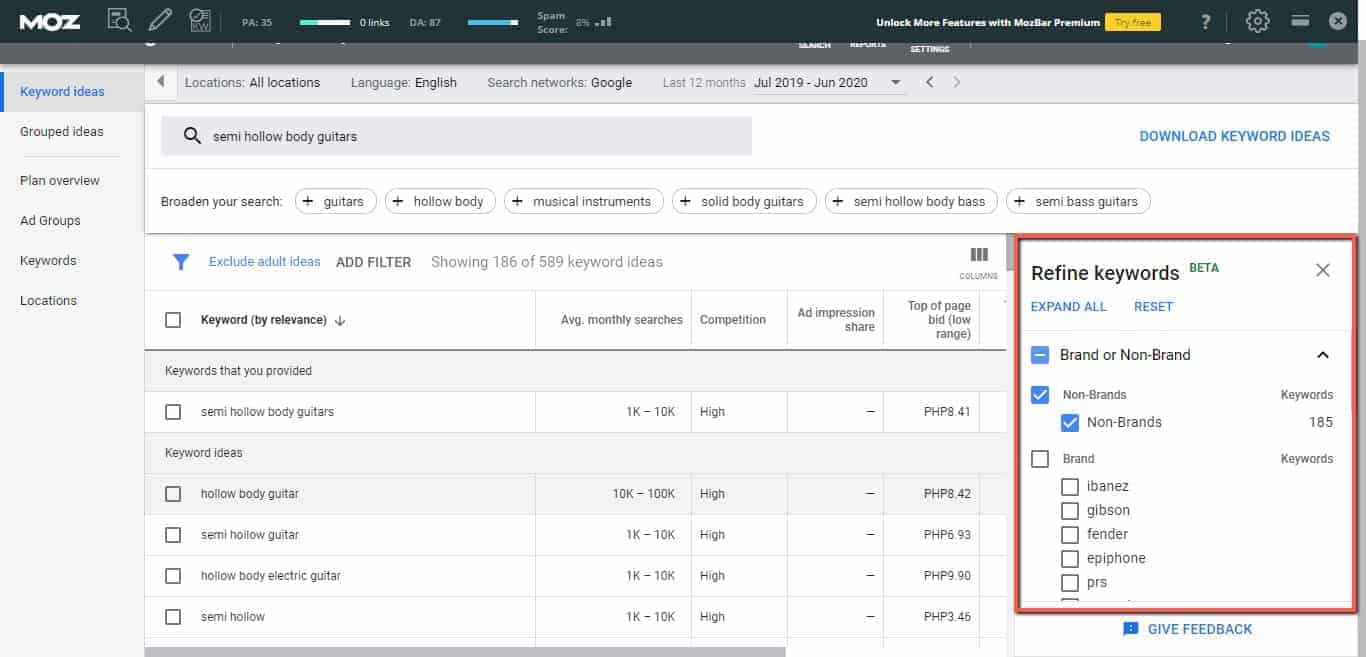
Take note of the keywords that range from 10-100 and 100-1000 searches a month. You want to avoid keywords that have an average monthly search of more than a thousand because, like I said before, it’ll be close to impossible to rank for those.
Remember MozBar? This is when it comes in handy. But first – here are some important MozBar metrics to understand before moving any further.
Page Authority (PA) – a score that determines how well a web page will rank on SERPs. Scores can reach up to 100, but for a keyword to qualify as “low competition,” the PA score must be 10 or below.
Unfortunately, it may be difficult to find pages with a PA score of 10 as the average PA score of most of the pages in Google lands between 15 and 25. Keep in mind that these pages typically have weaknesses that leave them vulnerable, opening the window for you to take their place.
Domain Authority (DA) – DA also determines how a web page will rank on SERPs. Similar to PA scores, the higher the score, the greater ability to rank. The main difference is that PA refers to an individual webpage, while DA refers to the entire domain.
It’s important to note that before using Google to search for competition, make sure that the search profile is set to “Google US (non-personalized).” Non-personalized search ensures that your search results won’t be influenced by your location and past search results.
![]()
Now that you understand the difference between PA and DA, let’s examine the search results for the long-tail keyword “best semi hollow body guitars under $2000.”

Although there are no results that have a PA of less than 10, one result does have a PA of 24. Remember when I discussed weaknesses that can be exploited on pages ranked on the first page of Google?
The key is to check if the page is optimized for the specific keyword you want to target. This can be done by checking if the title tag, URL, and meta description contain the EXACT keyword. If they don’t, then it’s game on.
It’ll be up to your judgment what keywords you ultimately choose to target for your blog posts. A good practice is to create a list of all of the viable keywords available (after checking for competition, of course) to make sure that you’ll never run out of topics to write about.
Remember that keyword research is useless if it’s not paired with high-quality content. Google WILL penalize your site if you regularly plug in keywords that are not even contextually related. Moreover, readers WILL notice and be put-off if you’re abusing this strategy.
Keyword research is a tool to deliver better content and provide more value to your readers. After all, providing value for your readers should be the main objective of your blog.

Having insight, experience, or vast knowledge regarding a topic will significantly improve the quality of your content. The value YOU provide to your readers will be unique and irreplaceable.
Here are the general guidelines to ensure your content is top-notch.
A great headline piques curiosity and invites readers to read the first sentence of the article. First impressions are everything, especially now when people are flooded with content.
Before you write a headline, ask yourself these three questions:
These questions will give you a better grasp on how to formulate a headline. It’s basically a “Who, What, Why?” format that puts you in your target audience’s shoes and gives a different perspective to help you understand their wants and needs.
Great headlines have these common characteristics:
A common mistake people make when creating content for a blog post is to write everything there is to write about a broad topic. The result?
A piece of content that’s too watered down to add real value.
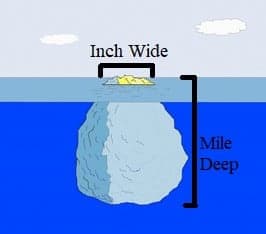 The best approach to writing high-quality content is the “Inch Wide, Mile Deep” approach. In other words, when you create a blog post, focus on a particular segment within a broad topic (inch wide) and flesh out specific questions or pain points for that one idea (mile deep).
Think about high school and college essays. A topic is given and the essay must contain a title, an introduction, a body (with at least three main points), and a conclusion. Following this pattern helps us to not get too out of touch with the subject at hand. Create multiple headings and subheadings to dive deeper into detail about the subject as well.
The research process differs from person to person. Everyone learns differently, and everybody eventually finds their groove. Conducting research for an entire blog post is very different and more complex than conducting keyword research.
Allocate time. Sit down and read, read, read. A factual and credible article is very important. There are a lot of blog posts that mislead people by sharing unverified, invalid, and non-factual information just to generate clicks.
A blog post with factual claims backed by credible sources is the one that will flourish.
Always remember that high-quality and credible content builds trust with your readers because it builds your authority in your niche. Nothing is worse than getting baited into an article only to find that the content is crap and gravely inaccurate.
A study by The Wharton School of the University of Pennsylvania found that longer content is 76.8% more likely to go viral.
There are many blogs that regularly publish 400 to 500-word articles or posts. However, these pieces of content have very little user engagement and social sharing because the content being shared provides no value to the audience and barely scratches the surface of a topic.
A great way to establish authority over a niche is by creating 5,000 to 10,000-word posts. However, if you’re just starting out, don’t spend multiple days composing huge pieces of content. Instead, your focus should be on publishing frequently, around 2 to 3 articles a week.
The ideal length of high-quality posts is 1,200 to 1,500 words. Although, if you’re a skilled writer, you could push it up to 2,000 words as the average word count of a top 10 result in Google is over 2,000 words.
The ideal frequency of posting high-quality content (i.e., content that has been well-researched and well-written) is 2 to 3 times a week..
If you find publishing 2 to 3 articles a week difficult, that’s okay. It’s better to publish a single high-quality article in a week than to publish multiple low-quality articles in the same time frame.
A well-written article will benefit you more in the long run than multiple subpar articles.
It’s important to ensure that the format of your content is visually pleasing. Readers tend to be put-off if a post is difficult to read and poorly formatted. Here are a few tips on how to write using the correct format:
Now that you’re equipped with the knowledge of how to write high-quality content, how will you reel readers into your site? In other words, how will you be noticed?
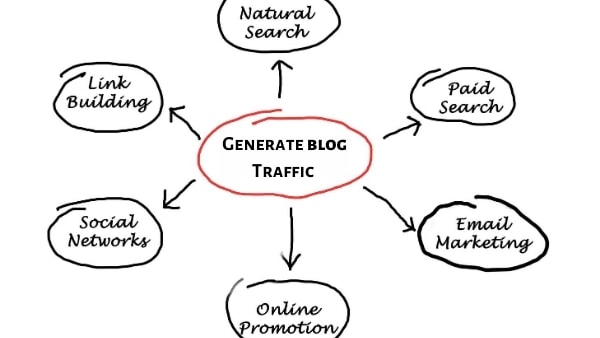
While there are many ways to drive traffic to your site, this section will discuss the three most popular methods: Pay Per Click, SEO, and Social Media. Each method has its own strengths and weaknesses, so it’s best to specialize in and focus on one or two of these methods.
Every site needs a foundation of at least 7 to 10 pieces of high-quality content before promotion. If you haven’t reached this point, it’s better to focus on writing and publishing more high-quality articles to ensure that the traffic generated from promotion won’t be wasted.
Pay Per Click is an advertising model that’s used to drive traffic to websites. What sets PPC apart from organic traffic generation is that it involves YOU, the website owner, paying the advertising company to promote your website.
You’re no stranger to this promotional method. Have you ever noticed how the pages that appear at the top of your search results are tagged as ads? When you click on one of those pages, the website publisher pays the advertising company for your click. That’s how PPC works.
When it comes to PPC advertising, Google Ads is the top choice. Afterall, it IS the most popular search engine. Setting up a campaign with Google Ads enables you to create ads that appear on Google’s search engine and other Google properties.
There’s a lot of work involved with PPC advertising. Every time a search is conducted, Google dives into a pool of “Ads” advertisers (people using Google Ads) and chooses a set of “winners” to appear in the ad space on the results page.
Winners are selected based on several factors: keyword relevance, landing page quality, quality score, and creativity.
PPC isn’t for everyone, and it’s definitely not ideal for someone who’s just getting started with a blog business. I recommend PPC for people with established and successful blogs, and for companies that have a large advertising budget.
PPC requires thousands of dollars to start, and there’s no guarantee it’ll work. Generating qualified traffic through PPC takes money, time, effort, research, organization (think spreadsheets), and analyzing and crunching numbers.
It’s no stroll in the park.
Search Engine Optimization is the process of generating traffic from the “free,” “organic,” “editorial” or “natural” search results on search engines. It may sound daunting and complicated, but SEO is essential for your site to start appearing in the Search Engine Results Page (SERPs). We’ll be mainly focusing on Google since it’s the most popular search engine available.
There are two categories of SEO: on-page SEO and off-page SEO. On-page SEO focuses on improving the parts of your website that are within your control, such as content, while off-page SEO can be described as what you do outside of your website (read more about off-page SEO here).
Since you’ve just started laying the foundation for your blog, you’ll only have to concern yourself with on-page SEO.
Google’s Gary Illyes urged people to stick to the basics of SEO and that’s exactly what we’ll be focusing on — the basics. The next few sections will teach you the importance of optimizing your blog for on-page SEO.
Everyone should practice on-page SEO for every piece of content added to their site. It’s the only method that’s free AND guarantees results.
Earlier, I discussed how important keyword research is and how to do it because a well-picked keyword ensures the success of your on-page SEO, and you’re about to see exactly how.
Optimizing the title tag of a post helps users and Google determine if your website is relevant to a query since the title tag is the first thing people see when looking at the SERPs. It’s even considered to be the most important on-page SEO factor.
To optimize a title tag for SEO, it’s good practice to place the target keyword at the beginning of the title tag (when it feels natural, of course).
All you need to do to optimize a URL for SEO is to create a short URL with the target keyword included. Although it’s recommended to keep the URL as short as possible, it’s fine to add 2 or 3 words if it makes the URL feel more natural.
The meta description is that little box of text that briefly describes a page and acts as a preview in the SERPs.
A well-written meta description will help Google and users determine if your post is relevant to their keyword query. Since Google places the terms that match a keyword in boldface, it’s important to include the target keyword in the meta description.
A good meta description boosts your organic Click-Through-Rate, leading to more traffic.
The H1 heading should contain the title of the actual blog post. Not to be confused with the title tag (the one that appears in the SERPs), the H1 heading is the first thing people see when they click your link and are redirected to your blog post or website.
For organizational purposes and to prevent confusion, it’s crucial to only have a single H1 heading.
Using H1 headings helps Google understand what your blog post is all about. Thus, the importance of including your target keyword in the H1 heading. WordPress actually sets your H1 heading from your title tag automatically.
If, for some reason, you’re still not using WordPress — why?
The remaining heading tags (H2-H6) don’t bear much weight when it comes to SEO, but it doesn’t hurt to naturally include your keyword once in these heading tags (preferably H2).
Remember – don’t force a keyword to work if the result is a grammatical mess.
It’s ideal to include your keyword as often as possible throughout your blog post, preferably within the first 100 words.
This doesn’t mean that you should stuff your blog post with keywords. Not only is this greatly frowned upon, Google penalizes such practices by dropping the rankings for your page, or worse, for your entire website. This leads to a significant drop in organic traffic.
Moreover, a blog post littered with keywords doesn’t provide value to your readers and even moves traffic away from your site because it doesn’t seem natural.
If you’re publishing high-quality content around a target keyword, Google’s algorithm is advanced enough that you’ll still manage to rank in the SERPs even with the synonyms of the target keyword being used.
External link building is the practice of linking blog posts to content outside of your website. Ideally, you’ll want to link to an authority site because it gives Google the confidence that your content has quality information. Internal link building also builds your credibility with the target audience.
Since your website is new, you won’t have an opportunity to do internal link building just yet. Internal link building can be done once there are enough blog posts published on your site to be able to link anything that is related to each other.
One of the most important things to remember when building your first blog business is that even when you do everything right, the results are rarely instant.
The duration it takes to rank in SERPs may vary depending on the niche and the competition.
There are 3.5 billion social media users worldwide. That equates to 45% of the population as of 2019. It’s obvious how social media has had a significant impact on the way people are able to connect around the world, so it carries a lot of potential to drive traffic to your website.
However, I consider this method to be niche-specific because niches that thrive on engagement through shares, likes, and comments work well with social media (such as fashion, beauty, or supplements).
Influencer marketing is another avenue to promote your blog as it’s the dominant method of online customer acquisition, specifically for social media.
Keep in mind that every social media platform has its own strengths and weaknesses. It’s important to choose the correct platform that complements your content well.
There are several other methods to drive traffic to your site that include guest blogging and guest interviews on television and podcasts. However, the chances of someone just starting out to land these opportunities are minimal.
Your expertise can only be leveraged for these opportunities when you become an established authority in your niche.
But there are other ways to promote your blog that don’t require your site to be an established authority.
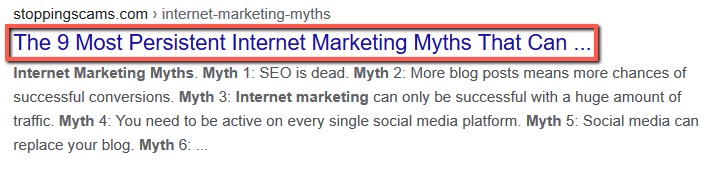
Check out this article on StoppingScams.com that discusses 60 ways to promote your blog that goes so much more in-depth than this article. I highly recommend bookmarking this post and taking the time to read through the article if you’re still looking to scratch that blog promotion itch.
Remember though, you don’t need to follow all of the strategies outlined. Pick 1 or 2 to specialize in and then consider other strategies later on.

The most frequent question I get asked is: “How do I start making money with my blog?”
I hate to be the bearer of bad news, but generating only a handful of traffic makes monetizing a blog extremely difficult. You should focus on monetizing your blog when you’re consistently getting 75-100 visitors a day.
With that said, as long as you set up your blog following a business model, you’ll be ready to generate income when traffic does start flowing. There are four main types of online business models that will guarantee your blog’s success:
Every type of business model has its own strengths in monetization. There will be methods that may work on one business model, but completely fail on another. That’s why it’s crucial to recognize what type of business model your blog will follow.
All of these business models generally follows an equation on how to predict revenue:
X (goal amount to earn per month) = Y (number of customers) x Z ($ per customer
To earn X amount of dollars per month, you’ll need Y number of customers multiplied by Z dollars per customer.
Regardless of which model you choose to follow, here’s a quick overview of how each business model works.
One way to monetize a content-based business model is through advertising.
Google AdSense is the most popular choice when it comes to monetizing your site through advertisements. One option to make money from Google Adsense is the Cost per Click (CPC) model — you get paid any time a visitor clicks on a Google ad on your site.
If you’re aiming to earn $5,000 a month (X), you’ll need 5,000 (Y) visitors to click the ad on your website if the payout is $1 (Z) per click. Following the equation:
$5,000 (X) = 5,000 visitors (Y) x $1 per click (Z)
However, not everybody who visits your website is going to click on an ad. Here’s where Click-Through Rate (CTR) comes into play. CTR is the percentage of visitors who click on an ad divided by the total number of visitors on your site.
Given a CTR of 1% (the common rate for an average website), if you’re aiming to make $5,000 a month, you’d need a total of 500,000 visitors to get 5,000 visitors to click on the ad on your website if the payout is $1 per click.
As you can see, monetization through ads isn’t really ideal for someone who’s just starting out and has little traffic.
Cost per Lead (CPL) is a model that pays you when a user signs up or takes interest in another company’s product advertised on your site. Think of it as a commission-based earning from every lead you generate for that company. This model tends to pay better than the CPC model.
The Cost per Action/Acquisition (CPA) model is what I recommend for someone who’s just starting out. You get paid by the advertiser every time a visitor takes a specific action from your site, such as signing up for a newsletter, subscribing to another website, or signing up for a free trial.
Netflix is a company that practices the CPA model. When a visitor signs up for a free trial with Netflix from a website that advertises the service, Netflix pays the website owner a commission. If the payout were $10 (Z) per sign up, you’d need 500 (Y) visitors to sign up through your website to earn $5,000 (X). Following the equation:
$5,000 (X) = 500 sign ups (Y) x $10 per sign up (Z)
Given a CTR of 1%, you’d need a total of 50,000 visitors to earn 500 sign ups. Although that’s still a lot of visitors, it’s WAY more achievable than driving 500,000 visitors to your site.
Potential products you could create on your own are: books, digital courses, and other products depending on your niche.
However, as you’re just starting out, it’ll be really difficult to follow this method since it requires a lot of time and effort to execute correctly. Plus, you still need to gain the trust of your audience for them to want to purchase anything from you.
An alternative option to consider is selling another company’s products instead of your own. Assuming you earn a 50% commission from a $200 product you sell, you’d yield a $100 profit for every product sold. Following the equation:
$5,000 (X) = 50 products (Y) x $100 per product (Z)
If you’re aiming to earn $5,000 (X), you’ll need to sell 50 (Y) products if you earn $100 (Z) per product sold. However, the CTR (conversion rate) still applies. If we assume a 1% conversion rate, you’ll need to drive 5,000 visitors to your site if you need 50 visitors to buy the product. Again, 5,000 visitors is a much more feasible number than 500,000.
Providing a service is a common way to monetize a blog. Once you’ve generated enough traffic and published multiple high-quality posts, people will begin to trust you as an authority in the niche you’ve chosen.
A common service to offer is coaching. This is a great way to earn money if you have the correct motivational skillset, especially since it requires no overhead costs and demands only your time. However, it’s in no way an easy task. Clients can be unpredictable and you never know who you’ll be dealing with. Like some of the other business models, this path isn’t for everyone.
A friendlier service for newbies to offer is a writing service. Freelance writing has become a very popular method to earn money and is advantageous, especially if you have specific skills and expertise. Brands today are desperately looking for bloggers with relevant expertise.
There are two different ways you could set up a blog as an e-commerce business selling physical products:
Let’s say you’re aiming to earn $5,000 (X) a month from selling a product. You’d need to sell 500 (Y) products if you earn a profit of $10 (Z) per product sold. Following the equation:
$5,000 (X) = 500 products (Y) x $10 profit per product (Z)
A conversion rate (CTR) of 1% still applies when selling a product online. Again, not everyone who’s going to visit your site will buy a product. If we apply a conversion rate of 1% to the equation, you’d need to generate 5000 visitors to your site for 500 people to buy a product. Gaining 500 visitors is WAY more doable than gaining 500,000 visitors.

Monetization shouldn’t be your main driving factor in blogging. If you have this kind of mindset, you’ll be putting out crappy content and be considered a “sellout” — people hate that. Don’t lose sight of the bigger picture where your goal is to provide value to your readers.
The readers should always be prioritized before anything else. This mindset is what’s going to set your blog up for success.
You might be wondering why there were no specific mentions of paying for landing page builders or premium email marketing softwares. Don’t get me wrong – they ARE important. However, they are only required once you’re generating consistent traffic to your blog to help with conversion optimization and to facilitate relationships.
Anyone who claims that you NEED to purchase landing page software or email marketing software services are probably trying to land a commission out of you. You’ll end up paying for those softwares over months or possibly years, all for someone else’s personal gain.
You now have everything you need to start your own blog. Remember – your main goal is to provide value to your readers.
Blogging may seem easy for people doing it as a hobby, but if you want to generate an income from an online blog business, then it will take some serious dedication. It all boils down to:
Don’t give up. If you’re months or even years into this journey and you’re still not seeing any results, go back to the basics. Review your posts and see if there’s something you missed.
Results are never instant.
Success in the blog industry demands months of consistency, grit, and determination. The first few months may seem bleak, but depending on your niche, you may see some form of part-time income within the first year. If you do everything right consistently and diligently, you’ll eventually approach a tipping point where traffic and money starts flowing within 18-24 months.
You’ll get there.
Do you feel like there’s still something missing before you can start your blog? Do you need clarification about anything? Or are you a seasoned blogger who wants to add some tips and tricks? Let me know in the comments below!
I've been in internet marketing for over 10 years, and I've purchased dozens of illegitimate products for the sole purpose of evaluating them and exposing the truth about these products to anyone who's thinking about purchasing it. I never let money influence my rating of a product and your success/safety is my absolute highest priority. Don't want to buy a product? Register for one of my 100% free internet marketing training courses>>
