Menu

Been reading monthly income reports for the highest-earning bloggers? Do you find yourself wanting to start blogging, too? Well, there’s no better time to start a blog than now. After all, you won’t go anywhere if you never get your foot in the door. For this article, I will show how to start a blog with Bluehost in 6 actionable steps.
Since you’re here, you probably already know that the two main requirements to start a blog are securing hosting and registering a domain name. And you’re probably considering Bluehost as your hosting provider — good choice!
“Why Bluehost?”
Well, let me give you a brief overview of Bluehost. Bluehost was one of the most reputable and reliable hosting companies for a long time — until the ownership changed. The great support system they were known for basically deteriorated overnight and became incompetent.
After a few months like this, the new owners hired more experienced members and completely restructured the support system. Since then, Bluehost has never been better.
You made the right choice for using Bluehost for blogging. They offer the cheapest yet most value rates out there. Bluehost is even recommended by the top blogging software, WordPress.
Let me start off by differentiating WordPress.com from WordPress.org.
WordPress.com was founded by Matt Mullenweg, who also co-founded WordPress.org. However, the two platforms are not directly related. WordPress.com is a free platform that doesn’t require you to pay for anything to start a blog. The website is basically handed to you on a silver platter.
With WordPress.org, even though the software itself is free, you’ll need to secure hosting to create a website on this platform — wherein WordPress.com handles everything for you.
Free platforms are convenient to use because they take care of everything for you, but they come with significant disadvantages and greatly limit your blog’s potential.
Here are the major drawbacks to using a free blogging platform:
If you’re really serious about blogging, then buying hosting through Bluehost and using WordPress.org (which I’ll be referring to as WordPress from this point forward) for your content management system is the best choice as proven by numerous successful bloggers who have chosen the same path.
WordPress is used by millions of people, which has resulted in an overwhelming support community. Any problems that you might encounter or any questions you have, the WordPress community has answers.
The only drawback to using WordPress is that you’ll need to secure hosting yourself, but this can easily be done for less than $60 a year.
At this point, I’m assuming that you already have a niche. If that’s not the case, read this article on how to find your perfect blog niche.
Choosing and registering a domain name is a crucial step in creating a blog. Once you’ve registered a domain name, it’ll be extremely difficult and expensive to change it.
Therefore, you’ll need to put serious thought into it. If it takes several hours or days to pinpoint the right domain name, that’s perfectly fine! This is not the step you want to find a shortcut for
When brainstorming a domain name, keep the following guidelines in mind:
Once you’ve settled on a domain name, it’s time to check it’s availability using a domain registrar — a company that is authorized to register a domain name on the internet.
There are two options available when registering a domain name: the hosting company itself (Bluehost) or through a domain registrar.
When registering a domain name through a registrar that isn’t the hosting company, you’ll have to connect the domain name to the hosting company. It’s a technical process that only takes 5 minutes, but purchasing a domain name with Bluehost eliminates that “technical process” for a much more straightforward process.
Bluehost offers a free domain name for the first year when you secure hosting with one of their plans. While this might be considered a sweet deal, you WILL start paying for that domain name once that first year is over. Domain names on Bluehost can cost up to $23.87 a year (with Domain Privacy included).

When you register a domain name, your personal information (e.g., full name, home or company address, phone number, and email) is saved on a public database called WHOIS.
The fact that your personal data can be accessed by ANYONE on the internet shouldn’t sit well with you. Having your personal information floating around on the internet leaves you susceptible to hacking and fraud, which will cost you a lot of money.
There are tons of domain registrars out there, but the one that offers the lowest rates is Namecheap. We’ve made a deal with Namecheap to provide you the lowest available price for a domain name when you register through our affiliate link.
You’ll see that the prices Namecheap offers are much more cost-efficient compared to what other domain registrars offer.

I recommend going with Namecheap if you’re in this for the long haul.
The average price of a “.com” domain name is $9/year through Namecheap, and that includes free Domain Privacy forever.
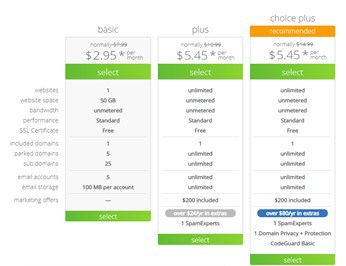
Bluehost really is the best option for cheap hosting. But now that you’ve decided on Bluehost, which one of their hosting plans should you choose?
We’ve secured a deal with Bluehost (affiliate link) that lets you start your very own website for as low as $59.40. Everything is paid upfront, which is a common practice among web hosting companies.
The prices you see below are what’s available when you register for a 36-month plan through our affiliate link. Here’s a breakdown of each plan:
Once you pick your preferred plan, you’ll be redirected to this page.
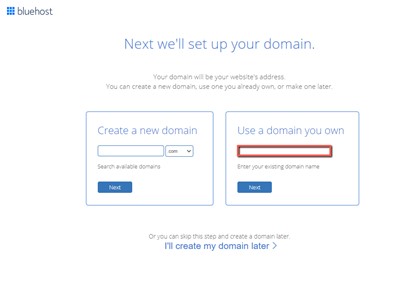
If you decide to opt for the free domain name in the first year with Bluehost, enter your chosen domain name on the left side of the page under “Create a new domain.”
If you decided to register with Namecheap, enter your registered domain name on the right side of the page under “Use a domain you own.”
You’ll then be redirected to the checkout page. It’s important to note that you should uncheck any upsells before checking out.
After check out, you will receive a payment confirmation in your inbox as well as a supplementary email containing vital information about your website. Print that email and keep it somewhere safe because it contains important information you’ll likely need while you’re with Bluehost.
Feel free to skip this section if you decided to take advantage of the free domain name with Bluehost.
This step will only take 5 minutes.
Your domain name is your web address and the web hosting provider provides the space for your actual website files to be saved. Your domain and hosting server need to be connected in order for your website to function properly. Otherwise, no one will ever see your website!
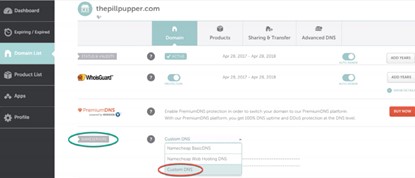
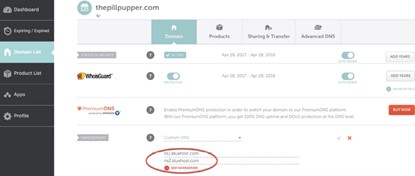
To connect your domain and hosting server, you need to update the nameservers in your domain registrar. The nameservers for your domain are already provided by Bluehost.
Updating the nameservers points your domain to Bluehost by telling it to connect to your website when someone searches for your domain name.
Complicated? Not really. This is a simple and necessary process that makes your website visible to everyone.
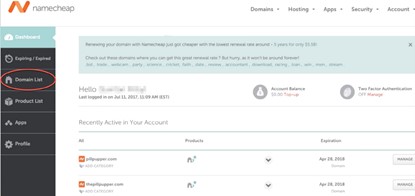
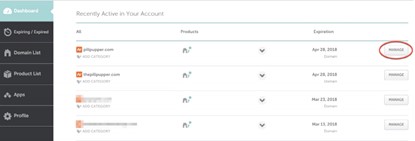
To locate and update your domain’s nameservers:
That’s basically it! All you have to do now is install your blogging software (WordPress) and get started on your first blog post.
Bluehost has made installing WordPress quick and easy! It’s come to be known as “the 5-minute WordPress install” because the entire process takes five minutes (or less).
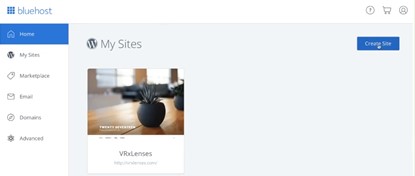
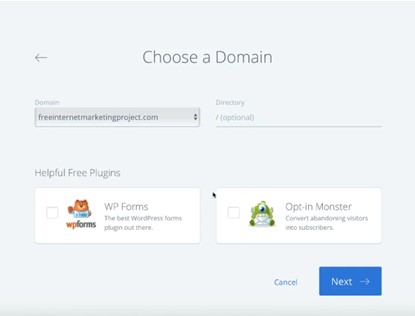
If you purchased a domain with Bluehost, skip this step. Bluehost already has WordPress installed by default. But, if you’ve decided to purchase a domain name with Namecheap, follow these steps to install WordPress:

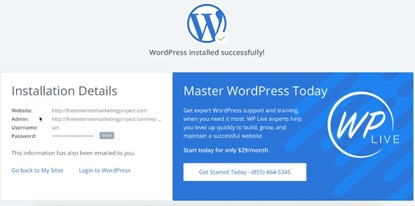
Congratulations! You’ve successfully set up a WordPress blog on Bluehost!
Your instinct might be to instantly go for a premium WordPress theme. The truth is, you don’t need a premium theme right now. A free and simple theme will accommodate all your needs in the first 6-12 months.
Keep these pointers in mind when picking a theme:
Now that you’ve got your blog all set up, it’s time to start filling it with content. Not just any content, mind you — but high-quality content. This is one of the most important factors that’s going to drive your blog’s success.
There’s a lot that goes into writing high-quality content. It requires research, experimentation, and hard work. Here are some important points to remember when writing high-quality content:
Congratulations on taking the first step towards success! You now have a much better chance at success than 99% of people using a free platform.
It’s important to manage your expectations. Blogging isn’t a “get rich quick” scheme. Blogging requires hard work and dedication. But once you’ve got it going, you’ll never look back. If you’d like to know more about blogging myths, check out this post.
I’m really glad I found Bluehost when I first started. It really helped cut costs without sacrificing quality, an important thing if you’re trying to stay under budget because your blog isn’t quite generating an income yet.
I hope you found this guide on how to start a blog with Bluehost helpful. Do you need further help? Do you have questions? I would love to hear your thoughts in the comments below.
I've been in internet marketing for over 10 years, and I've purchased dozens of illegitimate products for the sole purpose of evaluating them and exposing the truth about these products to anyone who's thinking about purchasing it. I never let money influence my rating of a product and your success/safety is my absolute highest priority. Don't want to buy a product? Register for one of my 100% free internet marketing training courses>>
