(8) comments
Add Your Reply

If you have a website that’s receiving traffic and you’re NOT building an email list, you’re probably missing out on some serious revenue. We hear that a lot as website owners, but how does a person actually grow their email list? Pay close attention, little internet entrepreneurs, because I’m about to lay out a step-by-step conversion system that gets me 15%-20% opt-in rates in every niche I’ve applied it to.
Clear the few minutes out of your busy schedule to take notes and really soak this in – this post has the potential to take your revenue to a whole new level.

Before we dig in, I want to make one thing absolutely clear: If you don’t have good content, you don’t have a shot in hell at building a large email list.
People opt-in to receive information from people that truly help them and earn their trust. You can’t build an email list without good content, and you can’t have good content by simply scratching the surface and sharing information that people can find anywhere else. Pour your blood, sweat, and tears into your content – it’s one of the best investments you can make in your internet business.
With that tiny disclaimer out of the way, let’s launch into the meat and potatoes.

The more conversion paths you present on each page, the more you divide your visitor’s attention which kills your conversion rates.
I prefer to have one crystal clear, easy-to-follow conversion goal site-wide. There are circumstances where you may have more than one (for example, different categories on your site may have different target audiences with completely different motivations) but I would still encourage you to limit any page on your website to a single conversion path, which in this lesson is getting your visitors to subscribe to your email list.
You shouldn’t gunk up your website’s margins with a bunch of links to different pieces of content on your site. Begin testing with just one clear call-to-action that results in that visitor opting in. After you reach your goal opt-in rates, begin adding other conversion paths if desired but pay close attention to how they effect your opt-in rate.
Step 2: Don’t confuse your website visitors with multiple conversion paths – only present one conversion path on each page of your site.

This is a bridge that’s impossible to cross without knowing your website visitors pretty well. What are your average visitor’s interests/desires and what can you create that they’ll really want to get their hands on? Find out what your average visitor wants the most and then serve it to them on a silver platter.
For example, I run a woodworking niche site. The bane of my target audience’s existence is when they put hours into a project just to have it explode or splinter into pieces, forcing them to start over from the beginning. I created a guide that gives five easy-to-follow steps that will prevent this from ever happening again.
Don’t just make it good, make it eye-opening, life-changing good. If you own a website about supplements, don’t create something vague like “The Supplement Bible” – create something specific and mouth-watering like “18 Supplements Clinically Proven to Prevent Disease and Extend Your Lifespan”. Do you see the difference?
Even if your website’s design inspires confidence and your content inspires visitors to trust you, we’ve all joined an email list that ended up blasting us with junk mail. As a result, we’re very weary to trust strangers with our personal email address. You’ll only get this highly personal piece of information if you can create a giveaway that has a perceived value greater than the risk of getting blasted with junk mail.
Step 3: Create a freebie that’s so valuable that the visitor is willing to risk getting spammed if their instincts of trusting you were wrong.

Hardly anyone is going to join your email list if you’re presenting it as “Join my free newsletter!” or “Receive a notification when new content is posted!”. You’ll be lucky to get 1% of your website visitors to opt-in with something so lackluster and nondescript.
Create specific headlines that strike the core of what motivates your target audience.
Writing good headlines can be tough, and it takes time and testing to figure out what resonates best with your website’s audience. Come up with 5-10 and rotate them on your site to see what’s getting the most clicks.
Don’t know where to start? Here are hundreds of headline templates to get you started: 102 headline templates here, 15 more here, and 10 more here.
Step 4: Create 5-10 specific headlines that resonate with your website’s audience, then prepare to rotate them on your site to see which one gets the most clicks.

Don’t freak out – you don’t need to write code to accomplish this. If you’re using WordPress there’s a handy little plugin that will do this for you.
If you’re on a computer right now, you’ve probably noticed that my right-side banner is following you as you scroll. This one little feature alone can seriously boost your opt-in rate, and it’s really easy to do. If your site isn’t developed using WordPress then you might have to hire a programmer to implement this feature, but it shouldn’t cost you more than $30-$50, which will be money very well spent.
Now before you install the banner, you have to have it created. You want a skyscraper banner that’s not very wide but somewhat tall. You want enough space to fit a headline, an image of some kind (eBook cover, logo, etc…), and possibly even a benefit-driven description that elaborates on your headline a bit.
Unless you’re fairly experienced in design, I don’t recommend doing this yourself. I’m pretty decent with Photoshop but hire professionals for this on all of my sites. At the very least hire someone on Fiverr, but paying for higher quality work on a freelance site like Elance is probably a much better idea – this is not a place you want to skimp.
Make sure you get the designer to create as many banners as you have headlines. Everything else in the banner should stay the same, but since you’ll be testing 5-10 different headlines, you’ll need a banner for each. Don’t go changing a bunch of stuff for each banner. When testing conversion components like this, it’s essential to isolate a single piece and test only that piece – if you change the design, the headline, the image, the description, etc… you’ll have no idea which change is actually improving conversions. Only test one piece at a time, leaving everything else the same.
Once you have your banners designed you need to place them into a widget with a bit of code (don’t panic, I’m going to make this very painless). In your WordPress admin panel, navigate to Appearance >> Widgets. Drag the “Text” block out of the sea of options on the left side to the widget section you’d like your banner to appear in on the right side. After that’s done, copy/paste the following code into the text widget, editing it with your image URL and landing page URL of course:
<a href=”YOUR LANDING PAGE URL GOES HERE” target=”_blank”>
<img src=”THE URL YOUR BANNER IMAGE IS STORED AT GOES HERE” alt=”ADD AN ALT TAG TO BRIEFLY DESCRIBE THIS BANNER” />
</a>
If you’ve followed all of the above steps properly, you should have something that looks like this:

Click to zoom
I don’t add a title because it just takes up space that is better used within my image. If you’ve checked to see that your new banner widget is displaying on your website properly, it’s time to make that sucker float when your website visitors scroll.
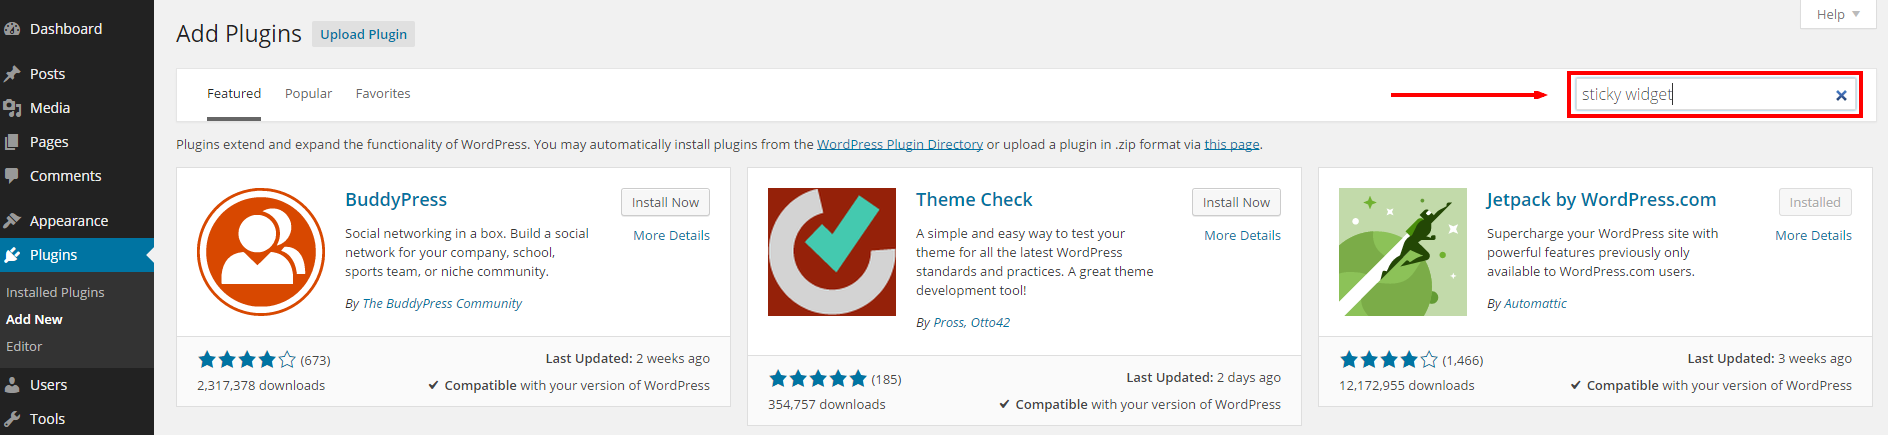
1) Navigate to the plugins section of your WordPress admin panel:

Click to zoom
2) Click “Add New” at the top of the page

Click to zoom
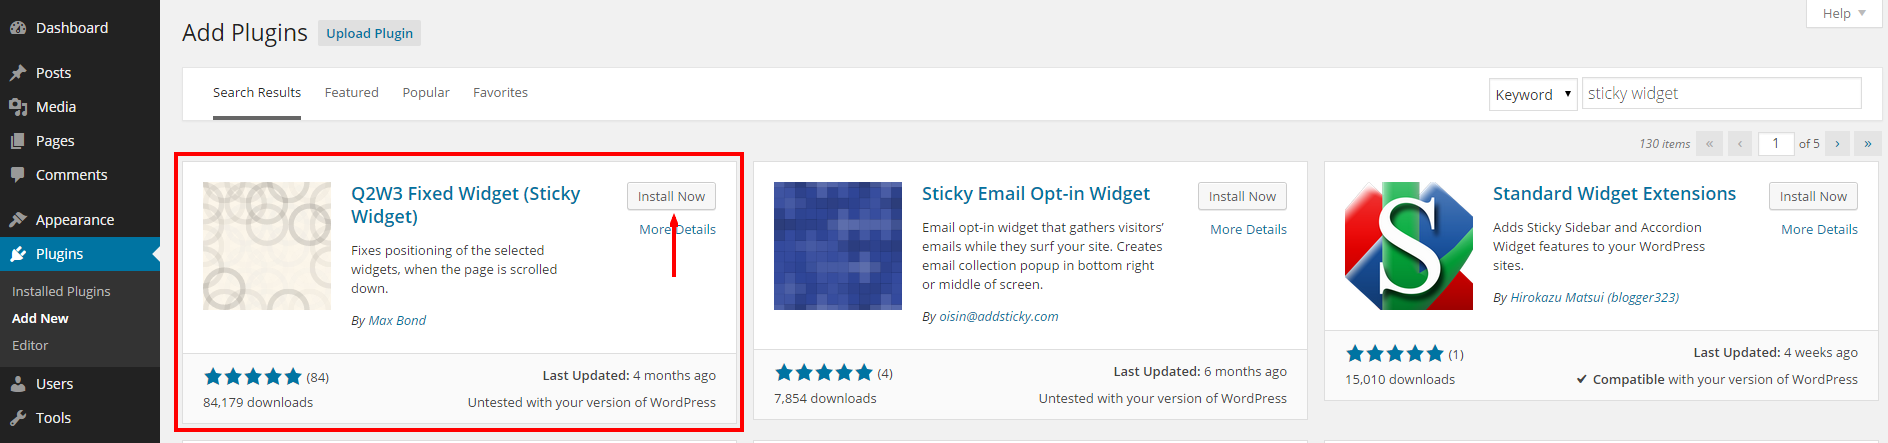
3) Search the WordPress plugin database for “Sticky Widget”
Click to zoom
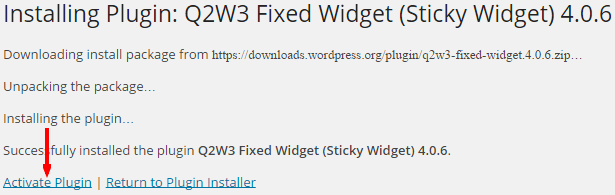
4) Install the “Q2W3 Sticky Widget” plugin
Click to zoom
5) Activate the plugin after successful installation and… Congratulations! It’s time to make your new banner float.
Click to zoom
6) Navigate to Appearance >> Widgets in your WP Admin panel and check the new “Fixed Widget” box for the text widget containing your banner code
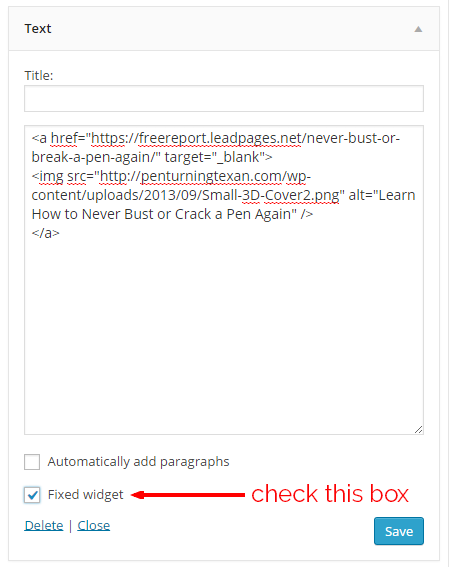
Click to zoom
Voila! Your new banner widget should float as the user scrolls through your website.
If for some reason this plugin isn’t working properly or is causing problems with other aspects of your website (rare, but I’ve had it happen) you will need to hire a programmer to implement this floating widget feature. They’ll likely do it without having to use this plugin. Again, this shouldn’t cost more than $30-$50 and is totally worth the cost if you’re getting much traffic to your website.
Why do I recommend jumping through all of these hoops rather than just copy/pasting an opt-in form into your widget? Test after test that my mentors, friends, and I have run on our sites show significantly higher conversion rates when a multi-step opt-in process like this is put into place (I’m talking like twice as high a lot of the time). People have grown weary of opt-in forms. This way you get them interested, get them excited, and get them to take action by clicking your banner before they’re ever prompted to input their email address.
If you want average opt-in rates, take the average route of copy/pasting your opt-in forms directly to the widget. If you want above-average opt-in rates, follow the steps above and continue reading even if you’re a bit outside of your comfort zone.
Step 5: I know it’s a long process if you’ve never done it before, but have some professional banners designed, place them into a widget, then make that widget float when visitors scroll.

Let’s take a second to reflect on how many dominoes have fallen PERFECTLY to get your visitor to this point in the opt-in process. You generated a visitor to your website, your content resonated with that person and built trust, your headline caught their attention, they’ve decided they want your freebie, and now they’ve clicked on your banner ad. That’s a lot of perfectly executed, masterful internet marketing execution!
Don’t f**k it all up by linking them to some crappy, unprofessional landing page. I’m sincerely sorry for the strong (albeit censored) language – that’s not classified as “messing” up or “screwing” up folks, it’s a serious, Class ‘A’ f-bomb that’s going to cost you a lot of money in the long run.
There are a lot of options these days to create really professional, high-converting landing pages even if you have no idea how to write code (like me). I’ve evaluated all of the options myself and am a very, very happy LeadPages (affiliate link) subscriber. I don’t recommend products/services unless I’ve bought them and heavily researched them myself, and I can confidently say that LeadPages is well worth the cost of admission. My already high opt-in rates went up another 50% overall (from about 10% of unique visitors opting in to 15%+) which is just insane.
As I write this, I renewed my subscription just a couple of weeks ago for another year because their service is essential to my business and is hands-down the biggest “bang for my buck” that I get out of any service I subscribe to.
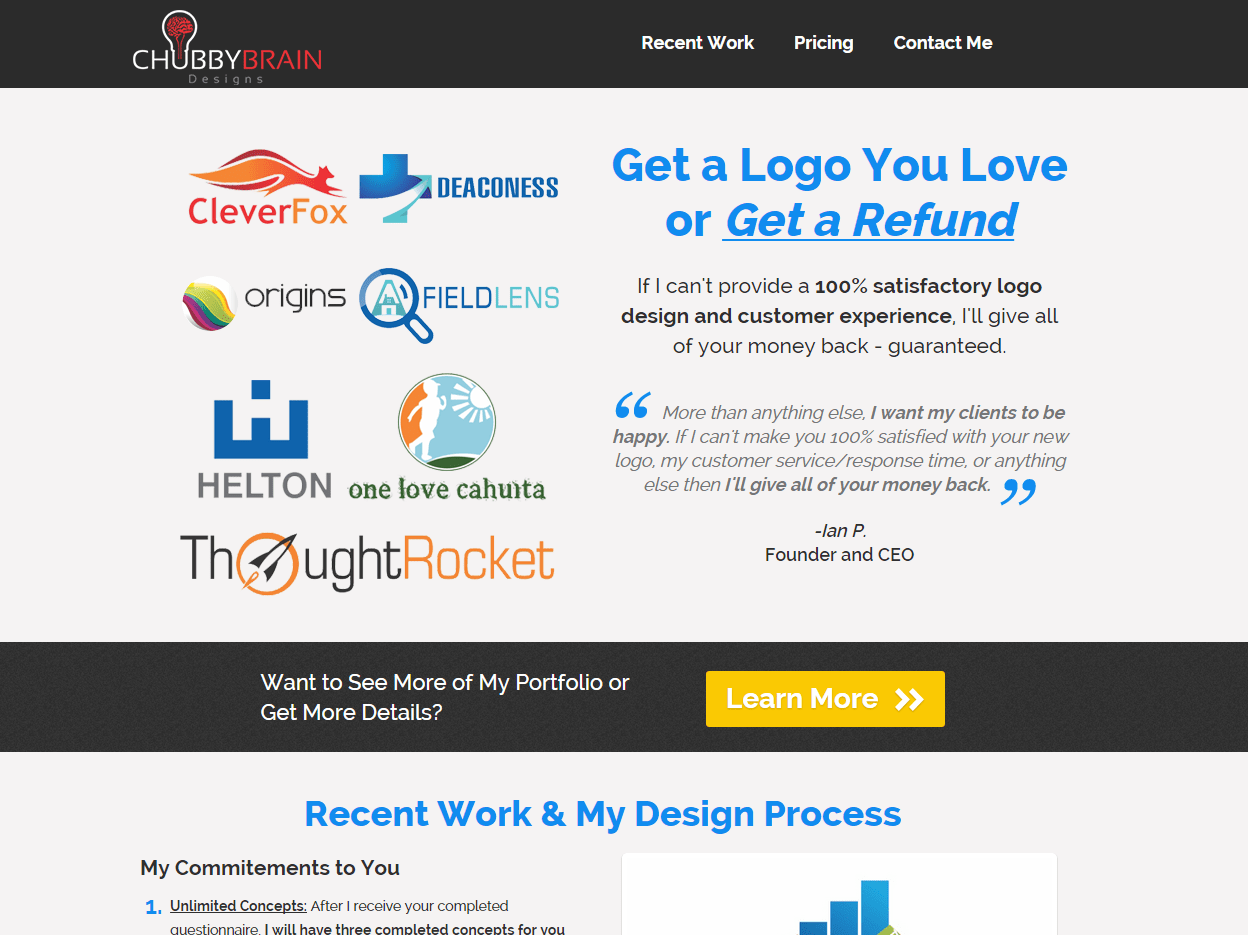
Prior to a service like LeadPages, guys like me that had no idea how to code paid several hundred to several thousand dollars per landing page. Now I can pump out a beautiful landing page like this:

Click to zoom
Or this…
Click to zoom
in a few minutes to a couple of hours (depending on the complexity). There’s no coding necessary and (my favorite part) no paying some designer/programmer $800 to find out that their landing page doesn’t convert. Just like anything else you’ll need to split-test different headlines, different images, etc… until you find your sweet spot but that’s fortunately very easy to do using LeadPages.
If your site is getting traffic and you’re getting this far in the opt-in process with your website visitors, do yourself a favor and see what LeadPages can do for your opt-in rates.
Step 6: You’re doing really, really well if you’re getting this far in the process with your website visitors – don’t obliterate all of those efforts by linking to a low-quality, unprofessional landing page.

As I’ve mentioned several times throughout this post, testing different components of your opt-in funnel is required to achieve the best subscription rates possible. You’ll very rarely get things perfect the first time around.
As I mentioned earlier, test any component of your opt-in funnel individually. Don’t make multiple changes at once because you won’t be sure which change caused the positive or negative results. Isolate ONE component to test at a time, gather data, then test the next component you think could be improved.
Here are some examples of opt-in funnel components you might test to improve conversion rates:
The list goes on and on, but don’t be discouraged. You don’t need to get EVERY component perfect to achieve way above average conversion rates. Following the other strategies that I’ve outlined in the steps above will put you WAY ahead of the curve, so just testing a couple of components like your banner headline and landing page headline (again – test them one at a time) can have a massive impact on your opt-in rate.
Step 7: Test, test, then test some more. Only test ONE component of your conversion funnel at a time and make sure you’ve collected a statistically significant amount of data before reverting back to the original or testing another component.

You can breathe a sigh of relief, this lesson is finally over. I know it’s a lot to swallow, but following all of the steps above can easily get you to the point that 15%-20% of your unique visitors are opting in to your email list, which will grow your email list VERY quickly. It takes time and it’s going to feel overwhelming and frustrating at points, but achieving high opt-in rates will take your business to an entirely new level.
It took me years of testing, learning, and constantly improving to come up with the system I’ve laid out above. Even just implementing a few aspects of this system will produce serious results, but combining all of them will make many people that read this lesson a great deal of money. I hope you’ve found it helpful and that this system injects a nice burst of growth into your business.
This piece of content took years to discover and many hours to write, and the best way to show your appreciation if you found it at all helpful is to share it using the icons below, leave a comment, and/or link to it from your website. Nothing would make me happier than knowing I helped your business enough that you took one (or all) of those actions.
Stay safe out there and cheers to your new found profits!
I've been in internet marketing for over 10 years, and I've purchased dozens of illegitimate products for the sole purpose of evaluating them and exposing the truth about these products to anyone who's thinking about purchasing it. I never let money influence my rating of a product and your success/safety is my absolute highest priority. Don't want to buy a product? Register for one of my 100% free internet marketing training courses>>
